
TravelMate 5710 Service Guide
Page 8
... the LCD module with the Brackets ...95 Removing the Inverter Board and FPC Cable ...96 Removing the LCD Brackets ...97 Removing the Left and Right Hinge ...97 Removing the Antennas ...98 Removing the Internal Microphone and Web Camera ...99 Troubleshooting 101 System Check Procedures ...102 External Diskette Drive Check ...102 External...
... the LCD module with the Brackets ...95 Removing the Inverter Board and FPC Cable ...96 Removing the LCD Brackets ...97 Removing the Left and Right Hinge ...97 Removing the Antennas ...98 Removing the Internal Microphone and Web Camera ...99 Troubleshooting 101 System Check Procedures ...102 External Diskette Drive Check ...102 External...
TravelMate 5710 Service Guide
Page 90
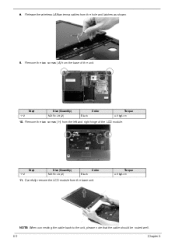
Remove the two screws (A) from the left and right hinge of the unit. Step 1~2 Size (Quantity) M2.5 x L8 (2) Black Color Torque 4.0 kgf-cm 11. NOTE: When connecting the cable back to the unit, please note that the cable should be routed well. 80 Chapter 3 Release the wireless LAN antenna cables from the base unit. Carefully remove the LCD module from the hole and latches as shown. 9. 8. Step 1~2 Size (Quantity) M2.5 x L6 (2) Black Color Torque 4.0 kgf-cm 10. Remove the two screws (H) from the base of the LCD module.
Remove the two screws (A) from the left and right hinge of the unit. Step 1~2 Size (Quantity) M2.5 x L8 (2) Black Color Torque 4.0 kgf-cm 11. NOTE: When connecting the cable back to the unit, please note that the cable should be routed well. 80 Chapter 3 Release the wireless LAN antenna cables from the base unit. Carefully remove the LCD module from the hole and latches as shown. 9. 8. Step 1~2 Size (Quantity) M2.5 x L6 (2) Black Color Torque 4.0 kgf-cm 10. Remove the two screws (H) from the base of the LCD module.
TravelMate 5710 Service Guide
Page 107
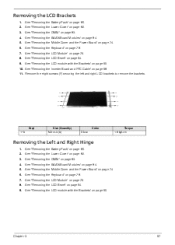
... page 94. See "Removing the LCD Bezel" on page 78. Step 1~8 Size (Quantity) M2 x L3 (8) Silver Color Torque 1.6 kgf-cm Removing the Left and Right Hinge 1. 2. 3. 4. 5. 6. 7. 8. 9. See "Removing the LCD Bezel" on page 78. Chapter 3 97 See "Removing the LCD Module" on page 94. See "Removing the Middle Cover and the...
... page 94. See "Removing the LCD Bezel" on page 78. Step 1~8 Size (Quantity) M2 x L3 (8) Silver Color Torque 1.6 kgf-cm Removing the Left and Right Hinge 1. 2. 3. 4. 5. 6. 7. 8. 9. See "Removing the LCD Bezel" on page 78. Chapter 3 97 See "Removing the LCD Module" on page 94. See "Removing the Middle Cover and the...
TravelMate 5710 Service Guide
Page 108
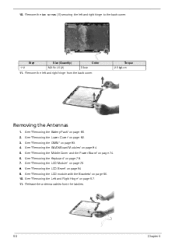
...Release the antenna cables from the back cover. Removing the Antennas 1. 2. 3. 4. 5. 6. 7. 8. 9. See "Removing the Keyboard" on page 74. Remove the left and right hinge to the back cover. See "Removing the Middle Cover and the Power Board" on page 76. See "Removing the LCD Module" on page 95. 10...the LCD module with the Brackets" on page 78. See "Removing the DIMM" on page 60. Remove the two screws (E) securing the left and right hinge from the latches. 98 Chapter 3 See "Removing the Battery Pack" on page 63. See "Removing the WLAN Board Modules" on page 97. 11. ...
...Release the antenna cables from the back cover. Removing the Antennas 1. 2. 3. 4. 5. 6. 7. 8. 9. See "Removing the Keyboard" on page 74. Remove the left and right hinge to the back cover. See "Removing the Middle Cover and the Power Board" on page 76. See "Removing the LCD Module" on page 95. 10...the LCD module with the Brackets" on page 78. See "Removing the DIMM" on page 60. Remove the two screws (E) securing the left and right hinge from the latches. 98 Chapter 3 See "Removing the Battery Pack" on page 63. See "Removing the WLAN Board Modules" on page 97. 11. ...
TravelMate 5710 Service Guide
Page 109
.... Release the internal microphone cable from the back cover. 12. See "Removing the WLAN Board Modules" on page 76. See "Removing the Left and Right Hinge" on page 60. Chapter 3 99 See "Removing the Battery Pack" on page 97. 11. See "Removing the DIMM" on page 62. See "Removing the Lower...
.... Release the internal microphone cable from the back cover. 12. See "Removing the WLAN Board Modules" on page 76. See "Removing the Left and Right Hinge" on page 60. Chapter 3 99 See "Removing the Battery Pack" on page 97. 11. See "Removing the DIMM" on page 62. See "Removing the Lower...
TravelMate 5710 Service Guide
Page 144
... WIRELESS ANTENNA LEFT/RIGHT Acer Part No. 25.TCZV1.001 LCD/INVERTER CABLE 14.1" WXGA 50.TCZV1.004 LCD BRACKET RIGHT Note: Right bracket is the upper one. 33.TB1V1.003 LCD BRACKET LEFT Note: Left bracket is the lower one 33.TB1V1.004 LCD PANEL 14.1" W/HINGE 60.AA6V1.004(Aspire...) 60.TB2V1.004(TravelMate) 60.TCZV1.005(TravelMate) LCD BEZEL 14.1" W/LOGO HINGE PACK LEFT/RIGHT 60.TB2V1.005 6K.TB2V1.001 LCD 14.1" WXGA AU B141EW01 V.1 NONE GLARE LCD...
... WIRELESS ANTENNA LEFT/RIGHT Acer Part No. 25.TCZV1.001 LCD/INVERTER CABLE 14.1" WXGA 50.TCZV1.004 LCD BRACKET RIGHT Note: Right bracket is the upper one. 33.TB1V1.003 LCD BRACKET LEFT Note: Left bracket is the lower one 33.TB1V1.004 LCD PANEL 14.1" W/HINGE 60.AA6V1.004(Aspire...) 60.TB2V1.004(TravelMate) 60.TCZV1.005(TravelMate) LCD BEZEL 14.1" W/LOGO HINGE PACK LEFT/RIGHT 60.TB2V1.005 6K.TB2V1.001 LCD 14.1" WXGA AU B141EW01 V.1 NONE GLARE LCD...


