
User Manual
Page 6
...dirt or dust. • Do not look into the air outlet grille when projector is to the sun. The best way is operating. Only use acer ceiling mount kit for inspection. • Do not face the projector lens to wait for replacement. • Do not operate lamps beyond the rated..." menu after replacing the lamp module. • Do not attempt to disassemble this product to break or drop it to ensure the projector completes its own removable cover. To temporarily turn off , suggest to break on the remote control. • The lamp becomes extremely hot during operation.
...dirt or dust. • Do not look into the air outlet grille when projector is to the sun. The best way is operating. Only use acer ceiling mount kit for inspection. • Do not face the projector lens to wait for replacement. • Do not operate lamps beyond the rated..." menu after replacing the lamp module. • Do not attempt to disassemble this product to break or drop it to ensure the projector completes its own removable cover. To temporarily turn off , suggest to break on the remote control. • The lamp becomes extremely hot during operation.
User Manual
Page 9
... 3 Projector Outlook 3 Control Panel 4 Remote Control Layout 5 Getting Started 7 Connecting the Projector 7 Turning the Projector On/Off 8 Turning on the Projector 8 Turning the projector off 9 Adjusting the Projected Image 10 Adjusting the Height of Projected Image 10 How to optimize image size and distance 11 User Controls 13 Installation menu 13 Acer Empowering Technology 14 Onscreen Display (OSD) Menus 15...
... 3 Projector Outlook 3 Control Panel 4 Remote Control Layout 5 Getting Started 7 Connecting the Projector 7 Turning the Projector On/Off 8 Turning on the Projector 8 Turning the projector off 9 Adjusting the Projected Image 10 Adjusting the Height of Projected Image 10 How to optimize image size and distance 11 User Controls 13 Installation menu 13 Acer Empowering Technology 14 Onscreen Display (OSD) Menus 15...

User Manual
Page 12
Contact your unit is missing. Check to RCA cable VGA cable Remote control User's Guide x2 XXXXXX 3V Battery Acer Projector Carrying case Quick Start Guide Quick start guide Adapter for iPod/iPhone (Optional) Projector with all the items shown below. English 2 Package Overview This projector comes with lens cap Power cord AC adapter 3.5 mm jack A/V cable 3.5 mm jack A/V to make sure your dealer immediately if any thing is complete.
Contact your unit is missing. Check to RCA cable VGA cable Remote control User's Guide x2 XXXXXX 3V Battery Acer Projector Carrying case Quick Start Guide Quick start guide Adapter for iPod/iPhone (Optional) Projector with all the items shown below. English 2 Package Overview This projector comes with lens cap Power cord AC adapter 3.5 mm jack A/V cable 3.5 mm jack A/V to make sure your dealer immediately if any thing is complete.
User Manual
Page 13
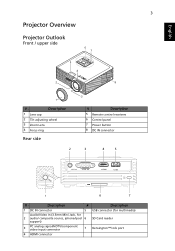
English 3 Projector Overview Projector Outlook Front / upper side 6 7 5 4 2 8 1 # Description 1 Lens cap 2 Tilt adjusting wheel 3 Zoom Lens 4 Focus ring Rear side 2 3 # Description 5 Remote control receivers 6 Control panel 7 Power button 8 DC IN connector 3 4 5 AV IN VGA IN HDMI USB 1 6 7 # Description # 1 DC IN connector 5 Audio/Video In (3.5mm Mini Jack, for 2 audio/ composite ...
English 3 Projector Overview Projector Outlook Front / upper side 6 7 5 4 2 8 1 # Description 1 Lens cap 2 Tilt adjusting wheel 3 Zoom Lens 4 Focus ring Rear side 2 3 # Description 5 Remote control receivers 6 Control panel 7 Power button 8 DC IN connector 3 4 5 AV IN VGA IN HDMI USB 1 6 7 # Description # 1 DC IN connector 5 Audio/Video In (3.5mm Mini Jack, for 2 audio/ composite ...

User Manual
Page 15
...To pause the screen image. English Remote Control Layout 2 3 5 8 10 17 13 Model No.:IR28012AC1 15 5 1 4 6 7 9 11 12 14 16 Parex Electronics & Computer CO., LTD # Icon Function 1 Infrared transmitter 2 FREEZE 3 POWER Description Sends signals to the "Turning the Projector On/Off" section. 4 HIDE ... to hide the image, press again to display the image. 5 ASPECT RATIO To pause the screen image. 6 RESYNC Automatically synchronizes the projector to the input source. 7 SOURCE Press "SOURCE" to choose from RGB, Component, S-Video, Composite, Video and HDTV sources. 8 BACK...
...To pause the screen image. English Remote Control Layout 2 3 5 8 10 17 13 Model No.:IR28012AC1 15 5 1 4 6 7 9 11 12 14 16 Parex Electronics & Computer CO., LTD # Icon Function 1 Infrared transmitter 2 FREEZE 3 POWER Description Sends signals to the "Turning the Projector On/Off" section. 4 HIDE ... to hide the image, press again to display the image. 5 ASPECT RATIO To pause the screen image. 6 RESYNC Automatically synchronizes the projector to the input source. 7 SOURCE Press "SOURCE" to choose from RGB, Component, S-Video, Composite, Video and HDTV sources. 8 BACK...

User Manual
Page 18
... multiple sources at the same time, use the "Source" button on either control panel or the remote control or direct source key on the Projector 1 Remove the lens cap.(Illustration #1) 2 Ensure that the power cord and signal cable are securely connected. The projector will turn blue.(Illustration #2) 4 Turn on your source automatically. • If the...
... multiple sources at the same time, use the "Source" button on either control panel or the remote control or direct source key on the Projector 1 Remove the lens cap.(Illustration #1) 2 Ensure that the power cord and signal cable are securely connected. The projector will turn blue.(Illustration #2) 4 Turn on your source automatically. • If the...
User Manual
Page 25
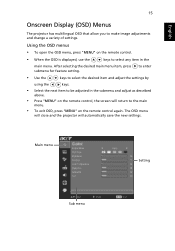
... to make image adjustments and change a variety of settings. The OSD menu will close and the projector will return to the main menu. • To exit OSD, press "MENU" on the remote control again. After selecting the desired main menu item, press submenu for feature setting. English 15 Onscreen ...Display (OSD) Menus The projector has multilingual OSD that allow you to be adjusted in the main menu. Main ...
... to make image adjustments and change a variety of settings. The OSD menu will close and the projector will return to the main menu. • To exit OSD, press "MENU" on the remote control again. After selecting the desired main menu item, press submenu for feature setting. English 15 Onscreen ...Display (OSD) Menus The projector has multilingual OSD that allow you to be adjusted in the main menu. Main ...
User Manual
Page 29
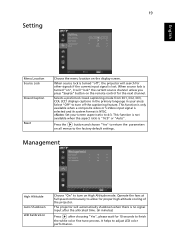
...selected and its system format is lost. Press the button and choose "Yes" to return the parameters on the remote control for proper high altitude cooling of the projector. When source lock is turned "off the captioning feature. Set your area). This function is not available when the...When source lock is "16:9" or "Auto" . Operate the fans at full speed continuously to finish the white color fine tune process. The projector will "lock" the current source channel unless you press "Source" button on all menus to adjust LED color performance. 19 Setting English Menu ...
...selected and its system format is lost. Press the button and choose "Yes" to return the parameters on the remote control for proper high altitude cooling of the projector. When source lock is turned "off the captioning feature. Set your area). This function is not available when the...When source lock is "16:9" or "Auto" . Operate the fans at full speed continuously to finish the white color fine tune process. The projector will "lock" the current source channel unless you press "Source" button on all menus to adjust LED color performance. 19 Setting English Menu ...
User Manual
Page 32
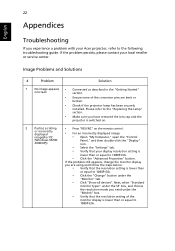
... image(For PC • Press "RESYNC" on the remote control. • For an incorrectly displayed image: • Open "My Computer," open the "Control (Windows 95/98/ 2000/XP)) Panel," and then double-click the "Display" icon. • Select the "Settings" tab. • Verify that your Acer projector, refer to 1080P-EIA. If the problem persists...
... image(For PC • Press "RESYNC" on the remote control. • For an incorrectly displayed image: • Open "My Computer," open the "Control (Windows 95/98/ 2000/XP)) Panel," and then double-click the "Display" icon. • Select the "Settings" tab. • Verify that your Acer projector, refer to 1080P-EIA. If the problem persists...
User Manual
Page 33
...) • For an incorrectly displayed image: • Follow the steps for more information. • Change the display color depth settings on the remote control. Refer to correct it compatible with the projector. 7 Image is out of focus • Make sure the lens cap is removed. • Adjusts the focus ring on your DVD...
...) • For an incorrectly displayed image: • Follow the steps for more information. • Change the display color depth settings on the remote control. Refer to correct it compatible with the projector. 7 Image is out of focus • Make sure the lens cap is removed. • Adjusts the focus ring on your DVD...

User Manual
Page 34
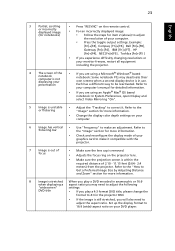
... the zoom ring on the top of the projector. Problems with the Projector # Condition Solution 1 The projector stops responding If possible, turn off the projector, then to all controls unplug the power cord and wait at least 30 seconds before reconnecting power. Press "MENU" on the remote control or on the OSD and adjust the projection direction...
... the zoom ring on the top of the projector. Problems with the Projector # Condition Solution 1 The projector stops responding If possible, turn off the projector, then to all controls unplug the power cord and wait at least 30 seconds before reconnecting power. Press "MENU" on the remote control or on the OSD and adjust the projection direction...
User Manual
Page 37
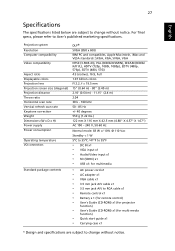
For final specs, please refer to Acer's published marketing specifications. Projection system Resolution Computer compatibility Video compatibility Aspect ratio Displayable colors Projection lens Projection screen size (diagonal) Projection distance Throw ratio... x1 • VGA cable x1 • 3.5 mm jack A/V cable x1 • 3.5 mm jack A/V to RCA cable x1 • Remote control x1 • Battery x 1 (for remote control) • User's Guide (CD-ROM) x1 (for projector function) • User's Guide (CD-ROM) x1 (for multi-media function) • Quick start guide x1 • Carrying case x1...
For final specs, please refer to Acer's published marketing specifications. Projection system Resolution Computer compatibility Video compatibility Aspect ratio Displayable colors Projection lens Projection screen size (diagonal) Projection distance Throw ratio... x1 • VGA cable x1 • 3.5 mm jack A/V cable x1 • 3.5 mm jack A/V to RCA cable x1 • Remote control x1 • Battery x 1 (for remote control) • User's Guide (CD-ROM) x1 (for projector function) • User's Guide (CD-ROM) x1 (for multi-media function) • Quick start guide x1 • Carrying case x1...

User Manual (Multimedia)
Page 2
Photo Format 12 2. Music Format 12 3. Contents Introduction 1 Multimedia Features 1 Getting Started 2 Connecting multi-media device to the projector 2 Control Panel and Remote Control 3 Onscreen Display (OSD) Menus 5 Presentation to Go 5 Setting 6 Photo Setting 7 Music Setting 8 Video Setting 9 Appendices 10 Troubleshooting 10 Problems and Solution 10 Multi-media format supported 11 1. Video Format 13
Photo Format 12 2. Music Format 12 3. Contents Introduction 1 Multimedia Features 1 Getting Started 2 Connecting multi-media device to the projector 2 Control Panel and Remote Control 3 Onscreen Display (OSD) Menus 5 Presentation to Go 5 Setting 6 Photo Setting 7 Music Setting 8 Video Setting 9 Appendices 10 Troubleshooting 10 Problems and Solution 10 Multi-media format supported 11 1. Video Format 13


