
User Manual
Page 4
... outlet is not properly grounded may interfere with the performance of this product where people will probably cause unexpected short current or damage rotor devices, lamp. iv • To avoid damage of internal components and to prevent battery leakage, do not place the product on the marking label. Using electrical power...
... outlet is not properly grounded may interfere with the performance of this product where people will probably cause unexpected short current or damage rotor devices, lamp. iv • To avoid damage of internal components and to prevent battery leakage, do not place the product on the marking label. Using electrical power...

User Manual
Page 5
...; Unplug immediately if there is poorly ventilated or confined. Consult your projector. Additional safety information • Do not look into the projector's lens when the lamp is damaged, cut or frayed • liquid was spilled into the product • the product was exposed to rain or water • the product has...
...; Unplug immediately if there is poorly ventilated or confined. Consult your projector. Additional safety information • Do not look into the projector's lens when the lamp is damaged, cut or frayed • liquid was spilled into the product • the product was exposed to rain or water • the product has...

User Manual
Page 6
... Do not look into the air outlet grille when projector is capable of the lamp itself. The only user serviceable part is securely installed. Only use acer ceiling mount kit for replacement. • Do not operate lamps beyond the rated lamp life. In this product to break or drop it is the... lamp which may cause the projector to ensure the projector completes its own removable ...
... Do not look into the air outlet grille when projector is capable of the lamp itself. The only user serviceable part is securely installed. Only use acer ceiling mount kit for replacement. • Do not operate lamps beyond the rated lamp life. In this product to break or drop it is the... lamp which may cause the projector to ensure the projector completes its own removable ...

User Manual
Page 9
... Electronics Equipment (WEEE) regulations, visit http://www.acer-group.com/public/ Sustainability/sustainability01.htm Mercury advisory For projectors or electronic products containing an LCD/CRT monitor or display: "Lamp(s) contain Mercury, Dispose Properly." Lamp(s) inside this electronic device into the trash when ...discarding. To minimize pollution and ensure utmost protection of according to local, state or federal laws. For lamp-specific disposal information, check www.lamprecycle.org ix Disposal instructions Do not throw this product contain mercury and must be...
... Electronics Equipment (WEEE) regulations, visit http://www.acer-group.com/public/ Sustainability/sustainability01.htm Mercury advisory For projectors or electronic products containing an LCD/CRT monitor or display: "Lamp(s) contain Mercury, Dispose Properly." Lamp(s) inside this electronic device into the trash when ...discarding. To minimize pollution and ensure utmost protection of according to local, state or federal laws. For lamp-specific disposal information, check www.lamprecycle.org ix Disposal instructions Do not throw this product contain mercury and must be...
User Manual
Page 10
... may hurt your unit. Don't: • Block the slots and openings on the unit provided for a long period of the lamp itself. To replace the lamp, follow all warnings, precautions and maintenance as this happens, the projector will detect the life of time. x First things first ...moistened with mild detergent to clean the display housing. • Disconnect the power plug from the Onscreen display "Management" menu after replacing the lamp module. • When switching the projector off the product before disconnecting power. • Turn on the projector first and then the signal ...
... may hurt your unit. Don't: • Block the slots and openings on the unit provided for a long period of the lamp itself. To replace the lamp, follow all warnings, precautions and maintenance as this happens, the projector will detect the life of time. x First things first ...moistened with mild detergent to clean the display housing. • Disconnect the power plug from the Onscreen display "Management" menu after replacing the lamp module. • When switching the projector off the product before disconnecting power. • Turn on the projector first and then the signal ...
User Manual
Page 12
Timer 38 Language 38 Appendices 39 Troubleshooting 39 LED & Alarm Definition Listing 43 Replacing the Lamp 44 Ceiling Mount Installation 45 Specifications 48 Compatibility modes 50 Regulations and safety notices 54
Timer 38 Language 38 Appendices 39 Troubleshooting 39 LED & Alarm Definition Listing 43 Replacing the Lamp 44 Ceiling Mount Installation 45 Specifications 48 Compatibility modes 50 Regulations and safety notices 54

User Manual
Page 13
... 4:3 / 16:9 aspect ratio supported (P5271/P5271i/P5271n/P5290) Full/4:3/16:9/L.Box aspect ratio supported (P5390W) • Manual lens shift adjustment • Acer ColorBoost technology delivers nature's true colors for vivid, life-like images • High brightness and contrast ...compatible and HDTV (720p, 1080i, 1080p) supported • Top-loading lamp design allows easy lamp replacement • Lower power consumption and economy (ECO) mode extends lamp life • Acer EcoProjeciton Technology delivers Intelligent power management approach and physical efficiency improvement •...
... 4:3 / 16:9 aspect ratio supported (P5271/P5271i/P5271n/P5290) Full/4:3/16:9/L.Box aspect ratio supported (P5390W) • Manual lens shift adjustment • Acer ColorBoost technology delivers nature's true colors for vivid, life-like images • High brightness and contrast ...compatible and HDTV (720p, 1080i, 1080p) supported • Top-loading lamp design allows easy lamp replacement • Lower power consumption and economy (ECO) mode extends lamp life • Acer EcoProjeciton Technology delivers Intelligent power management approach and physical efficiency improvement •...

User Manual
Page 17
Temp Indicator LED Press "SOURCE" to the input source. Unique Acer functions: eOpening, eView, eTimer, ePower Management. English 5 Control Panel 1 LAMP 2 RESYNC 6 TEMP SOURCE 7 3 8 MENU 4 3 5 9 # 1 LAMP 2 RESYNC Function 3 KEYSTONE 4 MENU 5 POWER 6 TEMP 7 SOURCE 8 Four directional select keys 9 Empowering key Description Lamp Indicator LED Automatically synchronizes the projector to choose RGB, Component, SVideo, Composite, SCART, HDTV...
Temp Indicator LED Press "SOURCE" to the input source. Unique Acer functions: eOpening, eView, eTimer, ePower Management. English 5 Control Panel 1 LAMP 2 RESYNC 6 TEMP SOURCE 7 3 8 MENU 4 3 5 9 # 1 LAMP 2 RESYNC Function 3 KEYSTONE 4 MENU 5 POWER 6 TEMP 7 SOURCE 8 Four directional select keys 9 Empowering key Description Lamp Indicator LED Automatically synchronizes the projector to choose RGB, Component, SVideo, Composite, SCART, HDTV...
User Manual
Page 24
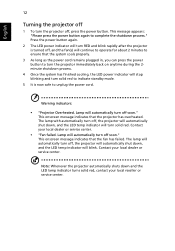
...will automatically shut down , and the LED temp indicator will stop blinking and turn solid red to complete the shutdown process." Lamp will blink. The lamp will automatically turn off , the projector will automatically shut down , and the LED temp indicator will automatically turn off ,... To turn the projector off soon." Contact your local reseller or service center. Note: Whenever the projector automatically shuts down and the LED lamp indicator turns solid red, contact your local dealer or service center. • "Fan failed. Warning indicators: • "Projector Overheated. ...
...will automatically shut down , and the LED temp indicator will stop blinking and turn solid red to complete the shutdown process." Lamp will blink. The lamp will automatically turn off , the projector will automatically shut down , and the LED temp indicator will automatically turn off ,... To turn the projector off soon." Contact your local reseller or service center. Note: Whenever the projector automatically shuts down and the LED lamp indicator turns solid red, contact your local dealer or service center. • "Fan failed. Warning indicators: • "Projector Overheated. ...
User Manual
Page 35
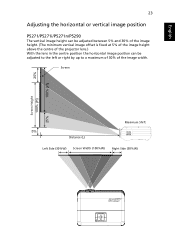
... 30% of the image width. Screen 25% 100% (H) Screen Height 100% (H) 25% 5% Distance (L) Maximum Shift Left Side (30%W) Screen Width (100%W) Right Side (30%W) RESYNC LAMP TEMP SOURCE MENU
... 30% of the image width. Screen 25% 100% (H) Screen Height 100% (H) 25% 5% Distance (L) Maximum Shift Left Side (30%W) Screen Width (100%W) Right Side (30%W) RESYNC LAMP TEMP SOURCE MENU
User Manual
Page 36
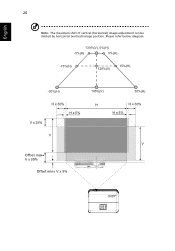
Please refer below diagram. 130%(V), 0%(H) -5%(H) 5%(H) -15%(H) 120%(V) 15%(H) -30%(H) V x 25% H x 30% H x 5% V Offset max= V x 30% Offset min= V x 5% 105%(V) 30%(H) H H x 30% H x 5% V RESYNC LAMP TEMP SOURCE MENU English 24 Note: The maximum shift of vertical (horizontal) image adjustment can be limited by horizontal (vertical) image position.
Please refer below diagram. 130%(V), 0%(H) -5%(H) 5%(H) -15%(H) 120%(V) 15%(H) -30%(H) V x 25% H x 30% H x 5% V Offset max= V x 30% Offset min= V x 5% 105%(V) 30%(H) H H x 30% H x 5% V RESYNC LAMP TEMP SOURCE MENU English 24 Note: The maximum shift of vertical (horizontal) image adjustment can be limited by horizontal (vertical) image position.
User Manual
Page 37
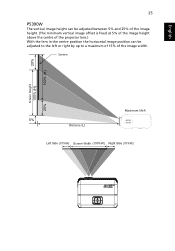
Screen 20% 100% (H) Screen Height 100% (H) 20% 5% Distance (L) Maximum Shift Left Side (15%W) Screen Width (100%W) Right Side (15%W) RESYNC LAMP TEMP SOURCE MENU English 25 P5390W The vertical image height can be adjusted between 5% and 25% of the image height. (The minimum vertical image offset is fixed at 5% of the image height above the centre of the projector lens.) With the lens in the centre position the horizontal image position can be adjusted to the left or right by up to a maximum of 15% of the image width.
Screen 20% 100% (H) Screen Height 100% (H) 20% 5% Distance (L) Maximum Shift Left Side (15%W) Screen Width (100%W) Right Side (15%W) RESYNC LAMP TEMP SOURCE MENU English 25 P5390W The vertical image height can be adjusted between 5% and 25% of the image height. (The minimum vertical image offset is fixed at 5% of the image height above the centre of the projector lens.) With the lens in the centre position the horizontal image position can be adjusted to the left or right by up to a maximum of 15% of the image width.

User Manual
Page 38
English 26 Note: The maximum shift of vertical (horizontal) image adjustment can be limited by horizontal (vertical) image position. Please refer below diagram. 125%(V), 0%(H) -4%(H) 4%(H) -10%(H) 115%(V) 10%(H) -15%(H) 105%(V) 15%(H) H x 15% H H x 15% H x 4% H x 4% V x 20% V V Offset max= V x 30% Offset min= V x 5% RESYNC LAMP TEMP SOURCE MENU
English 26 Note: The maximum shift of vertical (horizontal) image adjustment can be limited by horizontal (vertical) image position. Please refer below diagram. 125%(V), 0%(H) -4%(H) 4%(H) -10%(H) 115%(V) 10%(H) -15%(H) 105%(V) 15%(H) H x 15% H H x 15% H x 4% H x 4% V x 20% V V Offset max= V x 30% Offset min= V x 5% RESYNC LAMP TEMP SOURCE MENU
User Manual
Page 40
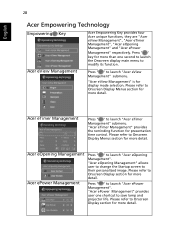
... time control. Acer eOpening Management Acer ePower Management Press " " to launch "Acer eView Management" submenu. "Acer eOpening Management" allows user to change the Startup screen to launch "Acer eTimer Management" submenu. Please refer to Onscreen Display section for more detail. Acer eTimer Management Press " " to their personalized image. Press " " to save lamp and projector life. "Acer eTimer Management...
... time control. Acer eOpening Management Acer ePower Management Press " " to launch "Acer eView Management" submenu. "Acer eOpening Management" allows user to change the Startup screen to launch "Acer eTimer Management" submenu. Please refer to Onscreen Display section for more detail. Acer eTimer Management Press " " to their personalized image. Press " " to save lamp and projector life. "Acer eTimer Management...

User Manual
Page 46
...button on the remote control for the next channel. 34 Management English ECO Mode High Altitude Auto Shutdown Lamp Hour Elapse Lamp Reminding Lamp Hour Reset Choose "On" to dim the projector lamp which will automatically shutdown when there is no signal input after the allocated time. (in minutes) ...Displays the lamp's elapsed operating time (in hours). Choose "On" to turn the lamp hour counter to 0 hours. When source lock is turned "on", it will search for proper high altitude cooling of...
...button on the remote control for the next channel. 34 Management English ECO Mode High Altitude Auto Shutdown Lamp Hour Elapse Lamp Reminding Lamp Hour Reset Choose "On" to dim the projector lamp which will automatically shutdown when there is no signal input after the allocated time. (in minutes) ...Displays the lamp's elapsed operating time (in hours). Choose "On" to turn the lamp hour counter to 0 hours. When source lock is turned "on", it will search for proper high altitude cooling of...

User Manual
Page 51
If the problem still appears, change the monitor display you are bent or broken. • Check if the projector lamp has been securely installed. Image Problems and Solutions # Problem Solution 1 No image appears • Connected as described in the "Getting Started... problem with your local reseller or service center. If the problem persists, please contact your Acer projector, refer to UXGA (1600 x 1200). • Click the "Advanced Properties" button. Please refer to the "Replacing the Lamp" section. • Make sure you need under the "Models" box. • Verify...
If the problem still appears, change the monitor display you are bent or broken. • Check if the projector lamp has been securely installed. Image Problems and Solutions # Problem Solution 1 No image appears • Connected as described in the "Getting Started... problem with your local reseller or service center. If the problem persists, please contact your Acer projector, refer to UXGA (1600 x 1200). • Click the "Advanced Properties" button. Please refer to the "Replacing the Lamp" section. • Make sure you need under the "Models" box. • Verify...

User Manual
Page 53
...will burn out and may make a loud popping sound. 41 English 9 Image is reversed • Select "Image --> Projection" on until the lamp module has been replaced. or too large • Move the projector closer to all controls unplug the power cord and wait at least 30 seconds... before reconnecting power. 2 Lamp burns out or makes a popping sound When the lamp reaches the end of the projector. Problems with the Projector # Condition Solution 1 The projector stops responding If possible, ...
...will burn out and may make a loud popping sound. 41 English 9 Image is reversed • Select "Image --> Projection" on until the lamp module has been replaced. or too large • Move the projector closer to all controls unplug the power cord and wait at least 30 seconds... before reconnecting power. 2 Lamp burns out or makes a popping sound When the lamp reaches the end of the projector. Problems with the Projector # Condition Solution 1 The projector stops responding If possible, ...

User Manual
Page 54
English 42 OSD Messages # Condition 1 Message Message Reminder Fan Fail - If the dust filter is clogged with dust, please clean it may be allowed to reach its recommended operating temperature and must be used. the lamp is not working. Projector Overheated - the projector has exceeded its maximum lifetime. Please refer to replace it soon. Replace the lamp - Please also check the dust filters if they are installed. Prepare to "Cleaning and replacing the dust filter" for details. the system fan is about to cool down before it .
English 42 OSD Messages # Condition 1 Message Message Reminder Fan Fail - If the dust filter is clogged with dust, please clean it may be allowed to reach its recommended operating temperature and must be used. the lamp is not working. Projector Overheated - the projector has exceeded its maximum lifetime. Please refer to replace it soon. Replace the lamp - Please also check the dust filters if they are installed. Prepare to "Cleaning and replacing the dust filter" for details. the system fan is about to cool down before it .
User Manual
Page 55
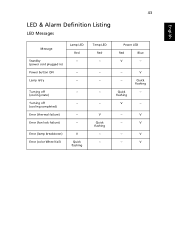
Quick flashing V V Quick flashing -- -- -- V Error (lamp breakdown) Error (color Wheel fail) V Quick flashing Temp LED Red -- --- -- -- V -- V Quick flashing --- Power LED Red Blue V -- --- V -- Turning off -- (cooling state) Turning off -- (cooling completed) Error (thermal failure) -- 43 English LED & Alarm Definition Listing LED Messages Message Standby (power cord plugged in) Power button ON Lamp retry Lamp LED Red -- --- Error (fan lock failure) -- V --
Quick flashing V V Quick flashing -- -- -- V Error (lamp breakdown) Error (color Wheel fail) V Quick flashing Temp LED Red -- --- -- -- V -- V Quick flashing --- Power LED Red Blue V -- --- V -- Turning off -- (cooling state) Turning off -- (cooling completed) Error (thermal failure) -- 43 English LED & Alarm Definition Listing LED Messages Message Standby (power cord plugged in) Power button ON Lamp retry Lamp LED Red -- --- Error (fan lock failure) -- V --
User Manual
Page 56
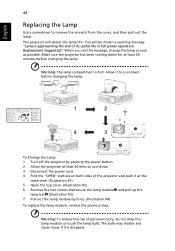
... same time. (Illustration #1) 5 Open the top cover. (Illustration #2) 6 Remove the two screws that secure the lamp moduleX and pull up the lamp barY.(Illustration #3) 7 Pull out the lamp module by pressing the power button. 2 Allow the projector at least 30 mins to cool down. 3 Disconnect the ...power cord. 4 Find the "OPEN" buttons on both sides of personal injury, do not drop the lamp module or touch the lamp bulb. Replacement Suggested!" OPEN OPEN LENS SHIFT PROJECTOR OPEN Lens Shift Control 1 LENS SHIFT PROJECTOR 2 OPEN Lens Shift Control 1 4 3 ...
... same time. (Illustration #1) 5 Open the top cover. (Illustration #2) 6 Remove the two screws that secure the lamp moduleX and pull up the lamp barY.(Illustration #3) 7 Pull out the lamp module by pressing the power button. 2 Allow the projector at least 30 mins to cool down. 3 Disconnect the ...power cord. 4 Find the "OPEN" buttons on both sides of personal injury, do not drop the lamp module or touch the lamp bulb. Replacement Suggested!" OPEN OPEN LENS SHIFT PROJECTOR OPEN Lens Shift Control 1 LENS SHIFT PROJECTOR 2 OPEN Lens Shift Control 1 4 3 ...


