

User Manual
Page 11
... image size and distance 14 How to get a preferred image size by adjusting distance and zoom 18 How to get a preferred image position by adjusting lens shift 22 User Controls 27 Installation menu 27 Acer Empowering Technology 28 Onscreen Display (OSD) Menus 29 Color 30 Image 31 Management 34 Setting 34 Audio 37
... image size and distance 14 How to get a preferred image size by adjusting distance and zoom 18 How to get a preferred image position by adjusting lens shift 22 User Controls 27 Installation menu 27 Acer Empowering Technology 28 Onscreen Display (OSD) Menus 29 Color 30 Image 31 Management 34 Setting 34 Audio 37

User Manual
Page 13
...WXGA resolution 4:3 / 16:9 aspect ratio supported (P5271/P5271i/P5271n/P5290) Full/4:3/16:9/L.Box aspect ratio supported (P5390W) • Manual lens shift adjustment • Acer ColorBoost technology delivers nature's true colors for vivid, life-like images • High brightness and contrast ratio •... • Manual focus projection lens zooms up to 1.6x (P5271/P5271i/P5271n/ P5290/P5390W) • 2x digital zoom and pan move function • Microsoft® Windows® 2000, XP, Vista® OS compliant • Manual lens shift adjustment English 1 Introduction Product Features...
...WXGA resolution 4:3 / 16:9 aspect ratio supported (P5271/P5271i/P5271n/P5290) Full/4:3/16:9/L.Box aspect ratio supported (P5390W) • Manual lens shift adjustment • Acer ColorBoost technology delivers nature's true colors for vivid, life-like images • High brightness and contrast ratio •... • Manual focus projection lens zooms up to 1.6x (P5271/P5271i/P5271n/ P5290/P5390W) • 2x digital zoom and pan move function • Microsoft® Windows® 2000, XP, Vista® OS compliant • Manual lens shift adjustment English 1 Introduction Product Features...

User Manual
Page 14
.... Check to make sure your dealer immediately if any thing is complete. Contact your unit is missing. LENS SHIFT PROJECTOR OPEN Lens Shift Control Projector with all the items shown below. All Rights Reserv ed. http://www.acer.com 2 x User's Guide (Wireless CD for P5271i) Remote control (#B for P5271i) Quick Start Guide 2 x Quick start guide...
.... Check to make sure your dealer immediately if any thing is complete. Contact your unit is missing. LENS SHIFT PROJECTOR OPEN Lens Shift Control Projector with all the items shown below. All Rights Reserv ed. http://www.acer.com 2 x User's Guide (Wireless CD for P5271i) Remote control (#B for P5271i) Quick Start Guide 2 x Quick start guide...

User Manual
Page 15
English 3 Projector Overview Projector Outlook Front / upper side 4 7 5 67 89 10 11 LENS SHIFT PROJECTOR 1 # Description 1 Lens cap 2 Elevator button 3 Elevator foot 4 Zoom Lens 5 Zoom ring 6 Focus ring OPEN Lens Shift Control 2 3 # Description 7 Remote control receivers 8 Control panel 9 Power button 10 Lens shift control rings 11 Tilt adjusting wheel
English 3 Projector Overview Projector Outlook Front / upper side 4 7 5 67 89 10 11 LENS SHIFT PROJECTOR 1 # Description 1 Lens cap 2 Elevator button 3 Elevator foot 4 Zoom Lens 5 Zoom ring 6 Focus ring OPEN Lens Shift Control 2 3 # Description 7 Remote control receivers 8 Control panel 9 Power button 10 Lens shift control rings 11 Tilt adjusting wheel

User Manual
Page 23
... your source (computer, notebook, video player ,etc.). English 11 Turning the Projector On/Off Turning on the Projector 1 Remove the lens cap.(Illustration #1) 2 Ensure that the power cord and signal cable are securely connected. • If you connect to multiple sources at...on either control panel or the remote control or direct source key on the remote control to switch between inputs. 2 Power button LENS SHIFT PROJECTOR 1 Lens cap OPEN Lens Shift Control The projector will turn blue.(Illustration #2) 4 Turn on your source automatically. • If the screen displays "Lock" and...
... your source (computer, notebook, video player ,etc.). English 11 Turning the Projector On/Off Turning on the Projector 1 Remove the lens cap.(Illustration #1) 2 Ensure that the power cord and signal cable are securely connected. • If you connect to multiple sources at...on either control panel or the remote control or direct source key on the remote control to switch between inputs. 2 Power button LENS SHIFT PROJECTOR 1 Lens cap OPEN Lens Shift Control The projector will turn blue.(Illustration #2) 4 Turn on your source automatically. • If the screen displays "Lock" and...

User Manual
Page 34
English 22 How to get a preferred image position by adjusting lens shift The projector is equipped with lens shift for reference only not approximate value. The figures between units can be different due to physically move the projector. Vertical Lens Shift ring Horizontal Lens Shift ring Note: The figures shown in this section are for adjusting the position of projected image right and left or up and down without requiring you to assembly tolerance.
English 22 How to get a preferred image position by adjusting lens shift The projector is equipped with lens shift for reference only not approximate value. The figures between units can be different due to physically move the projector. Vertical Lens Shift ring Horizontal Lens Shift ring Note: The figures shown in this section are for adjusting the position of projected image right and left or up and down without requiring you to assembly tolerance.
User Manual
Page 35
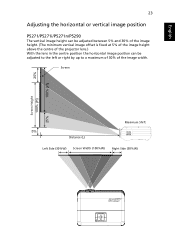
Screen 25% 100% (H) Screen Height 100% (H) 25% 5% Distance (L) Maximum Shift Left Side (30%W) Screen Width (100%W) Right Side (30%W) RESYNC LAMP TEMP SOURCE MENU English 23 Adjusting the horizontal or vertical image position P5271/P5271i/... 5% and 30% of the image height. (The minimum vertical image offset is fixed at 5% of the image height above the centre of the projector lens.) With the lens in the centre position the horizontal image position can be adjusted to the left or right by up to a maximum of 30% of the...
Screen 25% 100% (H) Screen Height 100% (H) 25% 5% Distance (L) Maximum Shift Left Side (30%W) Screen Width (100%W) Right Side (30%W) RESYNC LAMP TEMP SOURCE MENU English 23 Adjusting the horizontal or vertical image position P5271/P5271i/... 5% and 30% of the image height. (The minimum vertical image offset is fixed at 5% of the image height above the centre of the projector lens.) With the lens in the centre position the horizontal image position can be adjusted to the left or right by up to a maximum of 30% of the...
User Manual
Page 37
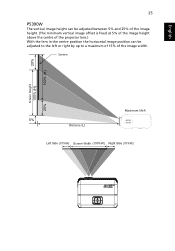
English 25 P5390W The vertical image height can be adjusted between 5% and 25% of the image height. (The minimum vertical image offset is fixed at 5% of the image height above the centre of the projector lens.) With the lens in the centre position the horizontal image position can be adjusted to the left or right by up to a maximum of 15% of the image width. Screen 20% 100% (H) Screen Height 100% (H) 20% 5% Distance (L) Maximum Shift Left Side (15%W) Screen Width (100%W) Right Side (15%W) RESYNC LAMP TEMP SOURCE MENU
English 25 P5390W The vertical image height can be adjusted between 5% and 25% of the image height. (The minimum vertical image offset is fixed at 5% of the image height above the centre of the projector lens.) With the lens in the centre position the horizontal image position can be adjusted to the left or right by up to a maximum of 15% of the image width. Screen 20% 100% (H) Screen Height 100% (H) 20% 5% Distance (L) Maximum Shift Left Side (15%W) Screen Width (100%W) Right Side (15%W) RESYNC LAMP TEMP SOURCE MENU
User Manual
Page 56
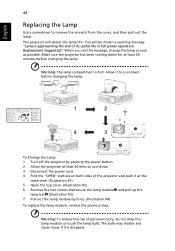
... the lamp bulb. Allow it is dropped. When you see this message, change the lamp as soon as possible. OPEN OPEN LENS SHIFT PROJECTOR OPEN Lens Shift Control 1 LENS SHIFT PROJECTOR 2 OPEN Lens Shift Control 1 4 3 LENS SHIFT PROJECTOR OPEN Lens Shift Control 2 To Change the Lamp 1 Turn off the projector by pressing the power button. 2 Allow the projector at least 30 mins...
... the lamp bulb. Allow it is dropped. When you see this message, change the lamp as soon as possible. OPEN OPEN LENS SHIFT PROJECTOR OPEN Lens Shift Control 1 LENS SHIFT PROJECTOR 2 OPEN Lens Shift Control 1 4 3 LENS SHIFT PROJECTOR OPEN Lens Shift Control 2 To Change the Lamp 1 Turn off the projector by pressing the power button. 2 Allow the projector at least 30 mins...


