

User Manual
Page 1
... Rights Reserved. Acer Projector PL6610T/PL6610/PL6510/PL6310W/PL6210/ SL6610T/SL6610/SL6510/SL6310W/SL6210/ FL261T/FL261/FL251/FL221/FL211/FL261ST/ FL261S/FL251S/FL221S/FL211S/ LU-P500UT/ LU-P500U/LU-P500F/LU-P500W/ LU-.../ML-560SB/ ML-560S/ ML-460S/ML-260S/ML-160S/ DWU1846/ DWU1817/D1P1818/DWX1819/ DNX1820/ DWU1847/DWU1821/D1P1822/ DWX1823/ DNX1824 User's Guide Copyright © 2018. Acer Projector User's Guide Original Issue: 11/2018
... Rights Reserved. Acer Projector PL6610T/PL6610/PL6510/PL6310W/PL6210/ SL6610T/SL6610/SL6510/SL6310W/SL6210/ FL261T/FL261/FL251/FL221/FL211/FL261ST/ FL261S/FL251S/FL221S/FL211S/ LU-P500UT/ LU-P500U/LU-P500F/LU-P500W/ LU-.../ML-560SB/ ML-560S/ ML-460S/ML-260S/ML-160S/ DWU1846/ DWU1817/D1P1818/DWX1819/ DNX1820/ DWU1847/DWU1821/D1P1822/ DWX1823/ DNX1824 User's Guide Copyright © 2018. Acer Projector User's Guide Original Issue: 11/2018

User Manual
Page 2
... only and belong to your unit should include the serial number, model number and purchase information. All correspondence concerning your projector. Changes may be made periodically to the information in the space provided below. Such changes will be incorporated in new ...companies. The serial number and model number are registered trademarks of purchase information in this publication without the prior written permission of Acer Incorporated. HDMI™, the HDMI logo and High-Definition Multimedia Interface are used herein for a particular purpose. Other companies'...
... only and belong to your unit should include the serial number, model number and purchase information. All correspondence concerning your projector. Changes may be made periodically to the information in the space provided below. Such changes will be incorporated in new ...companies. The serial number and model number are registered trademarks of purchase information in this publication without the prior written permission of Acer Incorporated. HDMI™, the HDMI logo and High-Definition Multimedia Interface are used herein for a particular purpose. Other companies'...

User Manual
Page 3
.... Do not locate this product on a vibrating surface. yy This product's AC adapter is easily accessible and located as possible. Keep this product from the projector. Follow all warnings and instructions marked on the power cord. When you are provided for ventilation to replace the power cord set . yy Never use...
.... Do not locate this product on a vibrating surface. yy This product's AC adapter is easily accessible and located as possible. Keep this product from the projector. Follow all warnings and instructions marked on the power cord. When you are provided for ventilation to replace the power cord set . yy Never use...

User Manual
Page 4
..., strange noise or odor comes out of other risks. In this could cause the object to turn off . yy When switching the projector off before disconnecting power. Refer servicing only to qualified service personnel. yy 360° projection capability Images can lead to wait for service...product to disassemble this product from walls and free flow of small children. Keep them out of the reach of air around the projector is operating. yy Locations near fire alarms. yy Locations with all servicing to suitable qualified professional service personnel. It can be reduced ...
..., strange noise or odor comes out of other risks. In this could cause the object to turn off . yy When switching the projector off before disconnecting power. Refer servicing only to qualified service personnel. yy 360° projection capability Images can lead to wait for service...product to disassemble this product from walls and free flow of small children. Keep them out of the reach of air around the projector is operating. yy Locations near fire alarms. yy Locations with all servicing to suitable qualified professional service personnel. It can be reduced ...
User Manual
Page 5
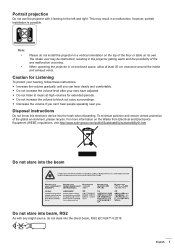
...the volume to the left and right. To minimize pollution and ensure utmost protection of fire and malfunction occurring. ‡‡ When operating the projector in an enclosed space, allow at high volumes for Listening To protect your ears have adjusted. RG2 English 5 yy Do not increase the ... vertical orientation on the top of the floor or table on the Waste from Electrical and Electronics Equipment (WEEE) regulations, visit http://www.acer-group.com/public/Sustainability/sustainability01.htm Do not stare into the beam Do not stare into beam, RG2 As with it leaning to block out...
...the volume to the left and right. To minimize pollution and ensure utmost protection of fire and malfunction occurring. ‡‡ When operating the projector in an enclosed space, allow at high volumes for Listening To protect your ears have adjusted. RG2 English 5 yy Do not increase the ... vertical orientation on the top of the floor or table on the Waste from Electrical and Electronics Equipment (WEEE) regulations, visit http://www.acer-group.com/public/Sustainability/sustainability01.htm Do not stare into the beam Do not stare into beam, RG2 As with it leaning to block out...
User Manual
Page 6
...warnings, precautions and maintenance as this product to excessive dust and dirt. yy To reduce the risk of time. yy When switching the projector off the product before disconnecting power. yy In areas susceptible to rain or moisture. yy Place In direct sunlight. The bright may ...cause electric shock. yy Do not look into the projector's lens when the light is not being used for ventilation. yy Near any appliance that generates a strong magnetic field. First things first ...
...warnings, precautions and maintenance as this product to excessive dust and dirt. yy To reduce the risk of time. yy When switching the projector off the product before disconnecting power. yy In areas susceptible to rain or moisture. yy Place In direct sunlight. The bright may ...cause electric shock. yy Do not look into the projector's lens when the light is not being used for ventilation. yy Near any appliance that generates a strong magnetic field. First things first ...

User Manual
Page 7
... Overview...10 Connections...11 Keypad...12 Remote control...13 SETUP AND INSTALLATION 14 Installing the projector...14 Connecting sources to the projector 16 Adjusting the projector image...18 Remote setup...19 USING THE PROJECTOR 21 Powering on / off the projector 21 Selecting an input source...22 Menu navigation and features 23 OSD Menu tree...24...
... Overview...10 Connections...11 Keypad...12 Remote control...13 SETUP AND INSTALLATION 14 Installing the projector...14 Connecting sources to the projector 16 Adjusting the projector image...18 Remote setup...19 USING THE PROJECTOR 21 Powering on / off the projector 21 Selecting an input source...22 Menu navigation and features 23 OSD Menu tree...24...

User Manual
Page 8
ADDITIONAL INFORMATION 49 Compatible resolutions...49 Image size and projection distance 52 Projector dimensions and ceiling mount installation 55 Troubleshooting...56 Warning indicators...57 Specifications...59 8 English
ADDITIONAL INFORMATION 49 Compatible resolutions...49 Image size and projection distance 52 Projector dimensions and ceiling mount installation 55 Troubleshooting...56 Warning indicators...57 Specifications...59 8 English
User Manual
Page 9
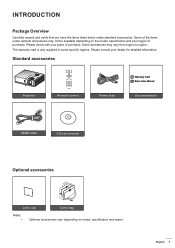
Please consult your place of purchase. English 9 The warranty card is only supplied in some specific regions. Standard accessories Projector Remote control Power lead Warranty Card Basic User Manual Documentation HDMI cable CD user manual Optional accessories Lens cap Carry bag Note: ‡&#...
Please consult your place of purchase. English 9 The warranty card is only supplied in some specific regions. Standard accessories Projector Remote control Power lead Warranty Card Basic User Manual Documentation HDMI cable CD user manual Optional accessories Lens cap Carry bag Note: ‡&#...
User Manual
Page 10
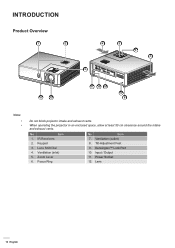
When operating the projector in an enclosed space, allow at least 50 cm clearance around the intake and exhaust vents. Keypad 3. Power Socket 12. No. Input / Output 11. Lens Shift Dial 4. Kensington™ Lock Port 10. IR Receivers 2. Zoom Lever 6. Ventilation (outlet) 8. Tilt-Adjustment Feet 9. Lens 10 English INTRODUCTION Product Overview 1 2 4 5 6 7 3 8 12 8 11 10 9 8 Note: ‡‡ ‡‡ Do not block projector intake and exhaust vents. Item 7. Ventilation (inlet) 5. Focus Ring No. Item 1.
When operating the projector in an enclosed space, allow at least 50 cm clearance around the intake and exhaust vents. Keypad 3. Power Socket 12. No. Input / Output 11. Lens Shift Dial 4. Kensington™ Lock Port 10. IR Receivers 2. Zoom Lever 6. Ventilation (outlet) 8. Tilt-Adjustment Feet 9. Lens 10 English INTRODUCTION Product Overview 1 2 4 5 6 7 3 8 12 8 11 10 9 8 Note: ‡‡ ‡‡ Do not block projector intake and exhaust vents. Item 7. Ventilation (inlet) 5. Focus Ring No. Item 1.

User Manual
Page 14
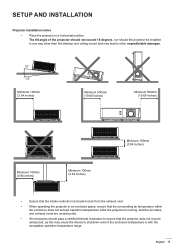
...For none standard installation advise please contact Acer. 14 English Table mount front Ceiling mount front Table mount rear Ceiling mount rear Projector should be placed flat on a surface and 90 degrees / perpendicular to the screen. ‡‡ How to determine projector location for a given screen size,... location you select. Your room layout or personal preference will invalidate the warranty and may shorten the lifetime of the projector light source or the projector itself. Take into consideration the size and position of your screen, the location of a suitable power outlet, as ...
...For none standard installation advise please contact Acer. 14 English Table mount front Ceiling mount front Table mount rear Ceiling mount rear Projector should be placed flat on a surface and 90 degrees / perpendicular to the screen. ‡‡ How to determine projector location for a given screen size,... location you select. Your room layout or personal preference will invalidate the warranty and may shorten the lifetime of the projector light source or the projector itself. Take into consideration the size and position of your screen, the location of a suitable power outlet, as ...
User Manual
Page 15
...(19.69 inches) Minimum 100mm (3.94 inches) Minimum 100mm (3.94 inches) Minimum 100mm (3.94 inches) ‡‡ Ensure that the projector does not recycle exhaust air, as this may cause the device to other than the desktop and ceiling mount and may lead to shutdown even... if the enclosure temperature is with the acceptable operation temperature range. SETUP AND INSTALLATION Projector installation notice ‡‡ Place the projector in an enclosed space, ensure that the surrounding air temperature within the enclosure does not exceed operation temperature ...
...(19.69 inches) Minimum 100mm (3.94 inches) Minimum 100mm (3.94 inches) Minimum 100mm (3.94 inches) ‡‡ Ensure that the projector does not recycle exhaust air, as this may cause the device to other than the desktop and ceiling mount and may lead to shutdown even... if the enclosure temperature is with the acceptable operation temperature range. SETUP AND INSTALLATION Projector installation notice ‡‡ Place the projector in an enclosed space, ensure that the surrounding air temperature within the enclosure does not exceed operation temperature ...
User Manual
Page 16
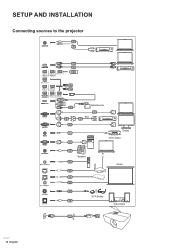
SETUP AND INSTALLATION Connecting sources to the projector 2 2 LR HDTV adapter 3 3 10 10 USB flash drive 16 9 10 3 4 5 7 8 Smart devices 5 RCA 6 Display Video Output 2 Speakers 11 12 12 13 Screen 14 3D IR Emitter 15 Audio Output 1 16 English
SETUP AND INSTALLATION Connecting sources to the projector 2 2 LR HDTV adapter 3 3 10 10 USB flash drive 16 9 10 3 4 5 7 8 Smart devices 5 RCA 6 Display Video Output 2 Speakers 11 12 12 13 Screen 14 3D IR Emitter 15 Audio Output 1 16 English

User Manual
Page 17
... Wireless remote control 12 LAN cable 13 12V DC cable 14 3D SYNC cable 15 SPDIF cable 16 USB flash drive Note: - To ensure the projector works well with the...
... Wireless remote control 12 LAN cable 13 12V DC cable 14 3D SYNC cable 15 SPDIF cable 16 USB flash drive Note: - To ensure the projector works well with the...

User Manual
Page 18
...projected image size. ‡‡ To adjust the image position, turn the lens shift dial clockwise or counterclockwise to raise or lower the projector. Please refer to adjust on the underside of the projected image vertically. ‡‡ To adjust the focus, turn the focus ring ...clockwise or counterclockwise until the image is within the required distance from the projector. Locate the adjustable foot you wish to "Image size and projection distance" for adjusting the image height. 1. Rotate the adjustable foot clockwise ...
...projected image size. ‡‡ To adjust the image position, turn the lens shift dial clockwise or counterclockwise to raise or lower the projector. Please refer to adjust on the underside of the projected image vertically. ‡‡ To adjust the focus, turn the focus ring ...clockwise or counterclockwise until the image is within the required distance from the projector. Locate the adjustable foot you wish to "Image size and projection distance" for adjusting the image height. 1. Rotate the adjustable foot clockwise ...
User Manual
Page 20
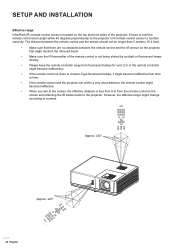
...control is close to Inverter-Type fluorescent lamps, it might become ineffective from time to time. ‡‡ If the remote control and the projector are no obstacles between the remote control and the sensor should not be longer than 5 m from the remote control to the screen and ...reflecting the IR beams back to the projector. SETUP AND INSTALLATION Effective range Infra-Red (IR) remote control sensor is located on the projector that might change according to screens. Ensure to hold the remote control at an angle within a ...
...control is close to Inverter-Type fluorescent lamps, it might become ineffective from time to time. ‡‡ If the remote control and the projector are no obstacles between the remote control and the sensor should not be longer than 5 m from the remote control to the screen and ...reflecting the IR beams back to the projector. SETUP AND INSTALLATION Effective range Infra-Red (IR) remote control sensor is located on the projector that might change according to screens. Ensure to hold the remote control at an angle within a ...

User Manual
Page 21
... in approximately 10 seconds and the Power LED will be displayed: Power Off Power Off? Turn on the projector by pressing the button on the projector keypad or remote control. 2. Powering off procedure. Press the button again to select the preferred language, projection orientation, and ...you wish to turn blue. English 21 When the Power turns solid red, this indicates the projector has entered standby mode. Disconnect the power lead from the electrical outlet and the projector. When connected, the Power LED will shut down. 4. The following message will be prompted to...
... in approximately 10 seconds and the Power LED will be displayed: Power Off Power Off? Turn on the projector by pressing the button on the projector keypad or remote control. 2. Powering off procedure. Press the button again to select the preferred language, projection orientation, and ...you wish to turn blue. English 21 When the Power turns solid red, this indicates the projector has entered standby mode. Disconnect the power lead from the electrical outlet and the projector. When connected, the Power LED will shut down. 4. The following message will be prompted to...

User Manual
Page 22
If multiple sources are connected, press the button on the projector keypad or the Source button on the remote control to display on the connected source that you want to select the desired input. or Lens cap 22 English The projector will automatically detect the source. USING THE PROJECTOR Selecting an input source Turn on the screen, such as computer, notebook, video player, etc.
If multiple sources are connected, press the button on the projector keypad or the Source button on the remote control to display on the connected source that you want to select the desired input. or Lens cap 22 English The projector will automatically detect the source. USING THE PROJECTOR Selecting an input source Turn on the screen, such as computer, notebook, video player, etc.
User Manual
Page 23
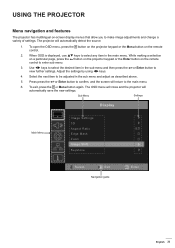
... press the or Enter button to be adjusted in the main menu. Press press the or Enter button to the main menu. 6. The projector will return to confirm, and the screen will automatically detect the source. 1. Select the next item to view further settings. The OSD menu... will close and the projector will automatically save the new settings. Sub Menu Settings Display Main Menu Image Settings 3D Aspect Ratio Edge Mask Zoom Image Shift Keystone Select...
... press the or Enter button to be adjusted in the main menu. Press press the or Enter button to the main menu. 6. The projector will return to confirm, and the screen will automatically detect the source. 1. Select the next item to view further settings. The OSD menu... will close and the projector will automatically save the new settings. Sub Menu Settings Display Main Menu Image Settings 3D Aspect Ratio Edge Mask Zoom Image Shift Keystone Select...
User Manual
Page 24
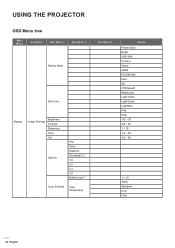
User 3D Off [Default] Blackboard Light Yellow Light Green Light Blue Pink Gray -50 ~ 50 -50 ~ 50 1 ~ 15 -50 ~ 50 -50 ~ 50 1 ~ 10 Warm Standard Cool Cold 24 English USING THE PROJECTOR OSD Menu tree Main Menu Sub Menu Sub Menu 2 Sub Menu 3 Display Mode Wall Color Display Brightness Image Settings Contrast Sharpness Color Tint Gamma Film Video Graphics Standard(2.2) 1.8 2.0 2.4 2.6 BrilliantColorTM Color Settings Color Temperature Sub Menu 4 Values Presentation Bright HDR SIM. Cinema Game sRGB DICOM SIM.
User 3D Off [Default] Blackboard Light Yellow Light Green Light Blue Pink Gray -50 ~ 50 -50 ~ 50 1 ~ 15 -50 ~ 50 -50 ~ 50 1 ~ 10 Warm Standard Cool Cold 24 English USING THE PROJECTOR OSD Menu tree Main Menu Sub Menu Sub Menu 2 Sub Menu 3 Display Mode Wall Color Display Brightness Image Settings Contrast Sharpness Color Tint Gamma Film Video Graphics Standard(2.2) 1.8 2.0 2.4 2.6 BrilliantColorTM Color Settings Color Temperature Sub Menu 4 Values Presentation Bright HDR SIM. Cinema Game sRGB DICOM SIM.


