

Aspire T300 Service Guide
Page 26
When the message of [Delete] to enter the setup menu. The Setup Utility main menu then appears: 20 Chapter 2 NOTE: If the message disappears before you respond and you still wish to enter Setup, restart the system by simultaneously pressing [Ctrl+Alt+Delete]. You may also restart the system by turning it OFF and On. Entering Setup Power on the screen, press the key of "Press DEL to enter SETUP" appears on the computer abd the system will start POST (Power On Self Test)prosecc.
When the message of [Delete] to enter the setup menu. The Setup Utility main menu then appears: 20 Chapter 2 NOTE: If the message disappears before you respond and you still wish to enter Setup, restart the system by simultaneously pressing [Ctrl+Alt+Delete]. You may also restart the system by turning it OFF and On. Entering Setup Power on the screen, press the key of "Press DEL to enter SETUP" appears on the computer abd the system will start POST (Power On Self Test)prosecc.
Aspire T300 Service Guide
Page 68
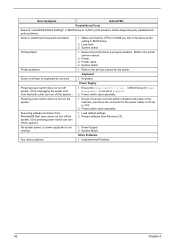
...BIOS Setup of the machine, just above the connector for the power cable) is not set to Suspend. 2. Executing software shutdown from Windows98 Start menu does not turn off the system. (Only pressing power switch can turn off the system.) 1. Printing failed. 1. ...Printer. 3. Printer cable. 4. Printer problems. 1. Power switch cable assembly Pressing power switch does not turn off system. (Only unplugging the power cord from Recovery CD. Ensure the power override switch (situated at the back of Power Management is properly installed. Reload software from electrical outlet...
...BIOS Setup of the machine, just above the connector for the power cable) is not set to Suspend. 2. Executing software shutdown from Windows98 Start menu does not turn off the system. (Only pressing power switch can turn off the system.) 1. Printing failed. 1. ...Printer. 3. Printer cable. 4. Printer problems. 1. Power switch cable assembly Pressing power switch does not turn off system. (Only unplugging the power cord from Recovery CD. Ensure the power override switch (situated at the back of Power Management is properly installed. Reload software from electrical outlet...

Power ST User Guide
Page 5
...dangerous voltage points or short out parts that could result in the cabinet and the back or bottom are not sure of the type of power available, consult your computer safely and correctly, please read this user guide carefully before cleaning. Also, make sure that the total ampere rating... reliable operation of the product and to rest on the product. v Before You Start To ensure that you can use your dealer or local power company. 7 Do not allow anything to protect it from the type of power indicated on the product. 2 Unplug this product from the wall outlet before you...
...dangerous voltage points or short out parts that could result in the cabinet and the back or bottom are not sure of the type of power available, consult your computer safely and correctly, please read this user guide carefully before cleaning. Also, make sure that the total ampere rating... reliable operation of the product and to rest on the product. v Before You Start To ensure that you can use your dealer or local power company. 7 Do not allow anything to protect it from the type of power indicated on the product. 2 Unplug this product from the wall outlet before you...

Power ST User Guide
Page 9
Contents Welcome iii FCC notice iii Before You Start v Important safety instructions v Laser compliance statement vi Lithium battery statement vii Setting Up The System vii Placement Tips vii Features 1 Performance 1 Multimedia 1 Connectivity 2 System Overview 3 ... Positioning your PC 12 Positioning your monitor 13 Positioning your keyboard 13 Positioning your mouse 13 Connecting peripherals 14 Mouse 14 Keyboard 14 Monitor 14 Power cable 14 Turning on your computer 15
Contents Welcome iii FCC notice iii Before You Start v Important safety instructions v Laser compliance statement vi Lithium battery statement vii Setting Up The System vii Placement Tips vii Features 1 Performance 1 Multimedia 1 Connectivity 2 System Overview 3 ... Positioning your PC 12 Positioning your monitor 13 Positioning your keyboard 13 Positioning your mouse 13 Connecting peripherals 14 Mouse 14 Keyboard 14 Monitor 14 Power cable 14 Turning on your computer 15

Power ST User Guide
Page 26
... at least four seconds. Note: You do not need to your computer. You can then turn off all peripherals connected to turn off the main power switch every time you cannot shut down ; Quickly pressing the button may put the computer in Suspend mode only. then click on the... Start button, highlight Shut Down, select Shut down your computer, on the Windows® taskbar click on OK. If you turn off your computer. 16 Turning ...
... at least four seconds. Note: You do not need to your computer. You can then turn off all peripherals connected to turn off the main power switch every time you cannot shut down ; Quickly pressing the button may put the computer in Suspend mode only. then click on the... Start button, highlight Shut Down, select Shut down your computer, on the Windows® taskbar click on OK. If you turn off your computer. 16 Turning ...

Power ST User Guide
Page 28
...following sections unless you are installed according to release the cover panel. • Slide the cover panel off the computer properly before you start installing the components may cause serious damage. by-step instructions in the following after installing a computer component: 1 See to it that ...you open the case, turn on your computer off and unplug the power cord from the wall outlet. • Remove the retaining screws to the step- Do not attempt the procedures described in their respective sections....
...following sections unless you are installed according to release the cover panel. • Slide the cover panel off the computer properly before you start installing the components may cause serious damage. by-step instructions in the following after installing a computer component: 1 See to it that ...you open the case, turn on your computer off and unplug the power cord from the wall outlet. • Remove the retaining screws to the step- Do not attempt the procedures described in their respective sections....


