
User Manual
Page 3
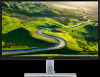
... all warnings and instructions marked on the desktop pattern you use . Turn off the power switch for a few hours. Keep this case, the screen is displayed for hours. It may find slightly uneven brightness on the screen depending on the product. English Information for your monitor Please carefully follow these instructions...
... all warnings and instructions marked on the desktop pattern you use . Turn off the power switch for a few hours. Keep this case, the screen is displayed for hours. It may find slightly uneven brightness on the screen depending on the product. English Information for your monitor Please carefully follow these instructions...
User Manual
Page 7
... carpal tunnel syndrome, tendonitis, tenosynovitis or other factors greatly increase the risk of a computer. This product has been shipped enabled for power management: • Activate display's Sleep mode within 15 minutes of user inactivity. • Activate computer's Sleep mode within 30 minutes of physical injury after prolonged use Computer users may...
... carpal tunnel syndrome, tendonitis, tenosynovitis or other factors greatly increase the risk of a computer. This product has been shipped enabled for power management: • Activate display's Sleep mode within 15 minutes of user inactivity. • Activate computer's Sleep mode within 30 minutes of physical injury after prolonged use Computer users may...

User Manual
Page 8
... suggestions on a distant point. • Blink frequently to an awkward viewing angle. • Avoid looking at the middle of the display. • Adjust the display brightness and/or contrast to a comfortable level for enhanced text readability and graphics clarity. • Eliminate glare and reflections by: •...; placing your display in such a way that the side faces the window or any light source • minimizing room light by looking at bright ...
... suggestions on a distant point. • Blink frequently to an awkward viewing angle. • Avoid looking at the middle of the display. • Adjust the display brightness and/or contrast to a comfortable level for enhanced text readability and graphics clarity. • Eliminate glare and reflections by: •...; placing your display in such a way that the side faces the window or any light source • minimizing room light by looking at bright ...

User Manual
Page 11
... 3 Connecting the adapter and AC Power cord 3 Power saving 3 Display Data Channel (DDC) 4 Connector pin assignment 4 15-pin color display signal cable 4 24-pin color display signal cable 4 19-pin color display signal cable 5 Standard timing table 6 Installation 7 Users controls 8 ...Panel controls 8 Using the Shortcut Menu 9 Input Source Selection 9 Acer eColor Management 10 Operation ...
... 3 Connecting the adapter and AC Power cord 3 Power saving 3 Display Data Channel (DDC) 4 Connector pin assignment 4 15-pin color display signal cable 4 24-pin color display signal cable 4 19-pin color display signal cable 5 Standard timing table 6 Installation 7 Users controls 8 ...Panel controls 8 Using the Shortcut Menu 9 Input Source Selection 9 Acer eColor Management 10 Operation ...
User Manual
Page 15
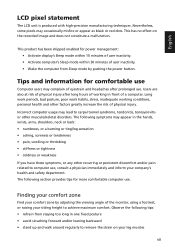
... sure that allows operation in which the equipment will be switched to "power saving" mode by the blinking blue light. The recovery time from the display controller, as indicated by the control signal from "power saving" mode back to "on" is around 3 seconds. 3 The monitor can adjust the monitor tilt, using...
... sure that allows operation in which the equipment will be switched to "power saving" mode by the blinking blue light. The recovery time from the display controller, as indicated by the control signal from "power saving" mode back to "on" is around 3 seconds. 3 The monitor can adjust the monitor tilt, using...
User Manual
Page 16
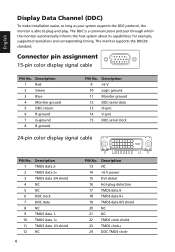
...No. Description 9 +5 V 10 Logic ground 11 Monitor ground 12 DDC-serial data 13 H-sync 14 V-sync 15 DDC-serial clock 24-pin color display signal cable PIN No. for example, supported resolutions and corresponding timing. Description 1 Red 2 Green 3 Blue 4 Monitor ground 5 DDC-return 6 ...6 DDC clock 7 DDC data 8 NC 9 TMDS data 1- 10 TMDS data 1+ 11 TMDS data 1/3 shield 12 NC 4 PIN No. English Display Data Channel (DDC) To make installation easier, so long as your system supports the DDC protocol, the monitor is a communication protocol through which the ...
...No. Description 9 +5 V 10 Logic ground 11 Monitor ground 12 DDC-serial data 13 H-sync 14 V-sync 15 DDC-serial clock 24-pin color display signal cable PIN No. for example, supported resolutions and corresponding timing. Description 1 Red 2 Green 3 Blue 4 Monitor ground 5 DDC-return 6 ...6 DDC clock 7 DDC data 8 NC 9 TMDS data 1- 10 TMDS data 1+ 11 TMDS data 1/3 shield 12 NC 4 PIN No. English Display Data Channel (DDC) To make installation easier, so long as your system supports the DDC protocol, the monitor is a communication protocol through which the ...
User Manual
Page 20
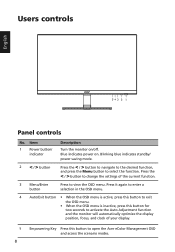
Blue indicates power on /off. Press the < / > button to change the settings of your display. 5 Empowering Key Press this button to view the OSD menu. Press it again to enter a selection in the OSD menu. 4 Auto/Exit button • When ... this button for two seconds to activate the Auto Adjustment function and the monitor will automatically optimize the display position, focus, and clock of the current function. 3 Menu/Enter button Press to open the Acer eColor Management OSD and access the scenario modes. 8 Item 1 Power button/ indicator Description Turn the monitor on...
Blue indicates power on /off. Press the < / > button to change the settings of your display. 5 Empowering Key Press this button to view the OSD menu. Press it again to enter a selection in the OSD menu. 4 Auto/Exit button • When ... this button for two seconds to activate the Auto Adjustment function and the monitor will automatically optimize the display position, focus, and clock of the current function. 3 Menu/Enter button Press to open the Acer eColor Management OSD and access the scenario modes. 8 Item 1 Power button/ indicator Description Turn the monitor on...

User Manual
Page 21
... volume. (Optional, only Audio-Input Model) Input Input Press the Input button to select from different video sources that may be connected to your display. User can support auto search for signal source in order. 2. When Auto Source is Off, press the "Input" Hot key to activate the... to display the input source Menu. The shortcut menu lets you quickly select the most commonly accessed settings. The default of Auto Source is off, press the "Input" Hot key to control the "Auto Source" function. Icon Item Empowering Description Press the Empowering Key to open the Acer eColor ...
... volume. (Optional, only Audio-Input Model) Input Input Press the Input button to select from different video sources that may be connected to your display. User can support auto search for signal source in order. 2. When Auto Source is Off, press the "Input" Hot key to activate the... to display the input source Menu. The shortcut menu lets you quickly select the most commonly accessed settings. The default of Auto Source is off, press the "Input" Hot key to control the "Auto Source" function. Icon Item Empowering Description Press the Empowering Key to open the Acer eColor ...

User Manual
Page 22
Pictures and photographs appear in clearest detail. Displays scenes in vibrant colors with sharp detail. Reflects native display capability. Settings can be fine-tuned to confirm the selection and exit Acer eColor Management. mpowering Technology User ECO Standard Graphics Movie 2 Press the < / > button to select the desired mode. 3 Press the Auto button to suit...
Pictures and photographs appear in clearest detail. Displays scenes in vibrant colors with sharp detail. Reflects native display capability. Settings can be fine-tuned to confirm the selection and exit Acer eColor Management. mpowering Technology User ECO Standard Graphics Movie 2 Press the < / > button to select the desired mode. 3 Press the Auto button to suit...
User Manual
Page 23
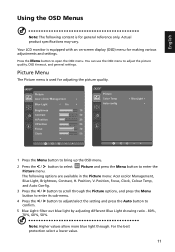
... > button to scroll through . For the best protection select a lower value. 11 Picture Menu The Picture menu is equipped with an on-screen display (OSD) menu for making various adjustments and settings. Position, V. Your LCD monitor is used for general reference only. You can use the OSD ... is for adjusting the picture quality. Press the Menu button to adjust the picture quality, OSD timeout, and general settings. Picture Acer eColor Management Blue Light On Brightness 70 Contrast 50 H.Position 20 V.Position 50 Focus 70 Clock 50 Picture Color Temp Auto config ...
... > button to scroll through . For the best protection select a lower value. 11 Picture Menu The Picture menu is equipped with an on-screen display (OSD) menu for making various adjustments and settings. Position, V. Your LCD monitor is used for general reference only. You can use the OSD ... is for adjusting the picture quality. Press the Menu button to adjust the picture quality, OSD timeout, and general settings. Picture Acer eColor Management Blue Light On Brightness 70 Contrast 50 H.Position 20 V.Position 50 Focus 70 Clock 50 Picture Color Temp Auto config ...
User Manual
Page 25
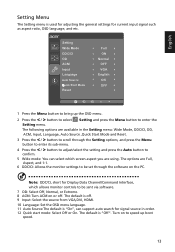
Note: DDC/CI, short for Display Data Channel/Command Interface, which screen aspect you are using. Setting Wide Mode DDC/CI OD ACM Input Language AAuuttooSSoouruc rece Quic k Start Mode Reset ...
Note: DDC/CI, short for Display Data Channel/Command Interface, which screen aspect you are using. Setting Wide Mode DDC/CI OD ACM Input Language AAuuttooSSoouruc rece Quic k Start Mode Reset ...
User Manual
Page 26
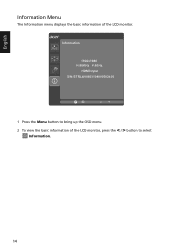
Information H:68KHz V:60Hz HDMI Input S/N: ETRLA00803104000502400 1 Press the Menu button to select Information. 14 English Information Menu The Information menu displays the basic information of the LCD monitor, press the < / > button to bring up the OSD menu. 2 To view the basic information of the LCD monitor.
Information H:68KHz V:60Hz HDMI Input S/N: ETRLA00803104000502400 1 Press the Menu button to select Information. 14 English Information Menu The Information menu displays the basic information of the LCD monitor, press the < / > button to bring up the OSD menu. 2 To view the basic information of the LCD monitor.
User Manual
Page 27
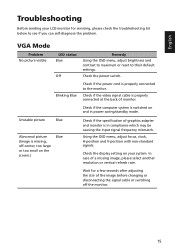
... the screen.) Blue Check if the specification of the image before changing or disconnecting the signal cable or switching off the monitor. 15 Check the display setting on and in compliance which may be causing the input signal frequency mismatch. Wait for servicing, please check the troubleshooting list below to the...
... the screen.) Blue Check if the specification of the image before changing or disconnecting the signal cable or switching off the monitor. 15 Check the display setting on and in compliance which may be causing the input signal frequency mismatch. Wait for servicing, please check the troubleshooting list below to the...


