
Quick Start Guide
Page 1
...rain. • The LCD monitor or case is damaged. Blue indicates power on a stable and level workspace. 2 Remove the monitor from the packaging and place it . 3 Do not apply pressure to open the Acer eColor Management OSD and access the scenario modes. An authorized technician should... perform servicing of any of your computer and your display. Package contents LCD monitor AC Power cable Audio cable VGA cable HDMI cable (Optional) AC ...
...rain. • The LCD monitor or case is damaged. Blue indicates power on a stable and level workspace. 2 Remove the monitor from the packaging and place it . 3 Do not apply pressure to open the Acer eColor Management OSD and access the scenario modes. An authorized technician should... perform servicing of any of your computer and your display. Package contents LCD monitor AC Power cable Audio cable VGA cable HDMI cable (Optional) AC ...

User Manual
Page 3
In this document for a few hours. Keep this case, the screen is displayed for your monitor Please carefully follow these instructions carefully. Cleaning your safety and comfort Safety instructions Read these guidelines when cleaning the monitor: • Always ... the nature of the previous screen may flicker during initial use . • The LCD screen has 99.99% or more effective pixels. Turn off the power switch for future reference. It may include blemishes of 0.01% or less such as a missing pixel or a pixel lit all warnings and instructions marked on...
In this document for a few hours. Keep this case, the screen is displayed for your monitor Please carefully follow these instructions carefully. Cleaning your safety and comfort Safety instructions Read these guidelines when cleaning the monitor: • Always ... the nature of the previous screen may flicker during initial use . • The LCD screen has 99.99% or more effective pixels. Turn off the power switch for future reference. It may include blemishes of 0.01% or less such as a missing pixel or a pixel lit all warnings and instructions marked on...

User Manual
Page 4
... blocked or covered. Never spill liquid of any vibrating environment which will walk on a bed, sofa, rug or other purposes. When you need to disconnect power from the equipment, be sure to prevent battery leakage, do not be operated from the type of any kind into this product through cabinet slots... the volume to protect it under sporting, exercising, or any kind onto or into is easily accessible and located as close to rest on the power cord. This product should be used with this product on an unstable cart, stand or table. These openings must not be placed near you. ...
... blocked or covered. Never spill liquid of any vibrating environment which will walk on a bed, sofa, rug or other purposes. When you need to disconnect power from the equipment, be sure to prevent battery leakage, do not be operated from the type of any kind into this product through cabinet slots... the volume to protect it under sporting, exercising, or any kind onto or into is easily accessible and located as close to rest on the power cord. This product should be used with this product on an unstable cart, stand or table. These openings must not be placed near you. ...

User Manual
Page 5
... branch circuit rating. Warning! If you to service this product. • Use the product only with a three-wire grounded plug. If power strips are used, the load should not exceed 80% of the equipment plugged into the wall outlet does not exceed the fuse rating. •... or water • the product has been dropped or the case has been damaged • the product exhibits a distinct change in a grounded power outlet. Contact your electrician for service • the product does not operate normally after following requirements: detachable type, UL listed/CSA certified, type ...
... branch circuit rating. Warning! If you to service this product. • Use the product only with a three-wire grounded plug. If power strips are used, the load should not exceed 80% of the equipment plugged into the wall outlet does not exceed the fuse rating. •... or water • the product has been dropped or the case has been damaged • the product exhibits a distinct change in a grounded power outlet. Contact your electrician for service • the product does not operate normally after following requirements: detachable type, UL listed/CSA certified, type ...
User Manual
Page 7
... to remove the strain on the recorded image and does not constitute a malfunction. This product has been shipped enabled for power management: • Activate display's Sleep mode within 15 minutes of user inactivity. • Activate computer's Sleep mode within 30 minutes of working conditions,...to achieve maximum comfort. This has no effect on your leg muscles Finding your comfort zone Find your comfort zone by pushing the power button. Tips and information for more comfortable computer use , consult a physician immediately and inform your sitting height to carpal tunnel ...
... to remove the strain on the recorded image and does not constitute a malfunction. This product has been shipped enabled for power management: • Activate display's Sleep mode within 15 minutes of user inactivity. • Activate computer's Sleep mode within 30 minutes of working conditions,...to achieve maximum comfort. This has no effect on your leg muscles Finding your comfort zone Find your comfort zone by pushing the power button. Tips and information for more comfortable computer use , consult a physician immediately and inform your sitting height to carpal tunnel ...

User Manual
Page 11
...your monitor iii Connecting/disconnecting the device iii Accessibility iv Safe listening iv Warnings iv Using electrical power iv Product servicing v Additional safety information vi IT Equipment Recycling Information vi Disposal instructions vi LCD...the power cord 4 Power saving 4 Connecting the docking device (for selected models) 5 Display Data Channel (DDC) 5 Connector pin assignment 5 15-pin color display signal cable 5 19-pin color display signal cable* 6 6 Standard timing table 7 Installation 8 Users controls 9 Front panel controls 9 Acer eColor...
...your monitor iii Connecting/disconnecting the device iii Accessibility iv Safe listening iv Warnings iv Using electrical power iv Product servicing v Additional safety information vi IT Equipment Recycling Information vi Disposal instructions vi LCD...the power cord 4 Power saving 4 Connecting the docking device (for selected models) 5 Display Data Channel (DDC) 5 Connector pin assignment 5 15-pin color display signal cable 5 19-pin color display signal cable* 6 6 Standard timing table 7 Installation 8 Users controls 9 Front panel controls 9 Acer eColor...
User Manual
Page 13
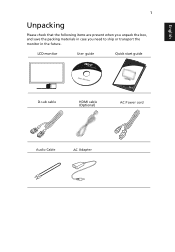
English 1 Unpacking Please check that the following items are present when you unpack the box, and save the packing materials in case you need to ship or transport the monitor in the future. LCD monitor User guide Quick start guide D-sub cable HDMI cable (Optional) AC Power cord Audio Cable AC Adapter
English 1 Unpacking Please check that the following items are present when you unpack the box, and save the packing materials in case you need to ship or transport the monitor in the future. LCD monitor User guide Quick start guide D-sub cable HDMI cable (Optional) AC Power cord Audio Cable AC Adapter

User Manual
Page 15
...activated. Connecting the adapter and AC Power code • Check first to 15 degrees up or 5 degrees down. The recovery time from "power saving" mode back to "power saving" mode by the control signal from the display controller, as indicated by the amber-colored power LED. No useradjustment is required.... • Plug one end of the AC power cord to hold the edges of the monitor...
...activated. Connecting the adapter and AC Power code • Check first to 15 degrees up or 5 degrees down. The recovery time from "power saving" mode back to "power saving" mode by the control signal from the display controller, as indicated by the amber-colored power LED. No useradjustment is required.... • Plug one end of the AC power cord to hold the edges of the monitor...

User Manual
Page 19
c Connect the digital cable (1) Make sure both the monitor and computer are powered-OFF. b Connect the VGA video cable to the adapter. b. b Connect one and of the adapter to the monitor and the other and to diagnose the ...
c Connect the digital cable (1) Make sure both the monitor and computer are powered-OFF. b Connect the VGA video cable to the adapter. b. b Connect one and of the adapter to the monitor and the other and to diagnose the ...
User Manual
Page 20
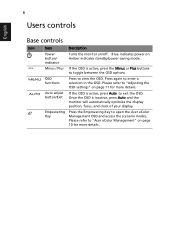
... Management OSD and access the scenario modes. Empowering Key Press the Empowering Key to view the OSD. Please refer to "Acer eColor Management" on page 11 for more details. Once the OSD is active, press the Minus or Plus buttons to "Adjusting the OSD ...Turns the monitor on . Please refer to toggle between the OSD options. Blue indicates power on /off. Press again to exit the OSD. Amber indicates standby/power saving mode. / Minus / Plus If the OSD is inactive, press Auto and the monitor will automatically optimize the display position, focus, and clock of your...
... Management OSD and access the scenario modes. Empowering Key Press the Empowering Key to view the OSD. Please refer to "Acer eColor Management" on page 11 for more details. Once the OSD is active, press the Minus or Plus buttons to "Adjusting the OSD ...Turns the monitor on . Please refer to toggle between the OSD options. Blue indicates power on /off. Press again to exit the OSD. Amber indicates standby/power saving mode. / Minus / Plus If the OSD is inactive, press Auto and the monitor will automatically optimize the display position, focus, and clock of your...
User Manual
Page 26
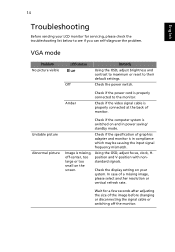
...focus, clock, Hposition and V-position with nonstandard signals. Check the display setting on your LCD monitor for a few seconds after adjusting the size of monitor. In case of graphics adapter and monitor is in power saving/ standby mode. 14 English Troubleshooting Before sending your system. VGA... the troubleshooting list below to see if you can self-diagnose the problem. Amber Check if the power cord is missing, off the monitor. Check the power switch. Image is properly connected to their default settings. Unstable picture Abnormal picture Check if the computer...
...focus, clock, Hposition and V-position with nonstandard signals. Check the display setting on your LCD monitor for a few seconds after adjusting the size of monitor. In case of graphics adapter and monitor is in power saving/ standby mode. 14 English Troubleshooting Before sending your system. VGA... the troubleshooting list below to see if you can self-diagnose the problem. Amber Check if the power cord is missing, off the monitor. Check the power switch. Image is properly connected to their default settings. Unstable picture Abnormal picture Check if the computer...
User Manual
Page 27
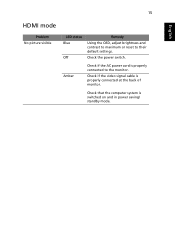
Check that the computer system is properly connected at the back of monitor. 15 English HDMI mode Problem No picture visible LED status Blue Off Remedy Using the OSD, adjust brightness and contrast to maximum or reset to the monitor. Check if the video signal cable is switched on and in power saving/ standby mode. Amber Check if the AC power cord is properly connected to their default settings. Check the power switch.
Check that the computer system is properly connected at the back of monitor. 15 English HDMI mode Problem No picture visible LED status Blue Off Remedy Using the OSD, adjust brightness and contrast to maximum or reset to the monitor. Check if the video signal cable is switched on and in power saving/ standby mode. Amber Check if the AC power cord is properly connected to their default settings. Check the power switch.

Service Manual
Page 3
... Service notes z When replacing parts or circuit boards, clamp the lead wires around terminals before cleaning it gets wet, unplug the power cable immediately and consult your monitor only in the parts list, may create shock, fire, or other hazards. 3. z Keep... repaired by a service technician. Have it contains no user-serviceable parts. z Always unplug the monitor before soldering. Acer Important Safety Notice Acer -LCD-S243HL 1. However, improper used or installation may cause electric shock to reduce interference. Before replacing any of substitute replacement parts...
... Service notes z When replacing parts or circuit boards, clamp the lead wires around terminals before cleaning it gets wet, unplug the power cable immediately and consult your monitor only in the parts list, may create shock, fire, or other hazards. 3. z Keep... repaired by a service technician. Have it contains no user-serviceable parts. z Always unplug the monitor before soldering. Acer Important Safety Notice Acer -LCD-S243HL 1. However, improper used or installation may cause electric shock to reduce interference. Before replacing any of substitute replacement parts...

Service Manual
Page 4
... Color management and ACM function. 1.1 Main Features Features Maximum resolution Back light system Pixel pitch Display area Contrast ratio Brightness Response time (Tr+Tf) Viewing angle Input interface Audio system Plug & Play Power supply For Non-EMEA OSD language For EMEA Specifications 1920(x3) x 1080 @ 60Hz 2 ... Finnish it featured with LVDS interface, VGA/Dual-HDMI input, LED panel and over driver function. General: 01 Product Specification Acer -LCD-S243HL Acer S243HL is designed with DC 19V adapter power supplies and audio input. The image can be adjusted through OSD control.
... Color management and ACM function. 1.1 Main Features Features Maximum resolution Back light system Pixel pitch Display area Contrast ratio Brightness Response time (Tr+Tf) Viewing angle Input interface Audio system Plug & Play Power supply For Non-EMEA OSD language For EMEA Specifications 1920(x3) x 1080 @ 60Hz 2 ... Finnish it featured with LVDS interface, VGA/Dual-HDMI input, LED panel and over driver function. General: 01 Product Specification Acer -LCD-S243HL Acer S243HL is designed with DC 19V adapter power supplies and audio input. The image can be adjusted through OSD control.

Service Manual
Page 5
...:1.Altitude Ramp rate: Operation Specifications The unit should suffer no visible cosmetic damage and should operate with no degradation in display quality during exposure to the operating conditions and after exposure to the non-operating conditions, in any sequence. 2.1 Environmental...12hrs)->+65°C/ 10% R.H.(12 Hrs)->+25°C/ 50% R.H.(2hr) Max. Acer 1.2 Accessories Items Description Option VGA cable 1.8m µ Audio cable 1.8m µ User's manual Multi µ Warranty card Multi µ Acer -LCD-S243HL Quick-start Guide Multi µ 2. High Temperature +40°C / 20% ...
...:1.Altitude Ramp rate: Operation Specifications The unit should suffer no visible cosmetic damage and should operate with no degradation in display quality during exposure to the operating conditions and after exposure to the non-operating conditions, in any sequence. 2.1 Environmental...12hrs)->+65°C/ 10% R.H.(12 Hrs)->+25°C/ 50% R.H.(2hr) Max. Acer 1.2 Accessories Items Description Option VGA cable 1.8m µ Audio cable 1.8m µ User's manual Multi µ Warranty card Multi µ Acer -LCD-S243HL Quick-start Guide Multi µ 2. High Temperature +40°C / 20% ...

Service Manual
Page 6
Operating with fixed driving current Note Except panel Note1 Acer Acer -LCD-S243HL 2.2 Safety, EMC, Ergonomics and Compatibility Requirements Items Description Safety EMC Ergonomics Compatibility Power Management GS ● FCC-B ● Ergo ● CB ● CE/EMC ● TCO'03 ● Windows 95/98/Me ● Energy Star 5.0 ● TUV/GS ...
Operating with fixed driving current Note Except panel Note1 Acer Acer -LCD-S243HL 2.2 Safety, EMC, Ergonomics and Compatibility Requirements Items Description Safety EMC Ergonomics Compatibility Power Management GS ● FCC-B ● Ergo ● CB ● CE/EMC ● TCO'03 ● Windows 95/98/Me ● Energy Star 5.0 ● TUV/GS ...

Service Manual
Page 7
Acer 3. Electrical and Optical Characteristics and Performance 3.1 Main Power Supply 3.1.1 Adapter characteristics Items AC Input Voltage range AC Input Voltage rating AC input frequency range AC input frequency rating AC Input Current Condition Universal ...
Acer 3. Electrical and Optical Characteristics and Performance 3.1 Main Power Supply 3.1.1 Adapter characteristics Items AC Input Voltage range AC Input Voltage rating AC input frequency range AC input frequency rating AC Input Current Condition Universal ...

Service Manual
Page 8
Acer DC Output Voltage DC output loading capability Rise Time Dynamic load change Overshoot Efficiency +5V output Audio 5V output +5V output Audio 5V output
Acer DC Output Voltage DC output loading capability Rise Time Dynamic load change Overshoot Efficiency +5V output Audio 5V output +5V output Audio 5V output

Service Manual
Page 10
luminanceof nine points (backlight) ‡70% Max.luminanceof nine points (backlight) 4. Acer 3.5 Brightness uniformity The test standard conditions refer to Sec 3.3. Input / Output Signal Specifications 4.1 Audio in 4.1.1 Input impedance u Ú 10K ohm 4.1.2 Frequency response range u200Hz ~ 20kHz 4.... shield 9 TMDS Data010 TMDS Clock+ Pin Symbol 11 Cable detect 12 TMDS Clock13 CEC 14 N/C 15 SCL 16 SDA 17 DDC/CEC Ground 18 +5V Power 19 Hot Plug Detect Acer -LCD-S243HL Min.
luminanceof nine points (backlight) ‡70% Max.luminanceof nine points (backlight) 4. Acer 3.5 Brightness uniformity The test standard conditions refer to Sec 3.3. Input / Output Signal Specifications 4.1 Audio in 4.1.1 Input impedance u Ú 10K ohm 4.1.2 Frequency response range u200Hz ~ 20kHz 4.... shield 9 TMDS Data010 TMDS Clock+ Pin Symbol 11 Cable detect 12 TMDS Clock13 CEC 14 N/C 15 SCL 16 SDA 17 DDC/CEC Ground 18 +5V Power 19 Hot Plug Detect Acer -LCD-S243HL Min.
Service Manual
Page 14
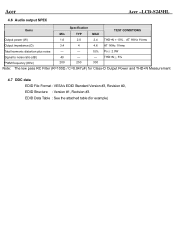
... THD+N Measurement 4.7 DDC data EDID File Format : VESA's EDID Standard Version #3, Revision #0, EDID Structure : Version #1, Revision #3. Acer Acer -LCD-S243HL 4.6 Audio output SPEC Items Specification Min TYP MAX TEST CONDITIONS Output power (W) 1.6 2.0 2.4 THD+N = 10%pAT 1KHz 1Vrms Output impedance (Ω) 3.4 4 4.6 AT 1KHz 1Vrms Total harmonic distortion plus noise --- --- 10% PoÙ 2.0W Signal to...
... THD+N Measurement 4.7 DDC data EDID File Format : VESA's EDID Standard Version #3, Revision #0, EDID Structure : Version #1, Revision #3. Acer Acer -LCD-S243HL 4.6 Audio output SPEC Items Specification Min TYP MAX TEST CONDITIONS Output power (W) 1.6 2.0 2.4 THD+N = 10%pAT 1KHz 1Vrms Output impedance (Ω) 3.4 4 4.6 AT 1KHz 1Vrms Total harmonic distortion plus noise --- --- 10% PoÙ 2.0W Signal to...


