

TravelMate 6410 - 6460 User's Guide EN
Page 8
...location of your computer. Your guides To help you use Adobe Reader, access the Help and Support menu. Follow these steps to use your Acer notebook, we have designed a set of guides: First off To turn on the screen to thank you get started with setting up your new... on your notebook. viii First things first We would like to complete the installation. For instructions on such subjects as system utilities, data recovery, expansion options and troubleshooting. poster helps you for making an Acer notebook your choice for your computer, clicking on AcerSystem User's Guide.
...location of your computer. Your guides To help you use Adobe Reader, access the Help and Support menu. Follow these steps to use your Acer notebook, we have designed a set of guides: First off To turn on the screen to thank you get started with setting up your new... on your notebook. viii First things first We would like to complete the installation. For instructions on such subjects as system utilities, data recovery, expansion options and troubleshooting. poster helps you for making an Acer notebook your choice for your computer, clicking on AcerSystem User's Guide.

TravelMate 6410 - 6460 User's Guide EN
Page 12
... your computer 49 Using a computer security lock 50 Acer GraviSense 50 Using Acer GraviSense 50 Protecting the HDD 51 Anti-Theft 51 Acer Trusted Platform Module (TPM) 53 User roles 53 Initialization and Administration of the Acer Security Platform54 User Authentication 54 Migrating Keys to other ...73 Boot sequence 74 Password on boot 74 Setting up passwords when using fingerprint recognition74 Enabling or disabling Acer TPM security 75 Enabling disk-to-disk recovery 76 Frequently asked questions 77 Requesting service 80 International Travelers Warranty (ITW) 80
... your computer 49 Using a computer security lock 50 Acer GraviSense 50 Using Acer GraviSense 50 Protecting the HDD 51 Anti-Theft 51 Acer Trusted Platform Module (TPM) 53 User roles 53 Initialization and Administration of the Acer Security Platform54 User Authentication 54 Migrating Keys to other ...73 Boot sequence 74 Password on boot 74 Setting up passwords when using fingerprint recognition74 Enabling or disabling Acer TPM security 75 Enabling disk-to-disk recovery 76 Frequently asked questions 77 Requesting service 80 International Travelers Warranty (ITW) 80

TravelMate 6410 - 6460 User's Guide EN
Page 13
Before you call 80 Taking your notebook PC with you 81 Disconnecting from the desktop 81 Disconnecting from Acer ezDock II/II+ 81 Moving around 81 Preparing the computer 81 What to bring to meetings 82 Taking the computer home 82 Preparing the computer...PC Card slot 89 ExpressCard 90 Installing memory 91 BIOS utility 91 Boot sequence 91 Enable disk-to-disk recovery 92 Password 92 Using software 92 Playing DVD movies 92 Power management 93 Acer eRecovery Management 93 Create backup 94 Restore from backup 94 Create factory default image CD 95 Re-install...
Before you call 80 Taking your notebook PC with you 81 Disconnecting from the desktop 81 Disconnecting from Acer ezDock II/II+ 81 Moving around 81 Preparing the computer 81 What to bring to meetings 82 Taking the computer home 82 Preparing the computer...PC Card slot 89 ExpressCard 90 Installing memory 91 BIOS utility 91 Boot sequence 91 Enable disk-to-disk recovery 92 Password 92 Using software 92 Playing DVD movies 92 Power management 93 Acer eRecovery Management 93 Create backup 94 Restore from backup 94 Create factory default image CD 95 Re-install...

TravelMate 6410 - 6460 User's Guide EN
Page 27
...DVD. • Image/data recovery tools: • Recover from a hidden partition (factory defaults). • Recover from the HDD (most recent user-defined recovery point). • Recover from CD/DVD. Acer eRecovery Management provides you with the need for recovery disks provided by the manufacturer.... By default, user-created backups are stored on your system's hard drive. The Acer eRecovery Management utility occupies...
...DVD. • Image/data recovery tools: • Recover from a hidden partition (factory defaults). • Recover from the HDD (most recent user-defined recovery point). • Recover from CD/DVD. Acer eRecovery Management provides you with the need for recovery disks provided by the manufacturer.... By default, user-created backups are stored on your system's hard drive. The Acer eRecovery Management utility occupies...

TravelMate 6410 - 6460 User's Guide EN
Page 28
Note: If your Acer ezDock II/II+. Empowering Technology 14 For more information, please refer to CD or DVD. To ensure the best results when recovering your system using a CD or Acer eRecovery Management, detach all peripherals (except the external Acer ODD, if your computer has one), including your computer did not come with a Recovery CD or System CD, please use Acer eRecovery Management's "System backup to optical disk" feature to burn a backup image to "Acer eRecovery Management" on page 93 in the AcerSystem User's Guide.
Note: If your Acer ezDock II/II+. Empowering Technology 14 For more information, please refer to CD or DVD. To ensure the best results when recovering your system using a CD or Acer eRecovery Management, detach all peripherals (except the external Acer ODD, if your computer has one), including your computer did not come with a Recovery CD or System CD, please use Acer eRecovery Management's "System backup to optical disk" feature to burn a backup image to "Acer eRecovery Management" on page 93 in the AcerSystem User's Guide.
TravelMate 6410 - 6460 User's Guide EN
Page 68
... proceeding with migration or contact your user keys and certificates. Old keys and certificates will merge your system administrator for data recovery procedure. • Migration to configure Security Platform Features for the user-specific secret. different Security Platform Users can be lost... then the migration process will be active. You will not lose any encrypted data. The migration operation is performed using the Acer Security Platform Migration Wizard. • Migration to a computer without existing user keys and certificates: The migration process will install ...
... proceeding with migration or contact your user keys and certificates. Old keys and certificates will merge your system administrator for data recovery procedure. • Migration to configure Security Platform Features for the user-specific secret. different Security Platform Users can be lost... then the migration process will be active. You will not lose any encrypted data. The migration operation is performed using the Acer Security Platform Migration Wizard. • Migration to a computer without existing user keys and certificates: The migration process will install ...

TravelMate 6410 - 6460 User's Guide EN
Page 88
English 76 Note: During boot up additional time is required to Enabled. Enabling disk-to-disk recovery To enable disk-to-disk recovery (hard disk recovery), activate the BIOS utility, then select Main from the categories listed at the bottom of the screen. Find D2D Recovery at the top of the screen and use the and keys to set this value to initialize the TPM layer, as a result you may find that boot times become slightly longer with TPM enabled.
English 76 Note: During boot up additional time is required to Enabled. Enabling disk-to-disk recovery To enable disk-to-disk recovery (hard disk recovery), activate the BIOS utility, then select Main from the categories listed at the bottom of the screen. Find D2D Recovery at the top of the screen and use the and keys to set this value to initialize the TPM layer, as a result you may find that boot times become slightly longer with TPM enabled.
TravelMate 6410 - 6460 User's Guide EN
Page 91
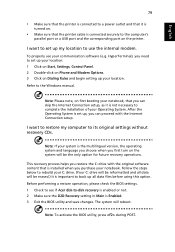
... drive. (Your C: drive will be the only option for future recovery operations. Before performing a restore operation, please check the BIOS settings. 1 Check to see if Acer disk-to-disk recovery is enabled or not. 2 Make sure the D2D Recovery setting in Main is not necessary to the computer's parallel port or ...you can skip the Internet Connection setup, as it is turned on Dialing Rules and begin setting up , you need to its original settings without recovery CDs. The system will be erased.) It is important to the Windows manual. I want to set up your location: 1 Click on Start,...
... drive. (Your C: drive will be the only option for future recovery operations. Before performing a restore operation, please check the BIOS settings. 1 Check to see if Acer disk-to-disk recovery is enabled or not. 2 Make sure the D2D Recovery setting in Main is not necessary to the computer's parallel port or ...you can skip the Internet Connection setup, as it is turned on Dialing Rules and begin setting up , you need to its original settings without recovery CDs. The system will be erased.) It is important to the Windows manual. I want to set up your location: 1 Click on Start,...

TravelMate 6410 - 6460 User's Guide EN
Page 92
... problems efficiently. This passport contains all you need to provide the following information available when you call Acer for online service, and please be at the same time to enter the recovery process. 3 Refer to the onscreen instructions to give you a helping hand. A list of available... messages or beeps reported by an International Travelers Warranty (ITW) that gives you call . English 80 To start the recovery process: 1 Restart the system. 2 While the Acer logo is showing, press + at your computer when you call Please have your ITW passport on hand, especially when ...
... problems efficiently. This passport contains all you need to provide the following information available when you call Acer for online service, and please be at the same time to enter the recovery process. 3 Refer to the onscreen instructions to give you a helping hand. A list of available... messages or beeps reported by an International Travelers Warranty (ITW) that gives you call . English 80 To start the recovery process: 1 Restart the system. 2 While the Acer logo is showing, press + at your computer when you call Please have your ITW passport on hand, especially when ...
TravelMate 6410 - 6460 User's Guide EN
Page 104
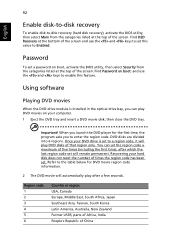
... New Zealand Former USSR, parts of Africa, India People's Republic of that region only. English 92 Enable disk-to-disk recovery To enable disk-to-disk recovery (hard disk recovery), activate the BIOS utility, then select Main from the categories listed at the top of the screen. Using software Playing DVD...the last region code set to enable this value to enter the region code. Important! DVD disks are divided into 6 regions. Find D2D Recovery at the top of the screen. Recovering your DVD drive is installed in the optical drive bay, you to Enabled. When you launch the...
... New Zealand Former USSR, parts of Africa, India People's Republic of that region only. English 92 Enable disk-to-disk recovery To enable disk-to-disk recovery (hard disk recovery), activate the BIOS utility, then select Main from the categories listed at the top of the screen. Using software Playing DVD...the last region code set to enable this value to enter the region code. Important! DVD disks are divided into 6 regions. Find D2D Recovery at the top of the screen. Recovering your DVD drive is installed in the optical drive bay, you to Enabled. When you launch the...
TravelMate 6410 - 6460 User's Guide EN
Page 106
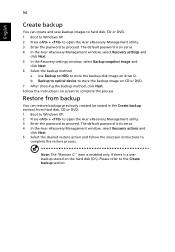
... to proceed. Note: The "Restore C:" item is enabled only if there is six zeros. 4 In the Acer eRecovery Management window, select Recovery settings and click Next. 5 In the Recovery settings window, select Backup snapshot image and click Next. 6 Select the backup method. a Use Backup to HDD...to optical device to store the backup image on the hard disk (D:\). The default password is six zeros. 4 In the Acer eRecovery Management window, select Recovery actions and click Next. 5 Select the desired restore action and follow the onscreen instructions to the Create backup section. English...
... to proceed. Note: The "Restore C:" item is enabled only if there is six zeros. 4 In the Acer eRecovery Management window, select Recovery settings and click Next. 5 In the Recovery settings window, select Backup snapshot image and click Next. 6 Select the backup method. a Use Backup to HDD...to optical device to store the backup image on the hard disk (D:\). The default password is six zeros. 4 In the Acer eRecovery Management window, select Recovery actions and click Next. 5 Select the desired restore action and follow the onscreen instructions to the Create backup section. English...

TravelMate 6410 - 6460 User's Guide EN
Page 107
... proceed. Application CD - Factory default image or 2. The default password is six zeros. 4 In the Acer eRecovery Management window, select Recovery settings and click Next. 5 In the Recovery settings window, select Burn image to disk and click Next. 6 In the Burn image to re-install.... The default password is six zeros. 4 In the Acer eRecovery Management window, select Recovery actions and click Next. 5 In the Recovery settings window, select Reinstall applications/drivers and click Next. 6 Select the desired driver/application and follow the...
... proceed. Application CD - Factory default image or 2. The default password is six zeros. 4 In the Acer eRecovery Management window, select Recovery settings and click Next. 5 In the Recovery settings window, select Burn image to disk and click Next. 6 In the Burn image to re-install.... The default password is six zeros. 4 In the Acer eRecovery Management window, select Recovery actions and click Next. 5 In the Recovery settings window, select Reinstall applications/drivers and click Next. 6 Select the desired driver/application and follow the...
TravelMate 6410 - 6460 User's Guide EN
Page 108
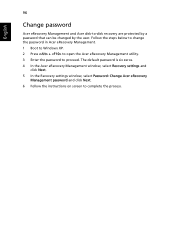
... that can be changed by the user. English 96 Change password Acer eRecovery Management and Acer disk-to proceed. The default password is six zeros. 4 In the Acer eRecovery Management window, select Recovery settings and click Next. 5 In the Recovery settings window, select Password: Change Acer eRecovery Management password and click Next. 6 Follow the instructions on...
... that can be changed by the user. English 96 Change password Acer eRecovery Management and Acer disk-to proceed. The default password is six zeros. 4 In the Acer eRecovery Management window, select Recovery settings and click Next. 5 In the Recovery settings window, select Password: Change Acer eRecovery Management password and click Next. 6 Follow the instructions on...
TravelMate 6410/6460 Service Guide
Page 39
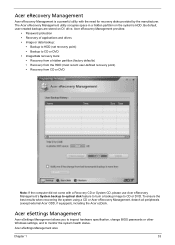
.... To ensure the best results when recovering the system using a CD or Acer eRecovery Management, detach all peripherals (except external Acer ODD, if equipped), including the Acer ezDock. Acer eRecovery Management Acer eRecovery Management is a powerful utility with a Recovery CD or System CD, please use Acer eRecovery Management's System backup to optical disk feature to burn a backup...
.... To ensure the best results when recovering the system using a CD or Acer eRecovery Management, detach all peripherals (except external Acer ODD, if equipped), including the Acer ezDock. Acer eRecovery Management Acer eRecovery Management is a powerful utility with a Recovery CD or System CD, please use Acer eRecovery Management's System backup to optical disk feature to burn a backup...
TravelMate 6410/6460 Service Guide
Page 46
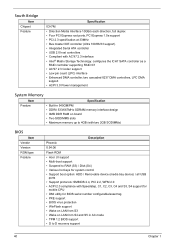
... slots • Maximum memory up to 4GB (with two 2GB SODIMMs) BIOS Item Vendor Version ROM type Feature Description Phoenix 0.94.06 Flash ROM • Acer UI support • Multi-boot support • Suspend to RAM (S3) / Disk (S4) • Various hot keys for system control • Support boot option: HDD...; WinFlash support • Wake on LAN from S3 • Wake on LAN from S4 and S5 in AC mode • TPM 1.2 BIOS support • D to D recovery support 40 Chapter 1
... slots • Maximum memory up to 4GB (with two 2GB SODIMMs) BIOS Item Vendor Version ROM type Feature Description Phoenix 0.94.06 Flash ROM • Acer UI support • Multi-boot support • Suspend to RAM (S3) / Disk (S4) • Various hot keys for system control • Support boot option: HDD...; WinFlash support • Wake on LAN from S3 • Wake on LAN from S4 and S5 in AC mode • TPM 1.2 BIOS support • D to D recovery support 40 Chapter 1
TravelMate 6410/6460 Service Guide
Page 60
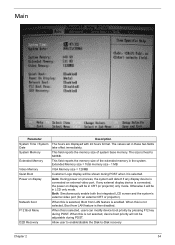
If any display device is connected on display Network boot F12 Boot Menu D2D Recovery Description The hours are displayed with 24 hours format. When this is not selected, Boot from LAN feature is then disabled. This field reports the ... it will be adjustable during POST. The size is connected, the power on display will detect if any external display device is fixed to -Disk recovery Chapter 2 54 The values set in CRT (or projector) only mode. Allow user to enable/disable the Disk-to 640KB. Extended Memory size = Total memory...
If any display device is connected on display Network boot F12 Boot Menu D2D Recovery Description The hours are displayed with 24 hours format. When this is not selected, Boot from LAN feature is then disabled. This field reports the ... it will be adjustable during POST. The size is connected, the power on display will detect if any external display device is fixed to -Disk recovery Chapter 2 54 The values set in CRT (or projector) only mode. Allow user to enable/disable the Disk-to 640KB. Extended Memory size = Total memory...


