
User Manual
Page 4
... product near water. • Do not place this product, make sure that could be operated from the type of power available, consult your ears have adjusted. • Limit the amount of time listening to music at high volume. • Avoid turning up the volume to block out noisy surroundings. • Turn...
... product near water. • Do not place this product, make sure that could be operated from the type of power available, consult your ears have adjusted. • Limit the amount of time listening to music at high volume. • Avoid turning up the volume to block out noisy surroundings. • Turn...

User Manual
Page 6
...as one of the company's top priorities in damage and will often require extensive work by the operating instructions, since improper adjustment of our other products. Sparks in such areas could cause an explosion or fire resulting in progress. or where blasting operations...Visit www. We at service stations. chemical plants; IT Equipment Recycling Information Acer is strongly committed to reduce the environmental impact of used equipment, as grain, dust or metal powders. vi Note: Adjust only those controls that are covered by a qualified technician to restore the...
...as one of the company's top priorities in damage and will often require extensive work by the operating instructions, since improper adjustment of our other products. Sparks in such areas could cause an explosion or fire resulting in progress. or where blasting operations...Visit www. We at service stations. chemical plants; IT Equipment Recycling Information Acer is strongly committed to reduce the environmental impact of used equipment, as grain, dust or metal powders. vi Note: Adjust only those controls that are covered by a qualified technician to restore the...

User Manual
Page 8
... pushing the power button. Users are also at risk of physical injury after prolonged use . Observe the following tips: • refrain from Sleep mode by adjusting the viewing angle of the monitor, using a footrest, or raising your sitting height to achieve maximum comfort. The following symptoms may lead to carpal tunnel...
... pushing the power button. Users are also at risk of physical injury after prolonged use . Observe the following tips: • refrain from Sleep mode by adjusting the viewing angle of the monitor, using a footrest, or raising your sitting height to achieve maximum comfort. The following symptoms may lead to carpal tunnel...

User Manual
Page 9
...some stretching exercises. • Breathe fresh air as often as a piece of cardboard extended from the display's top front edge • Avoid adjusting your display to an awkward viewing angle. • Avoid looking away from the monitor and focusing on how to make your eyes from drying out.... Eyes • Rest your eyes frequently. • Give your eyes regular breaks by looking at the middle of the display. • Adjust the display brightness and/or contrast to a comfortable level for extended periods of your vision Long viewing hours, wearing incorrect glasses or contact lenses,...
...some stretching exercises. • Breathe fresh air as often as a piece of cardboard extended from the display's top front edge • Avoid adjusting your display to an awkward viewing angle. • Avoid looking away from the monitor and focusing on how to make your eyes from drying out.... Eyes • Rest your eyes frequently. • Give your eyes regular breaks by looking at the middle of the display. • Adjust the display brightness and/or contrast to a comfortable level for extended periods of your vision Long viewing hours, wearing incorrect glasses or contact lenses,...

User Manual
Page 12
... the power cord Power saving Display Data Channel (DDC) Connector pin assignment Standard timing table Installation User controls How to adjust a setting Acer eColor Management User Troubleshooting VGA mode DVI mode 1 iii iii iii iii iii iv iv iv iv v vi vi vii vii viii xi 1 2 2 5 5 5 6 8 9 10 11 ...
... the power cord Power saving Display Data Channel (DDC) Connector pin assignment Standard timing table Installation User controls How to adjust a setting Acer eColor Management User Troubleshooting VGA mode DVI mode 1 iii iii iii iii iii iv iv iv iv v vi vi vii vii viii xi 1 2 2 5 5 5 6 8 9 10 11 ...

User Manual
Page 14
English 2 Attaching the Base Note: Remove the monitor and monitor base from its packaging. Carefully place the monitor face-down . 25 Screen position adjustment To optimize the viewing position, you can be adjusted to 25 degrees up or 5 degrees down on a stable surface -- use a cloth to avoid scratching the screen. ① ④② ③ Remove: Reverse the steps to hold the edges of the monitor as shown below. The monitor can adjust the monitor tilt by using both of your hands to remove the base.
English 2 Attaching the Base Note: Remove the monitor and monitor base from its packaging. Carefully place the monitor face-down . 25 Screen position adjustment To optimize the viewing position, you can be adjusted to 25 degrees up or 5 degrees down on a stable surface -- use a cloth to avoid scratching the screen. ① ④② ③ Remove: Reverse the steps to hold the edges of the monitor as shown below. The monitor can adjust the monitor tilt by using both of your hands to remove the base.

User Manual
Page 15
...: Use a cord set should have the appropriate safety approvals for the country in either 100/120 V AC or 220/240 V AC voltage area. No user-adjustment is required. • Plug one end of H05VV-F cord and plug rated 10 A/250 V. Power saving The monitor will be kept until a control signal has...
...: Use a cord set should have the appropriate safety approvals for the country in either 100/120 V AC or 220/240 V AC voltage area. No user-adjustment is required. • Plug one end of H05VV-F cord and plug rated 10 A/250 V. Power saving The monitor will be kept until a control signal has...

User Manual
Page 20
...Empowering Key to open the Acer eColor Management OSD and access the scenario modes. MENU OSD functions Press this button to appear. INPUT Input Key Use Input key to select from different video sources that may take 1 or 2 seconds for the image to activate the Auto Adjustment function. VGA or DVI ... and Focus. The shortcut menu lets you will see the following messages on right top side of screen to activate the OSD menu. The Auto Adjustment function is used to indicate the power is selected ,but the VGA and DVI cables are not connected, a floating dialog box indicates: "No ...
...Empowering Key to open the Acer eColor Management OSD and access the scenario modes. MENU OSD functions Press this button to appear. INPUT Input Key Use Input key to select from different video sources that may take 1 or 2 seconds for the image to activate the Auto Adjustment function. VGA or DVI ... and Focus. The shortcut menu lets you will see the following messages on right top side of screen to activate the OSD menu. The Auto Adjustment function is used to indicate the power is selected ,but the VGA and DVI cables are not connected, a floating dialog box indicates: "No ...

User Manual
Page 21
.... Pictures and photographs appear in unsuitably-lit environments. Presents great visuals, even in vibrant colors with sharp detail. Acer eColor Management Operation instructions Step 1: Press " " Key to open the Acer eColor Management OSD and access the scenario modes Step 2: Press " " or " " to select the mode ...mode capability N/A Grahpic mode Enhances colors and emphasize fine detail. Settings can be fine-tuned to suit any situation N/A ECO mode Adjusts the settings to confirm the mode and exit the eColor menu. EN-14 Features and Benefits Main Menu icon Sub Menu icon Sub...
.... Pictures and photographs appear in unsuitably-lit environments. Presents great visuals, even in vibrant colors with sharp detail. Acer eColor Management Operation instructions Step 1: Press " " Key to open the Acer eColor Management OSD and access the scenario modes Step 2: Press " " or " " to select the mode ...mode capability N/A Grahpic mode Enhances colors and emphasize fine detail. Settings can be fine-tuned to suit any situation N/A ECO mode Adjusts the settings to confirm the mode and exit the eColor menu. EN-14 Features and Benefits Main Menu icon Sub Menu icon Sub...

User Manual
Page 22
...the picture element you wish to adjust. 3 Use the / keys to adjust the sliding scales. 4 The Picture menu can be used to adjust the current Brightness, Contrast, Colour Temp, Auto Config and other image-related qualities. The OSD can use the OSD to adjust the picture quality, OSD position ...general reference only. For advanced settings, please refer to following content is for adjusting the settings of your LCD Monitor. Press the MENU key to open the OSD. Adjusting the OSD settings Note: The following page: Adjusting the picture quality 1 Press the MENU key to bring up the OSD. 2...
...the picture element you wish to adjust. 3 Use the / keys to adjust the sliding scales. 4 The Picture menu can be used to adjust the current Brightness, Contrast, Colour Temp, Auto Config and other image-related qualities. The OSD can use the OSD to adjust the picture quality, OSD position ...general reference only. For advanced settings, please refer to following content is for adjusting the settings of your LCD Monitor. Press the MENU key to open the OSD. Adjusting the OSD settings Note: The following page: Adjusting the picture quality 1 Press the MENU key to bring up the OSD. 2...
User Manual
Page 23
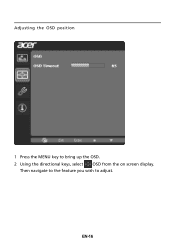
EN-16 Then navigate to the feature you wish to bring up the OSD. 2 Using the directional keys, select OSD from the on screen display. Adjusting the OSD position 1 Press the MENU key to adjust.
EN-16 Then navigate to the feature you wish to bring up the OSD. 2 Using the directional keys, select OSD from the on screen display. Adjusting the OSD position 1 Press the MENU key to adjust.

User Manual
Page 24
Adjusting the setting 1 Press the MENU key to adjust the screen Menu Language and other important settings. EN-17 Then navigate to the feature you wish to adjust. 3 The Setting menu can be used to bring up the OSD. 2 Using the / keys, select Setting from the OSD.
Adjusting the setting 1 Press the MENU key to adjust the screen Menu Language and other important settings. EN-17 Then navigate to the feature you wish to adjust. 3 The Setting menu can be used to bring up the OSD. 2 Using the / keys, select Setting from the OSD.

User Manual
Page 26
...video signal cable is properly connected at the back of a missing image, please select another resolution or vertical refresh rate. Using the OSD, adjust focus, clock, Hposition and V-position with nonstandard signals. In case of monitor. Unstable picture Abnormal picture Check if the computer system is ... compliance which may be causing the input signal frequency mismatch. Check the display setting on your LCD monitor for a few seconds after adjusting the size of graphics adapter and monitor is in power saving/ standby mode. VGA mode Problem No picture visible LED status Blue Off...
...video signal cable is properly connected at the back of a missing image, please select another resolution or vertical refresh rate. Using the OSD, adjust focus, clock, Hposition and V-position with nonstandard signals. In case of monitor. Unstable picture Abnormal picture Check if the computer system is ... compliance which may be causing the input signal frequency mismatch. Check the display setting on your LCD monitor for a few seconds after adjusting the size of graphics adapter and monitor is in power saving/ standby mode. VGA mode Problem No picture visible LED status Blue Off...

User Manual
Page 27
Check if the video signal cable is switched on and in power saving/ standby mode. Amber Check if the AC power cord is properly connected to their default settings. Check that the computer system is properly connected at the back of monitor. English 16 DVI mode Problem No picture visible LED status Blue Off Remedy Using the OSD, adjust brightness and contrast to maximum or reset to the monitor. Check the power switch.
Check if the video signal cable is switched on and in power saving/ standby mode. Amber Check if the AC power cord is properly connected to their default settings. Check that the computer system is properly connected at the back of monitor. English 16 DVI mode Problem No picture visible LED status Blue Off Remedy Using the OSD, adjust brightness and contrast to maximum or reset to the monitor. Check the power switch.


