User Manual
Page 2
... affixed to the information in any form or by any person of Acer Incorporated. Other companies' product names or trademarks are used herein for a particular purpose. Acer Incorporated. Acer LCD Monitor User Guide Model number Serial number Date of purchase Place of this ...merchantability or fitness for identification purposes only and belong to the contents hereof and specifically disclaims the implied warranties of Acer Incorporated. Acer LCD Monitor User Guide Original Issue: 10/2017 Changes may be incorporated in the space provided below. This company makes no...
... affixed to the information in any form or by any person of Acer Incorporated. Other companies' product names or trademarks are used herein for a particular purpose. Acer Incorporated. Acer LCD Monitor User Guide Model number Serial number Date of purchase Place of this ...merchantability or fitness for identification purposes only and belong to the contents hereof and specifically disclaims the implied warranties of Acer Incorporated. Acer LCD Monitor User Guide Original Issue: 10/2017 Changes may be incorporated in the space provided below. This company makes no...
User Manual
Page 3
Special notes on the desktop pattern you use . Cleaning your safety and comfort Safety instructions Read these guidelines when cleaning the monitor: • Always unplug the monitor before cleaning. • Use a soft cloth to wipe the screen and cabinet front and sides. Keep this case, the screen is recovered...on again to make sure the flicker disappears. • You may find slightly uneven brightness on the screen depending on LCD monitors The following are normal with the LCD monitor and do not indicate a problem. • Due to the nature of the LCD screen, an afterimage of 0.01% or...
Special notes on the desktop pattern you use . Cleaning your safety and comfort Safety instructions Read these guidelines when cleaning the monitor: • Always unplug the monitor before cleaning. • Use a soft cloth to wipe the screen and cabinet front and sides. Keep this case, the screen is recovered...on again to make sure the flicker disappears. • You may find slightly uneven brightness on the screen depending on LCD monitors The following are normal with the LCD monitor and do not indicate a problem. • Due to the nature of the LCD screen, an afterimage of 0.01% or...
User Manual
Page 4
... anything to prevent battery leakage, do not place the product on a vibrating surface. • Never use this product near water. • Do not place this monitor, do not be used for ventilation to ensure reliable operation of the product and to unplug the power cord from the type of power indicated...
... anything to prevent battery leakage, do not place the product on a vibrating surface. • Never use this product near water. • Do not place this monitor, do not be used for ventilation to ensure reliable operation of the product and to unplug the power cord from the type of power indicated...

User Manual
Page 7
...you have these symptoms, or any keyboard key. Finding your comfort zone Find your comfort zone by adjusting the viewing angle of the monitor, using a footrest, or raising your leg muscles Long work periods, bad posture, poor work habits, stress, inadequate working in front ... no effect on your sitting height to achieve maximum comfort. Observe the following symptoms may complain of user inactivity. • Wake the monitor when it is produced with high-precision manufacturing techniques. This product has been shipped enabled for power management: • Activate display's Sleep...
...you have these symptoms, or any keyboard key. Finding your comfort zone Find your comfort zone by adjusting the viewing angle of the monitor, using a footrest, or raising your leg muscles Long work periods, bad posture, poor work habits, stress, inadequate working in front ... no effect on your sitting height to achieve maximum comfort. Observe the following symptoms may complain of user inactivity. • Wake the monitor when it is produced with high-precision manufacturing techniques. This product has been shipped enabled for power management: • Activate display's Sleep...

User Manual
Page 8
... stress your display in such a way that the side faces the window or any light source • minimizing room light by looking away from the monitor and focusing on how to an awkward viewing angle. • Avoid looking at bright light sources, such as possible. • Exercise regularly and maintain a healthy...
... stress your display in such a way that the side faces the window or any light source • minimizing room light by looking away from the monitor and focusing on how to an awkward viewing angle. • Avoid looking at bright light sources, such as possible. • Exercise regularly and maintain a healthy...
User Manual
Page 9
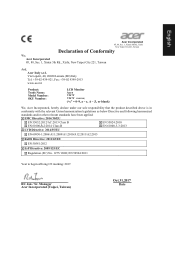
...40, 20020 Lainate (MI) Italy Tel: +39-02-939-921 ,Fax: +39-02 9399-2913 www.acer.it Product: Trade Name: Model Number: SKU Number: LCD Monitor Acer V247Y V247Y xxxxxx; ("x" = 0~9, a ~ z, A ~ Z, or blank) We, Acer Incorporated, hereby declare under our sole responsibility that the product described above is in conformity with the relevant Union...2012 ErP Directive: 2009/125/EC Regulation (EC) No. 1275/ 2008; EN 50564:2011 Year to begin affixing CE marking: 2017. English Acer Incorporated 8F, 88, Sec. 1, Xintai 5th Rd., Xizhi New Taipei City 221, Taiwan Declaration of Conformity We...
...40, 20020 Lainate (MI) Italy Tel: +39-02-939-921 ,Fax: +39-02 9399-2913 www.acer.it Product: Trade Name: Model Number: SKU Number: LCD Monitor Acer V247Y V247Y xxxxxx; ("x" = 0~9, a ~ z, A ~ Z, or blank) We, Acer Incorporated, hereby declare under our sole responsibility that the product described above is in conformity with the relevant Union...2012 ErP Directive: 2009/125/EC Regulation (EC) No. 1275/ 2008; EN 50564:2011 Year to begin affixing CE marking: 2017. English Acer Incorporated 8F, 88, Sec. 1, Xintai 5th Rd., Xizhi New Taipei City 221, Taiwan Declaration of Conformity We...
User Manual
Page 10
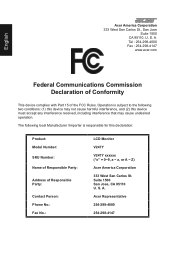
...with Part 15 of Responsible Party: Contact Person: Phone No.: Fax No.: LCD Monitor V247Y V247Y xxxxxx ("x" = 0~9, a ~ z, or A ~ Z) Acer America Corporation 333 West San Carlos St. Suite 1500 San Jose, CA 95110 U. S. English Acer America Corporation 333 West San Carlos St., San Jose Suite 1500 CA 95110..., U. A. Acer Representative 254-298-4000 254-298-4147 S. A. Operation is responsible for this device must accept ...
...with Part 15 of Responsible Party: Contact Person: Phone No.: Fax No.: LCD Monitor V247Y V247Y xxxxxx ("x" = 0~9, a ~ z, or A ~ Z) Acer America Corporation 333 West San Carlos St. Suite 1500 San Jose, CA 95110 U. S. English Acer America Corporation 333 West San Carlos St., San Jose Suite 1500 CA 95110..., U. A. Acer Representative 254-298-4000 254-298-4147 S. A. Operation is responsible for this device must accept ...
User Manual
Page 11
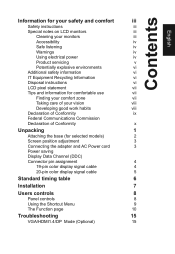
Contents English Information for your safety and comfort iii Safety instructions iii Special notes on LCD monitors iii Cleaning your monitors iii Accessibility iv Safe listening iv Warnings iv Using electrical power iv Product servicing v Potentially explosive environments vi Additional safety information vi IT Equipment Recycling ...
Contents English Information for your safety and comfort iii Safety instructions iii Special notes on LCD monitors iii Cleaning your monitors iii Accessibility iv Safe listening iv Warnings iv Using electrical power iv Product servicing v Potentially explosive environments vi Additional safety information vi IT Equipment Recycling ...

User Manual
Page 12
LCD monitor Quick start guide VGA Cable (Optional) DP Cable (Optional) USER GUIDE HDMI1.4 cable (Optional) AC Power cord Audio Cable (Optional) English Unpacking Please check that the following items are present when you unpack the box, and save the packing materials in case you need to ship or transport the monitor in the future.
LCD monitor Quick start guide VGA Cable (Optional) DP Cable (Optional) USER GUIDE HDMI1.4 cable (Optional) AC Power cord Audio Cable (Optional) English Unpacking Please check that the following items are present when you unpack the box, and save the packing materials in case you need to ship or transport the monitor in the future.

User Manual
Page 13
The monitor can adjust the monitor tilt by using both of the monitor as shown below. Carefully place the monitor face-down . 25 5 English • Attaching the Base Note: Remove the monitor and monitor base from its packaging. use a cloth to avoid scratching the screen. • Screen position adjustment To optimize the viewing position, you can be adjusted to hold the edges of your hands to 25 degrees up or 5 degrees down on a stable surface --
The monitor can adjust the monitor tilt by using both of the monitor as shown below. Carefully place the monitor face-down . 25 5 English • Attaching the Base Note: Remove the monitor and monitor base from its packaging. use a cloth to avoid scratching the screen. • Screen position adjustment To optimize the viewing position, you can be adjusted to hold the edges of your hands to 25 degrees up or 5 degrees down on a stable surface --
User Manual
Page 14
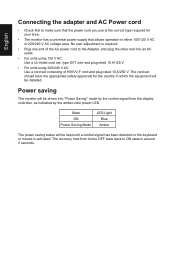
Power saving The monitor will be driven into "Power Saving" mode by the amber-color power LED. English Connecting the adapter and AC Power cord • Check first to ... plug rated 10 A/125 V. • For units using 220/240 V AC: Use a cord set should have the appropriate safety approvals for your area. • The monitor has a universal power supply that the power cord you use is activated. State ON Power Saving Mode LED Light Blue Amber The power saving states...
Power saving The monitor will be driven into "Power Saving" mode by the amber-color power LED. English Connecting the adapter and AC Power cord • Check first to ... plug rated 10 A/125 V. • For units using 220/240 V AC: Use a cord set should have the appropriate safety approvals for your area. • The monitor has a universal power supply that the power cord you use is activated. State ON Power Saving Mode LED Light Blue Amber The power saving states...
User Manual
Page 15
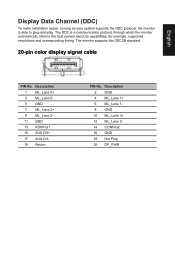
...supported resolutions and corresponding timing. Description 2 GND 4 ML_Lane 1+ 6 ML_Lane 18 GND 10 ML_Lane 3+ 12 ML_Lane 314 CONFIG2 16 GND 18 Hot Plug 20 DP_PWR The monitor supports the DDC2B standard. 20-pin color display signal cable PIN No. Description 1 ML_Lane 0+ 3 ML_Lane 05 GND 7 ML_Lane 2+ 9 ML_Lane 211 GND 13 KONFIG1 ...to plug-and-play. English Display Data Channel (DDC) To make installation easier, so long as your system supports the DDC protocol, the monitor is a communication protocol through which the monitor automatically informs the host system about its capabilities;
...supported resolutions and corresponding timing. Description 2 GND 4 ML_Lane 1+ 6 ML_Lane 18 GND 10 ML_Lane 3+ 12 ML_Lane 314 CONFIG2 16 GND 18 Hot Plug 20 DP_PWR The monitor supports the DDC2B standard. 20-pin color display signal cable PIN No. Description 1 ML_Lane 0+ 3 ML_Lane 05 GND 7 ML_Lane 2+ 9 ML_Lane 211 GND 13 KONFIG1 ...to plug-and-play. English Display Data Channel (DDC) To make installation easier, so long as your system supports the DDC protocol, the monitor is a communication protocol through which the monitor automatically informs the host system about its capabilities;
User Manual
Page 18
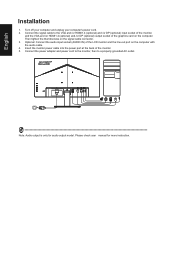
... off your computer and unplug your computer's power cord. 2. Connect the power adapter and power cord to the monitor, then to the VGA and /or HDMI1.4 (optional) and /or DP (optional) input socket of the monitor, and the VGA and /or HDMI1.4 (optional) and /or DP (optional) output socket of the LCD... monitor and the line-out port on the signal cable connector. 3. Optional: Connect the audio input socket (AUDIO IN) ...
... off your computer and unplug your computer's power cord. 2. Connect the power adapter and power cord to the monitor, then to the VGA and /or HDMI1.4 (optional) and /or DP (optional) input socket of the monitor, and the VGA and /or HDMI1.4 (optional) and /or DP (optional) output socket of the LCD... monitor and the line-out port on the signal cable connector. 3. Optional: Connect the audio input socket (AUDIO IN) ...
User Manual
Page 19
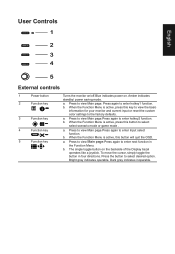
... b. The single toggle button on . When the Function Menu is active, press this key to view the basic information for your monitor and current input or reset the custom color settings to enter hotkey2 function. b. To move the cursor, simply toggle the button in ... User Controls 1 2 3 4 5 External controls 1 Power button 2 Function key / 3 Function key / 4 Function key /X 5 Function key / Turns the monitor on/off.Blue indicates power on the backside of the Display bezel operates like a joystick. Amber indicates standby/ power saving mode. a. When the Function Menu...
... b. The single toggle button on . When the Function Menu is active, press this key to view the basic information for your monitor and current input or reset the custom color settings to enter hotkey2 function. b. To move the cursor, simply toggle the button in ... User Controls 1 2 3 4 5 External controls 1 Power button 2 Function key / 3 Function key / 4 Function key /X 5 Function key / Turns the monitor on/off.Blue indicates power on the backside of the Display bezel operates like a joystick. Amber indicates standby/ power saving mode. a. When the Function Menu...
User Manual
Page 20
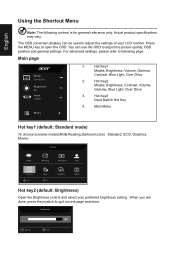
..., Graphics, Movie) Modes sRGB Reading Darkroom User Standard Move ECO OK Graphics Movie Hot key2 (default: Brightness) Open the Brightness control and select your LCD monitor. Actual product specifications may vary. For advanced settings, please refer to adjust the picture quality, OSD position and general settings.
..., Graphics, Movie) Modes sRGB Reading Darkroom User Standard Move ECO OK Graphics Movie Hot key2 (default: Brightness) Open the Brightness control and select your LCD monitor. Actual product specifications may vary. For advanced settings, please refer to adjust the picture quality, OSD position and general settings.

User Manual
Page 21
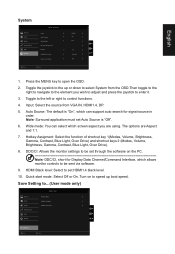
... element you are done, press the joystick to open the OSD. Press the MENU key to exit current page and store. Information Hot Key : Show Monitor Information and Reset control function. English Selecting the input Open the Input control and select VGA IN, HDMI1.4, DP or Auto Source.
... element you are done, press the joystick to open the OSD. Press the MENU key to exit current page and store. Information Hot Key : Show Monitor Information and Reset control function. English Selecting the input Open the Input control and select VGA IN, HDMI1.4, DP or Auto Source.
User Manual
Page 25
... Blue Light, Over Drive) and shortcut keys 2 (Modes, Volume, Brightness, Gamma, Contrast, Blue Light, Over Drive). 8. DDC/CI: Allows the monitor settings to be set through the software on to control functions. 4. HDMI Black level: Select to ... User Picture Mode: sRGB Color Mode: Reading Audio ...Mode: Darkroom Performance OSD System X Save setting to set Auto Source is "On", which allows monitor controls to be sent via software. 9. Press the MENU key to ...(User mode only) Mode - Move Enter The options are using....
... Blue Light, Over Drive) and shortcut keys 2 (Modes, Volume, Brightness, Gamma, Contrast, Blue Light, Over Drive). 8. DDC/CI: Allows the monitor settings to be set through the software on to control functions. 4. HDMI Black level: Select to ... User Picture Mode: sRGB Color Mode: Reading Audio ...Mode: Darkroom Performance OSD System X Save setting to set Auto Source is "On", which allows monitor controls to be sent via software. 9. Press the MENU key to ...(User mode only) Mode - Move Enter The options are using....

User Manual
Page 27
Check if the computer system is On, the LED status set Amber. Note: Acer monitor is purposed for servicing, please check the troubleshooting list below to see if you can self-diagnose the problem. Amber Check if the AC power ... Mode (Optional) Problem No picture visible LED status Blue Off Remedy Using the OSD menu, adjust brightness and contrast to maximum or reset to the monitor. Troubleshooting Before sending your LCD monitor for video and visual display of...
Check if the computer system is On, the LED status set Amber. Note: Acer monitor is purposed for servicing, please check the troubleshooting list below to see if you can self-diagnose the problem. Amber Check if the AC power ... Mode (Optional) Problem No picture visible LED status Blue Off Remedy Using the OSD menu, adjust brightness and contrast to maximum or reset to the monitor. Troubleshooting Before sending your LCD monitor for video and visual display of...


