User Manual
Page 5
...15 Device Control 39 Your guides 15 Basic care and tips for using your Acer clear.fi 40 computer 15 Navigating media and photos 40 Turning your computer on ... device 42 Cleaning and servicing 17 Screen orientation Your Acer tablet PC tour 19 and G-sensor 43 Tablet PC 19 Front view 20 Power management 44 Back view 21 Acer Green Instant On 44 Top view 21 Saving power... 45 Bottom view 22 Left/right views 23 LED Indicators 25 Connect the tablet to the cradle 25 Tablet cradle 26 Front view 27...
...15 Device Control 39 Your guides 15 Basic care and tips for using your Acer clear.fi 40 computer 15 Navigating media and photos 40 Turning your computer on ... device 42 Cleaning and servicing 17 Screen orientation Your Acer tablet PC tour 19 and G-sensor 43 Tablet PC 19 Front view 20 Power management 44 Back view 21 Acer Green Instant On 44 Top view 21 Saving power... 45 Bottom view 22 Left/right views 23 LED Indicators 25 Connect the tablet to the cradle 25 Tablet cradle 26 Front view 27...

User Manual
Page 21
The following set of images will show you around your computer as if you are holding the Tablet with the screen towards you and the camera at the top. Your Acer tablet PC tour - 19 The views are labeled as illustrated in the setup poster, let us show you new computer via the touchscreen. YOUR ACER TABLET PC TOUR After setting up your new Acer computer. You can enter information into you both of these. Tablet PC Your new computer has two components: the tablet and the tablet cradle.
The following set of images will show you around your computer as if you are holding the Tablet with the screen towards you and the camera at the top. Your Acer tablet PC tour - 19 The views are labeled as illustrated in the setup poster, let us show you new computer via the touchscreen. YOUR ACER TABLET PC TOUR After setting up your new Acer computer. You can enter information into you both of these. Tablet PC Your new computer has two components: the tablet and the tablet cradle.

User Manual
Page 22
Your Acer tablet PC tour Front view 12 No. Press once to open the Start menu. 20 - Web camera for video communication. Item 1 Camera indicator light 2 Integrated webcam 3 Windows key 3 Description Lights up when camera is active.
Your Acer tablet PC tour Front view 12 No. Press once to open the Start menu. 20 - Web camera for video communication. Item 1 Camera indicator light 2 Integrated webcam 3 Windows key 3 Description Lights up when camera is active.

User Manual
Page 23
Item 1 Lock switch 2 Description Locks the screen orientation. Item Description 1 Integrated webcam Web camera for video communication. 2 Camera indicator light Lights up when camera is active. Your Acer tablet PC tour - 21 Top view 1 No. Back view 1 2 No.
Item 1 Lock switch 2 Description Locks the screen orientation. Item Description 1 Integrated webcam Web camera for video communication. 2 Camera indicator light Lights up when camera is active. Your Acer tablet PC tour - 21 Top view 1 No. Back view 1 2 No.
User Manual
Page 24
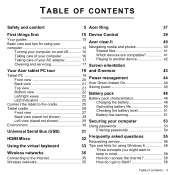
...). Note: Display orientation may be fixed when apps designed for four seconds to stay cool. No. When making video calls, you should always hold the tablet in landscape orientation. Delivers stereo audio output. 22 - cooling fan Do not cover or obstruct the openings. Bottom view No. Your...
...). Note: Display orientation may be fixed when apps designed for four seconds to stay cool. No. When making video calls, you should always hold the tablet in landscape orientation. Delivers stereo audio output. 22 - cooling fan Do not cover or obstruct the openings. Bottom view No. Your...
User Manual
Page 25
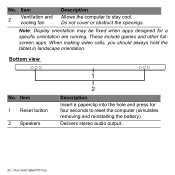
Left/right views 1 2 5 3 6 4 7 No. When using the cradle's USB ports, it is recommended to USB devices. Connects to plug in the power adapter. Your Acer tablet PC tour - 23 Supports high-definition digital video connections. A USB 3.0 port can be distinguished by its blue connector (see below). Icon 1 2 3 Item Microphone micro HDMI port USB 3.0 port Description Internal microphone for sound recording.
Left/right views 1 2 5 3 6 4 7 No. When using the cradle's USB ports, it is recommended to USB devices. Connects to plug in the power adapter. Your Acer tablet PC tour - 23 Supports high-definition digital video connections. A USB 3.0 port can be distinguished by its blue connector (see below). Icon 1 2 3 Item Microphone micro HDMI port USB 3.0 port Description Internal microphone for sound recording.
User Manual
Page 26
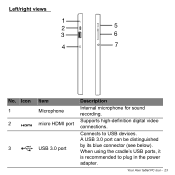
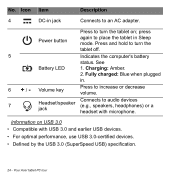
Your Acer tablet PC tour No. Charging: Amber. 2. Fully charged: Blue when plugged in Sleep mode. press Power button again to place the tablet in . 6 + / - Volume key Press to increase or decrease volume. 7 Headset/speaker jack Connects to turn the tablet on USB 3.0 • Compatible with microphone.... See Battery LED 1. Icon Item Description 4 DC-in jack Connects to turn the tablet off. 5 Indicates the computer's battery status. Information on ; Press and hold to audio devices (e.g., speakers, headphones) or a ...
Your Acer tablet PC tour No. Charging: Amber. 2. Fully charged: Blue when plugged in Sleep mode. press Power button again to place the tablet in . 6 + / - Volume key Press to increase or decrease volume. 7 Headset/speaker jack Connects to turn the tablet on USB 3.0 • Compatible with microphone.... See Battery LED 1. Icon Item Description 4 DC-in jack Connects to turn the tablet off. 5 Indicates the computer's battery status. Information on ; Press and hold to audio devices (e.g., speakers, headphones) or a ...
User Manual
Page 27
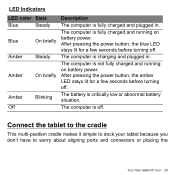
... is not fully charged and running on battery power. Connect the tablet to the cradle This multi-position cradle makes it simple to dock your tablet because you don't have to worry about aligning ports and connectors or placing the Your Acer tablet PC tour - 25 The computer is fully charged and plugged in...
... is not fully charged and running on battery power. Connect the tablet to the cradle This multi-position cradle makes it simple to dock your tablet because you don't have to worry about aligning ports and connectors or placing the Your Acer tablet PC tour - 25 The computer is fully charged and plugged in...

User Manual
Page 28
Your Acer tablet PC tour NOTE: In some countries the cradle is optional. 26 - tablet at the correct angle. Simply rest the tablet in the cradle and slide it to the left until it stops. 1 2 Tablet cradle The following set of images show you the bundled cradle.
Your Acer tablet PC tour NOTE: In some countries the cradle is optional. 26 - tablet at the correct angle. Simply rest the tablet in the cradle and slide it to the left until it stops. 1 2 Tablet cradle The following set of images show you the bundled cradle.

User Manual
Page 29
Icon Item 1 USB connector Description Connects to the tablet's USB port. 2 DC-out jack Provides power from the cradle to the tablet Your Acer tablet PC tour - 27 Front view 1 2 No.
Icon Item 1 USB connector Description Connects to the tablet's USB port. 2 DC-out jack Provides power from the cradle to the tablet Your Acer tablet PC tour - 27 Front view 1 2 No.

User Manual
Page 30
Your Acer tablet PC tour Item 1 Portrait view slot 2 Landscape view slot 2 Description Insert the stand here to rest the tablet in portrait view. Back view (stand not shown) 1 No. Insert the stand here to rest the tablet in landscape view. 28 -
Your Acer tablet PC tour Item 1 Portrait view slot 2 Landscape view slot 2 Description Insert the stand here to rest the tablet in portrait view. Back view (stand not shown) 1 No. Insert the stand here to rest the tablet in landscape view. 28 -

User Manual
Page 31
Provides power to USB devices. Your Acer tablet PC tour - 29 Left view (stand not shown) 1 2 No. Icon Item 1 USB 3.0 ports 2 DC-in jack Information on USB 3.0 Description Connect to the cradle. A USB 3.0 port can be distinguished by its blue connector (see below).
Provides power to USB devices. Your Acer tablet PC tour - 29 Left view (stand not shown) 1 2 No. Icon Item 1 USB 3.0 ports 2 DC-in jack Information on USB 3.0 Description Connect to the cradle. A USB 3.0 port can be distinguished by its blue connector (see below).

User Manual
Page 32
Your Acer tablet PC tour Environment • Temperature: • Operating: 5 °C to 35 °C • Non-operating: -20 °C to 65 °C • Humidity (non-condensing): • Operating: 20% to 80% • Non-operating: 20% to 80% 30 - • Compatible with USB 3.0 and earlier USB devices. • For optimal performance, use USB 3.0-certified devices. • Defined by the USB 3.0 (SuperSpeed USB) specification.
Your Acer tablet PC tour Environment • Temperature: • Operating: 5 °C to 35 °C • Non-operating: -20 °C to 65 °C • Humidity (non-condensing): • Operating: 20% to 80% • Non-operating: 20% to 80% 30 - • Compatible with USB 3.0 and earlier USB devices. • For optimal performance, use USB 3.0-certified devices. • Defined by the USB 3.0 (SuperSpeed USB) specification.

User Manual
Page 45
... rotates the screen to set the orientation before starting a video call . You can lock the screen orientation by using the lock switch. Please rotate your tablet in . • When programs designed for a specific orientation are making a video call . Screen orientation and G-sensor - 43 Note: You are advised...above the screen while you are running. The screen orientation lock status will be locked at other times, including: • When the tablet is attached to keep your display to the landscape orientation and use the lock switch to suit the orientation. The orientation may also ...
... rotates the screen to set the orientation before starting a video call . You can lock the screen orientation by using the lock switch. Please rotate your tablet in . • When programs designed for a specific orientation are making a video call . Screen orientation and G-sensor - 43 Note: You are advised...above the screen while you are running. The screen orientation lock status will be locked at other times, including: • When the tablet is attached to keep your display to the landscape orientation and use the lock switch to suit the orientation. The orientation may also ...

User Manual
Page 50
Insert the tablet into the cradle and connect to a power outlet. Battery pack Battery pack characteristics The battery pack has the following characteristics: • Employs current battery technology ... to use , enabling you to recharge the battery while you continue to operate the computer. Plug the AC adapter into the cradle (see "Connect the tablet to the cradle" on AC power while your computer is charging. However, charging the battery with the computer turned off results in a significantly faster charge...
Insert the tablet into the cradle and connect to a power outlet. Battery pack Battery pack characteristics The battery pack has the following characteristics: • Employs current battery technology ... to use , enabling you to recharge the battery while you continue to operate the computer. Plug the AC adapter into the cradle (see "Connect the tablet to the cradle" on AC power while your computer is charging. However, charging the battery with the computer turned off results in a significantly faster charge...
User Manual
Page 53
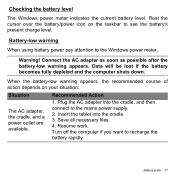
... adapter into the cradle. 3. Save all necessary files. 4. Data will be lost if the battery becomes fully depleted and the computer shuts down. Insert the tablet into the cradle, and then connect to see the battery's present charge level. Connect the AC adapter as soon as possible after the battery-low...
... adapter into the cradle. 3. Save all necessary files. 4. Data will be lost if the battery becomes fully depleted and the computer shuts down. Insert the tablet into the cradle, and then connect to see the battery's present charge level. Connect the AC adapter as soon as possible after the battery-low...

User Manual
Page 57
... start or boot up. FREQUENTLY ASKED QUESTIONS The following is a list of your computer. Check the following: Frequently asked questions - 55 Also make sure the tablet fits snug into the cradle and to the computer.
... start or boot up. FREQUENTLY ASKED QUESTIONS The following is a list of your computer. Check the following: Frequently asked questions - 55 Also make sure the tablet fits snug into the cradle and to the computer.


