

User Manual
Page 9
...viii Introduction 1 Product Features 1 Package Overview 2 Projector Overview 3 Projector Outlook 3 Control Panel 4 Remote Control Layout 5 Getting Started 7 Connecting the Projector 7 Turning the Projector On/Off 8 Turning On the Projector 8 Turning Off the Projector 9 Adjusting the ...Projected Image 10 Adjusting the Height of the Projected Image 10 How to Optimize Image Size and Distance 11 How to Get a Preferred Image Size by Adjusting Distance and Zoom 13 User Controls 15 Installation Menu 15 Acer...
...viii Introduction 1 Product Features 1 Package Overview 2 Projector Overview 3 Projector Outlook 3 Control Panel 4 Remote Control Layout 5 Getting Started 7 Connecting the Projector 7 Turning the Projector On/Off 8 Turning On the Projector 8 Turning Off the Projector 9 Adjusting the ...Projected Image 10 Adjusting the Height of the Projected Image 10 How to Optimize Image Size and Distance 11 How to Get a Preferred Image Size by Adjusting Distance and Zoom 13 User Controls 15 Installation Menu 15 Acer...

User Manual
Page 11
...® projector, including the following outstanding features: • DLP® technology • X1110/X1110A: Native 800 x 600 SVGA resolution X1210/X1210A/X1210K/X1210S/X1213/X1216: Native 1024 x 768 XGA resolution 4:3 / 16:9 aspect ratio supported • Acer ColorBoost technology... and economy (ECO) mode extends lamp life • Acer EcoProjeciton Technology delivers Intelligent power management approach and physical efficiency improvement • Empowering Key reveals Acer Empowering Technology functions (Acer eView, eTimer, ePower Management) for easy adjustment of settings...
...® projector, including the following outstanding features: • DLP® technology • X1110/X1110A: Native 800 x 600 SVGA resolution X1210/X1210A/X1210K/X1210S/X1213/X1216: Native 1024 x 768 XGA resolution 4:3 / 16:9 aspect ratio supported • Acer ColorBoost technology... and economy (ECO) mode extends lamp life • Acer EcoProjeciton Technology delivers Intelligent power management approach and physical efficiency improvement • Empowering Key reveals Acer Empowering Technology functions (Acer eView, eTimer, ePower Management) for easy adjustment of settings...

User Manual
Page 25
... (POWER) on the control panel or 2 Press "MENU" on the control panel or remote control to launch the OSD for projector installation and maintenance. (X1110/X1110A/X1210/ X1210A/X1213/X1216) (X1210K/X1210S) 3 The background pattern acts as a guide to adjusting the calibration and alignment settings,...arrow keys to adjust selected option settings, and the right arrow key to the Acer welcome screen. English 15 User Controls Installation Menu The installation menu provides an onscreen display (OSD) for feature setting. The new settings will be saved automatically upon exiting the menu. 5 ...
... (POWER) on the control panel or 2 Press "MENU" on the control panel or remote control to launch the OSD for projector installation and maintenance. (X1110/X1110A/X1210/ X1210A/X1213/X1216) (X1210K/X1210S) 3 The background pattern acts as a guide to adjusting the calibration and alignment settings,...arrow keys to adjust selected option settings, and the right arrow key to the Acer welcome screen. English 15 User Controls Installation Menu The installation menu provides an onscreen display (OSD) for feature setting. The new settings will be saved automatically upon exiting the menu. 5 ...
User Manual
Page 27
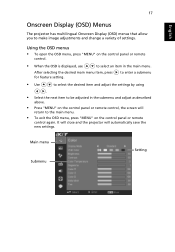
...panel or remote control, the screen will automatically save the new settings. Main menu Submenu Setting After selecting the desired main menu item, press for feature setting. to enter a submenu • Use to select the desired item and adjust the settings by using . • Select the next item... to make image adjustments and change a variety of settings. English 17 Onscreen Display (OSD) Menus The projector has multilingual Onscreen Display (OSD) menus that allow you to be adjusted in the main menu. Using the OSD menus • To open the ...
...panel or remote control, the screen will automatically save the new settings. Main menu Submenu Setting After selecting the desired main menu item, press for feature setting. to enter a submenu • Use to select the desired item and adjust the settings by using . • Select the next item... to make image adjustments and change a variety of settings. English 17 Onscreen Display (OSD) Menus The projector has multilingual Onscreen Display (OSD) menus that allow you to be adjusted in the main menu. Using the OSD menus • To open the ...

User Manual
Page 33
... aspect ratio is NTSC. When this function is turned off the captioning feature. Select "Off" to 4:3. Set your area). Setting (X1110A/X1210/X1210A/ X1210K/X1210S/X1213/X1216) (X1110) Menu Location Chooses the OSD menu location on 3D or after the projector is lost. Selects a preferred closed captioning mode from CC1, CC2, CC3, CC4...
... aspect ratio is NTSC. When this function is turned off the captioning feature. Select "Off" to 4:3. Set your area). Setting (X1110A/X1210/X1210A/ X1210K/X1210S/X1213/X1216) (X1110) Menu Location Chooses the OSD menu location on 3D or after the projector is lost. Selects a preferred closed captioning mode from CC1, CC2, CC3, CC4...


