
Quick Guide
Page 6
Select the 3D section (the sixth menu option) on the projector remote control to Nvidia 3D Vision. English 6 If you are viewing Blu-ray 3D content over an HDMI 1.4a or later connection, this will be set automatically. 6 Press the menu button on the left-hand side of the window. 7 Set 3D to open the OSD.
Select the 3D section (the sixth menu option) on the projector remote control to Nvidia 3D Vision. English 6 If you are viewing Blu-ray 3D content over an HDMI 1.4a or later connection, this will be set automatically. 6 Press the menu button on the left-hand side of the window. 7 Set 3D to open the OSD.

Quick Guide
Page 7
English 7 8 Alternatively, press the Empowering Key on your projector's remote control to view content at . Other players may have a stereoscopic player in the player. The instructions below explain how to view 3D content using the Stereoscopic ... content. From the 3D options, select Nvidia 3D Vision. Note: You need to get the 3D effects. Using the stereoscopic player You need to open Acer e3D Management.
English 7 8 Alternatively, press the Empowering Key on your projector's remote control to view content at . Other players may have a stereoscopic player in the player. The instructions below explain how to view 3D content using the Stereoscopic ... content. From the 3D options, select Nvidia 3D Vision. Note: You need to get the 3D effects. Using the stereoscopic player You need to open Acer e3D Management.

Quick Guide
Page 8
... enjoy the benefits of the window. Note: You may need to purchase additional software. 4 Ensure you will need to 100/120 Hz on the projector remote control to open the OSD. Note: Please refer to the NVIDIA 3DTV Play website: www.nvidia.com/3dtv. To download software and use an NVIDIA 3DTV...
... enjoy the benefits of the window. Note: You may need to purchase additional software. 4 Ensure you will need to 100/120 Hz on the projector remote control to open the OSD. Note: Please refer to the NVIDIA 3DTV Play website: www.nvidia.com/3dtv. To download software and use an NVIDIA 3DTV...

Quick Guide
Page 9
The "3D Format" is only existed at HDMI 1.4 or later input. The "Frame Packing" is only available for correct 3D displaying. English 9 3 Set 3D to On. 4 Alternatively, press the Empowering Key on your projector's remote control to open Acer e3D Management. From the 3D options, select On. 5 "3D Format" shows while no enough info, please choose suitable one for HDMI 1.4 or 2nd generation 3D projectors. 2. Note: 1.
The "3D Format" is only existed at HDMI 1.4 or later input. The "Frame Packing" is only available for correct 3D displaying. English 9 3 Set 3D to On. 4 Alternatively, press the Empowering Key on your projector's remote control to open Acer e3D Management. From the 3D options, select On. 5 "3D Format" shows while no enough info, please choose suitable one for HDMI 1.4 or 2nd generation 3D projectors. 2. Note: 1.

Quick Guide
Page 11
... that supports 3D playback, you have a DVD or Blu-ray player that 3D options are on and the video uses 24p before turning on your Acer 3D-enabled projector. Connect your DVD or Blu-ray player to the projector using your projector. Note: You need to view content at fullscreen resolution...-ray content If you can watch 3D DVD content using any of the window. Select the 3D section (the sixth menu option) on the projector remote control to open the OSD. English 11 1 Open the stereoscopic player and set to 480i or 576i. 1 Press the menu button on the left-hand side...
... that supports 3D playback, you have a DVD or Blu-ray player that 3D options are on and the video uses 24p before turning on your Acer 3D-enabled projector. Connect your DVD or Blu-ray player to the projector using your projector. Note: You need to view content at fullscreen resolution...-ray content If you can watch 3D DVD content using any of the window. Select the 3D section (the sixth menu option) on the projector remote control to open the OSD. English 11 1 Open the stereoscopic player and set to 480i or 576i. 1 Press the menu button on the left-hand side...

Quick Guide
Page 12
Note: 1. The "Frame Packing" is only available for correct 3D displaying. From the 3D options, select On. 4 "3D Format" shows while no enough info, please choose suitable one for HDMI 1.4 or 2nd generation 3D projectors. 2. The "3D Format" is only existed at HDMI 1.4 or later input. English 12 2 Set 3D to On. 3 Alternatively, press the Empowering Key on your projector's remote control to open Acer e3D Management.
Note: 1. The "Frame Packing" is only available for correct 3D displaying. From the 3D options, select On. 4 "3D Format" shows while no enough info, please choose suitable one for HDMI 1.4 or 2nd generation 3D projectors. 2. The "3D Format" is only existed at HDMI 1.4 or later input. English 12 2 Set 3D to On. 3 Alternatively, press the Empowering Key on your projector's remote control to open Acer e3D Management.
User Manual
Page 6
...which becomes hot. • Clean the air filter frequently if have. There are dangerous high voltages inside may hurt you. Only use acer ceiling mount kit for inspection. • Do not face the projector lens to ensure the projector completes its own removable cover. Please ...bottom plate which may rise and cause damage when the filter/ventilation slots clogged with any electronic components unless the projector is on the remote control. • The lamp becomes extremely hot during operation. It could cause the object to fall over, causing injury or damage. •...
...which becomes hot. • Clean the air filter frequently if have. There are dangerous high voltages inside may hurt you. Only use acer ceiling mount kit for inspection. • Do not face the projector lens to ensure the projector completes its own removable cover. Please ...bottom plate which may rise and cause damage when the filter/ventilation slots clogged with any electronic components unless the projector is on the remote control. • The lamp becomes extremely hot during operation. It could cause the object to fall over, causing injury or damage. •...
User Manual
Page 9
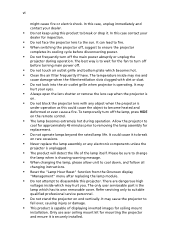
... viii Usage Notes viii Precautions viii Introduction 1 Product Features 1 Package Overview 2 Projector Overview 3 Projector Outlook 3 Control Panel 4 Remote Control Layout 5 MHL (Mobile High-Definition Link) Control 7 Getting Started 8 Connecting the Projector 8 Turning the Projector On/Off 10 Turning on the Projector 10 Turning... size and distance 13 How to get a preferred image size by adjusting distance and zoom 17 User Controls 21 Installation menu 21 Onscreen Display (OSD) Menus 23 Color 24 Image 26 Setting 28 Management 31 Audio 32 ...
... viii Usage Notes viii Precautions viii Introduction 1 Product Features 1 Package Overview 2 Projector Overview 3 Projector Outlook 3 Control Panel 4 Remote Control Layout 5 MHL (Mobile High-Definition Link) Control 7 Getting Started 8 Connecting the Projector 8 Turning the Projector On/Off 10 Turning on the Projector 10 Turning... size and distance 13 How to get a preferred image size by adjusting distance and zoom 17 User Controls 21 Installation menu 21 Onscreen Display (OSD) Menus 23 Color 24 Image 26 Setting 28 Management 31 Audio 32 ...
User Manual
Page 12
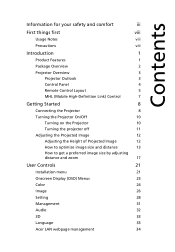
English Projector Power cord VGA cable 2 x Batteries (option) Security card User's guide Quick start guide MEDIA SETUP MODE SOURCE HIDE ZOOM RATIO FREEZE Carrying case (option) MEDIA SETUP MODE SOURCE HIDE ZOOM FREEZE Remote control (option) Remote control (option) Dust filters (option) 2 Package Overview This projector comes with all the items shown below. Check to make sure your dealer immediately if any thing is complete. Contact your unit is missing.
English Projector Power cord VGA cable 2 x Batteries (option) Security card User's guide Quick start guide MEDIA SETUP MODE SOURCE HIDE ZOOM RATIO FREEZE Carrying case (option) MEDIA SETUP MODE SOURCE HIDE ZOOM FREEZE Remote control (option) Remote control (option) Dust filters (option) 2 Package Overview This projector comes with all the items shown below. Check to make sure your dealer immediately if any thing is complete. Contact your unit is missing.
User Manual
Page 13
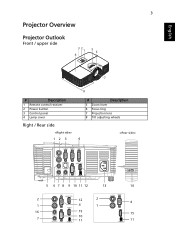
English 3 Projector Overview Projector Outlook Front / upper side 32 1 4 5 6 7 8 # Description 1 Remote control receiver 2 Power button 3 Control panel 4 Lamp cover # Description 5 Zoom lever 6 Focus ring 7 Projection lens 8 Tilt adjusting wheels Right / Rear side 12 3 4 5 6 7 8 9 10 11 12 13 14 2 12 2 4 1 4 1 16 15 15 10 7 11 11
English 3 Projector Overview Projector Outlook Front / upper side 32 1 4 5 6 7 8 # Description 1 Remote control receiver 2 Power button 3 Control panel 4 Lamp cover # Description 5 Zoom lever 6 Focus ring 7 Projection lens 8 Tilt adjusting wheels Right / Rear side 12 3 4 5 6 7 8 9 10 11 12 13 14 2 12 2 4 1 4 1 16 15 15 10 7 11 11
User Manual
Page 15
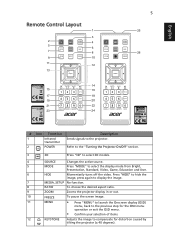
English 5 Remote Control Layout 1 25 3 2 SOURCE 4 5 MEDIA 6 SETUP MODE HIDE 7 8 MEDIA SETUP MODE SOURCE HIDE 9 ZOOM RATIO FREEZE 10 ZOOM FREEZE 26 11 12 13 15 17 19 ...
English 5 Remote Control Layout 1 25 3 2 SOURCE 4 5 MEDIA 6 SETUP MODE HIDE 7 8 MEDIA SETUP MODE SOURCE HIDE 9 ZOOM RATIO FREEZE 10 ZOOM FREEZE 26 11 12 13 15 17 19 ...
User Manual
Page 20
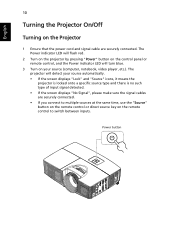
... and signal cable are securely connected. • If you connect to multiple sources at the same time, use the "Source" button on the remote control or direct source key on the remote control to switch between inputs. The Power indicator LED will flash red. 2 Turn on the projector by pressing "Power" button on the...
... and signal cable are securely connected. • If you connect to multiple sources at the same time, use the "Source" button on the remote control or direct source key on the remote control to switch between inputs. The Power indicator LED will flash red. 2 Turn on the projector by pressing "Power" button on the...

User Manual
Page 31
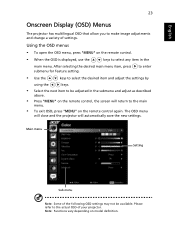
English 21 User Controls Installation menu The installation menu provides an onscreen display (OSD) for projector installation and maintenance. 3 The ...alignment settings, such as screen size and distance, focus and more . 1 Turn on the projector by pressing "Power" button on the control pad. 2 Press the "MENU" button on the screen. Keystone •V. The menu options include settings and adjustments for screen size ... settings •H. Use the OSD only when the message "No signal input" is displayed on the remote control to launch the OSD for projector installation and maintenance.
English 21 User Controls Installation menu The installation menu provides an onscreen display (OSD) for projector installation and maintenance. 3 The ...alignment settings, such as screen size and distance, focus and more . 1 Turn on the projector by pressing "Power" button on the control pad. 2 Press the "MENU" button on the screen. Keystone •V. The menu options include settings and adjustments for screen size ... settings •H. Use the OSD only when the message "No signal input" is displayed on the remote control to launch the OSD for projector installation and maintenance.
User Manual
Page 33
...close and the projector will return to select any item in the submenu and adjust as described above. • Press "MENU" on the remote control, the screen will automatically save the new settings. to enter • Use the keys to select the desired item and adjust the settings ...by using the keys. • Select the next item to be available. Note: Functions vary depending on the remote control again. Please refer to make image adjustments and change a variety of settings. English 23 Onscreen Display (OSD) Menus The projector has multilingual OSD...
...close and the projector will return to select any item in the submenu and adjust as described above. • Press "MENU" on the remote control, the screen will automatically save the new settings. to enter • Use the keys to select the desired item and adjust the settings ...by using the keys. • Select the next item to be available. Note: Functions vary depending on the remote control again. Please refer to make image adjustments and change a variety of settings. English 23 Onscreen Display (OSD) Menus The projector has multilingual OSD...

User Manual
Page 38
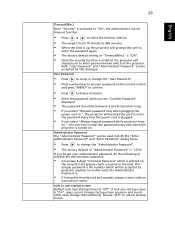
... the instructions below , takes effect when there is in your Acer projector. • User: Use memorize picture from the default setting "Acer" to "User". • Press "Screen Capture" to customize the startup screen. • A dialog box appears to turn on the remote control for other signals if the current input signal is selected, then... you change the "Security" setting. Press to change the setting, the changes will "lock" the current source channel unless you exit the OSD menu. • Acer: The default startup screen of the projector .
... the instructions below , takes effect when there is in your Acer projector. • User: Use memorize picture from the default setting "Acer" to "User". • Press "Screen Capture" to customize the startup screen. • A dialog box appears to turn on the remote control for other signals if the current input signal is selected, then... you change the "Security" setting. Press to change the setting, the changes will "lock" the current source channel unless you exit the OSD menu. • Acer: The default startup screen of the projector .
User Manual
Page 39
...Press to unlock startup screen. If lock user startup screen is . • If losing this dialogue. If you forgot your password on the remote control and press "MENU" to confirm. • Press to delete character. • Enter the password when you select "Always request password while ... Password" is "1234". Administrator Password The "Administrator Password" can be accepted for this security card and number, please contact with an Acer service center. 29 English Timeout(Min.) Once "Security" is activated to "On", the administrator can set your administrator password, do the...
...Press to unlock startup screen. If lock user startup screen is . • If losing this dialogue. If you forgot your password on the remote control and press "MENU" to confirm. • Press to delete character. • Enter the password when you select "Always request password while ... Password" is "1234". Administrator Password The "Administrator Password" can be accepted for this security card and number, please contact with an Acer service center. 29 English Timeout(Min.) Once "Security" is activated to "On", the administrator can set your administrator password, do the...

User Manual
Page 48
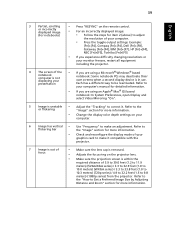
...the projector is switched on. 2 Partial, scrolling • Press "RESYNC" on the remote control. or incorrectly displayed image • For an incorrectly displayed image: (for PC (Windows • Open "My Computer", open the "Control 2000/XP/Vista/ Panel", and then double-click the "Display" Windows 7/ Windows ... to WUXGA-RB (1920 x 1200). Please refer to the "Replacing the Lamp" section. • Make sure you experience a problem with your Acer projector, refer to WUXGA-RB (1920 x 1200). • Click the "Change" button under the "Monitor" tab. • Click "Show all...
...the projector is switched on. 2 Partial, scrolling • Press "RESYNC" on the remote control. or incorrectly displayed image • For an incorrectly displayed image: (for PC (Windows • Open "My Computer", open the "Control 2000/XP/Vista/ Panel", and then double-click the "Display" Windows 7/ Windows ... to WUXGA-RB (1920 x 1200). Please refer to the "Replacing the Lamp" section. • Make sure you experience a problem with your Acer projector, refer to WUXGA-RB (1920 x 1200). • Click the "Change" button under the "Monitor" tab. • Click "Show all...
User Manual
Page 49
39 English 3 Partial, scrolling or incorrectly displayed image (For notebooks) • Press "RESYNC" on the remote control. • For an incorrectly displayed image: • Follow the steps for item 2 (above) to adjust the resolution of your graphics card to make an adjustment. ...
39 English 3 Partial, scrolling or incorrectly displayed image (For notebooks) • Press "RESYNC" on the remote control. • For an incorrectly displayed image: • Follow the steps for item 2 (above) to adjust the resolution of your graphics card to make an adjustment. ...

User Manual
Page 50
... on the OSD and adjust the projection direction. Go to "Image - -> Aspect Ratio" and try different settings or press "RATIO" on the remote control to adjust directly. 10 Image has slanted • If possible, reposition the projector so that it is sides centered on the screen. • ...Press the "Keystone / " button on the remote control until the sides are vertical. • Press "MENU" on the remote control. or too large • Move the projector closer to or further from the screen. • Press "MENU" on ...
... on the OSD and adjust the projection direction. Go to "Image - -> Aspect Ratio" and try different settings or press "RATIO" on the remote control to adjust directly. 10 Image has slanted • If possible, reposition the projector so that it is sides centered on the screen. • ...Press the "Keystone / " button on the remote control until the sides are vertical. • Press "MENU" on the remote control. or too large • Move the projector closer to or further from the screen. • Press "MENU" on ...
User Manual
Page 60
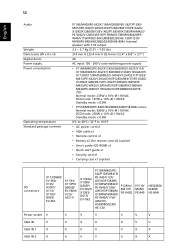
...< 0.5W 0ºC to 40ºC / 32ºF to 104ºF • AC power cord x1 • VGA cable x1 • Remote control x1 • Battery x2 (for remote control) (option) • User's guide (CD-ROM) x1 • Quick start guide x1 • Security card x1 • Carrying case x1 (option...) I/O connectors X113/D600/ EV-S60/ V10S/ AS201/ X114/ X1183/ D603/ EV-S62 X113H/ X113PH/ D600D/ EV-S60H/ V12S/ AS211/ X1183A/ X1280...
...< 0.5W 0ºC to 40ºC / 32ºF to 104ºF • AC power cord x1 • VGA cable x1 • Remote control x1 • Battery x2 (for remote control) (option) • User's guide (CD-ROM) x1 • Quick start guide x1 • Security card x1 • Carrying case x1 (option...) I/O connectors X113/D600/ EV-S60/ V10S/ AS201/ X114/ X1183/ D603/ EV-S62 X113H/ X113PH/ D600D/ EV-S60H/ V12S/ AS211/ X1183A/ X1280...


