

User Manual
Page 1
TABLE OF CONTENTS Special notes on LCD monitors 1 Information for your safety and comfort 2 Unpacking 5 Attaching/Removing the base 6 Screen position adjustment 6 Connecting the power cord 7 Safety precaution 7 Cleaning your monitor 7 Power saving 8 DDC 8 Connector Pin Assingment 9 Standard Timing Table 11 Installation 12 User controls 13 How to adjust a setting 14 Troubleshooting 20
TABLE OF CONTENTS Special notes on LCD monitors 1 Information for your safety and comfort 2 Unpacking 5 Attaching/Removing the base 6 Screen position adjustment 6 Connecting the power cord 7 Safety precaution 7 Cleaning your monitor 7 Power saving 8 DDC 8 Connector Pin Assingment 9 Standard Timing Table 11 Installation 12 User controls 13 How to adjust a setting 14 Troubleshooting 20

User Manual
Page 4
...; To avoid damage of the product and to the equipment, be placed near you can hear it clearly and comfortably and without distortion. • After setting the volume level, do not place the product on the product. When you plug the power cord into this product on a bed, sofa, rug or...
...; To avoid damage of the product and to the equipment, be placed near you can hear it clearly and comfortably and without distortion. • After setting the volume level, do not place the product on the product. When you plug the power cord into this product on a bed, sofa, rug or...

User Manual
Page 9
... or where sun- CONNECTING THE POWER CORD · Check first to a proper AC outlet. · For unit using at 120 V AC: Use a UL Listed Cord Set, Type SVT wire and plug rated 10 A/125 V. · For unit using at 220/240 V AC (outside of U.S.): Use a Cord... Set consisting of H05VV-F cord and plug rated 10 A, 250 V. The cord set should have the appropriate safety approvals for your area. · This monitor has a universal power supply that allows operation in...
... or where sun- CONNECTING THE POWER CORD · Check first to a proper AC outlet. · For unit using at 120 V AC: Use a UL Listed Cord Set, Type SVT wire and plug rated 10 A/125 V. · For unit using at 220/240 V AC (outside of U.S.): Use a Cord... Set consisting of H05VV-F cord and plug rated 10 A, 250 V. The cord set should have the appropriate safety approvals for your area. · This monitor has a universal power supply that allows operation in...

User Manual
Page 15
... menu). 2)When OSD menu is in off status, press this button for 2 seconds to activate the AutoAdjustment function.The Auto Adjustment function is used to set the HPos, VPos, Clock and Focus. 5.< / > Press < or > to select the desired function.Press < or > to change the... settings of the current function. 6.MENU / ENTER: Activate OSD menu when OSD is OFF or activate/de-activate adjustment function whenOSD is ON or Exit OSD ...
... menu). 2)When OSD menu is in off status, press this button for 2 seconds to activate the AutoAdjustment function.The Auto Adjustment function is used to set the HPos, VPos, Clock and Focus. 5.< / > Press < or > to select the desired function.Press < or > to change the... settings of the current function. 6.MENU / ENTER: Activate OSD menu when OSD is OFF or activate/de-activate adjustment function whenOSD is ON or Exit OSD ...

User Manual
Page 16
... MENU-button to select the function that you want to change the settings of the current function. 5. Press < or > to adjust. 4. Acer eColor Management If selected to select the desired function. 3. Press < or > to "Acer eColor Management " item, will appear the Acer eColor" OSD · OSD and" Key " locations Value Line Value Line w/speaker...
... MENU-button to select the function that you want to change the settings of the current function. 5. Press < or > to adjust. 4. Acer eColor Management If selected to select the desired function. 3. Press < or > to "Acer eColor Management " item, will appear the Acer eColor" OSD · OSD and" Key " locations Value Line Value Line w/speaker...
User Manual
Page 20
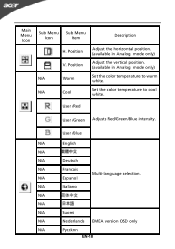
Set the color temperature to warm white. User /Red User /Green Adjusts Red/Green/Blue intensity. Position N/A Warm N/A Cool Description Adjust the horizontal position. (available in Analog mode only) Adjust the vertical position. (available in Analog mode only) Set the color temperature to cool white. User /Blue N/A English N/A N/A Deutsch N/A Francais Multi-language selection. Position V. N/A Espanol N/A Italiano N/A N/A N/A Suomi N/A Nederlands EMEA version OSD only N/A Pyccknn EN-18 Main Menu Icon Sub Menu Sub Menu Icon Item H.
Set the color temperature to warm white. User /Red User /Green Adjusts Red/Green/Blue intensity. Position N/A Warm N/A Cool Description Adjust the horizontal position. (available in Analog mode only) Adjust the vertical position. (available in Analog mode only) Set the color temperature to cool white. User /Blue N/A English N/A N/A Deutsch N/A Francais Multi-language selection. Position V. N/A Espanol N/A Italiano N/A N/A N/A Suomi N/A Nederlands EMEA version OSD only N/A Pyccknn EN-18 Main Menu Icon Sub Menu Sub Menu Icon Item H.

User Manual
Page 21
...Reset Clear each old status of the OSD. EN-19 N/A Input Source Select input signal from D-Sub or DVI-D or HDMI Select Wide mode setting N/A Wide Mode for Full screen, Aspect ratio or 1:1 mode N/A DDC/CI Trun ON/OFF DDC/CI Support N/A Informati- Position Adjust the ...horizontal position of Autoconfigurationand set the color temperature to Cool. OSD Timeout Adjust the OSD timeout. V. Show the resolution, H/V frequency on andinput port of the OSD. Position...
...Reset Clear each old status of the OSD. EN-19 N/A Input Source Select input signal from D-Sub or DVI-D or HDMI Select Wide mode setting N/A Wide Mode for Full screen, Aspect ratio or 1:1 mode N/A DDC/CI Trun ON/OFF DDC/CI Support N/A Informati- Position Adjust the ...horizontal position of Autoconfigurationand set the color temperature to Cool. OSD Timeout Adjust the OSD timeout. V. Show the resolution, H/V frequency on andinput port of the OSD. Position...

User Manual
Page 22
... cable is properly connected at the back of monitor. · Check if the power of graphics adapter and monitor is properly connected to their default settings. Unstable Picture · Check if the specification of computer system is · Using OSD, adjust RESOLUTION, CLOCK, missing, center CLOCK-PHASE, H-POSITION and V- EN-20...
... cable is properly connected at the back of monitor. · Check if the power of graphics adapter and monitor is properly connected to their default settings. Unstable Picture · Check if the specification of computer system is · Using OSD, adjust RESOLUTION, CLOCK, missing, center CLOCK-PHASE, H-POSITION and V- EN-20...
User Manual
Page 23
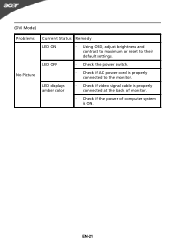
LED OFF · Check the power switch. · Check if AC power cord is ON. LED displays amber color · Check if video signal cable is properly connected at the back of monitor. · Check if the power of computer system is properly connected to their default settings. (DVI Mode) Problems No Picture Current Status Remedy LED ON · Using OSD, adjust brightness and contrast to maximum or reset to the monitor. EN-21
LED OFF · Check the power switch. · Check if AC power cord is ON. LED displays amber color · Check if video signal cable is properly connected at the back of monitor. · Check if the power of computer system is properly connected to their default settings. (DVI Mode) Problems No Picture Current Status Remedy LED ON · Using OSD, adjust brightness and contrast to maximum or reset to the monitor. EN-21


