
User Manual
Page 2
... View Mode Buttons 58 10.3.3 Control Panel ...59 10.4 System Configuration ...61 2 Configuring Wireless Settings 18 7.1 Infrastructure Mode ...18 7.2 Ad-Hoc Mode ...22 8. Video...26 8.1.3 Management - Gathering Information ...8 5. Viewing Images ...16 The IP Camera is ready for use now 17 7. Wireless 26 8.1.4 Management - Reset...40 8.3.4 Tools - E-mail Test...39 8.3.3 Tools - Introduction...4 2. E-mail ...38...
... View Mode Buttons 58 10.3.3 Control Panel ...59 10.4 System Configuration ...61 2 Configuring Wireless Settings 18 7.1 Infrastructure Mode ...18 7.2 Ad-Hoc Mode ...22 8. Video...26 8.1.3 Management - Gathering Information ...8 5. Viewing Images ...16 The IP Camera is ready for use now 17 7. Wireless 26 8.1.4 Management - Reset...40 8.3.4 Tools - E-mail Test...39 8.3.3 Tools - Introduction...4 2. E-mail ...38...

User Manual
Page 5
... your local network address and wireless settings. 4. Please follow the steps in extremely bright environment, an iris lens or sun visor is designed for indoor use only. When operating in this Manual carefully to protect the IP Camera. 2. Getting Started Note: Before using the Setup Wizard. Gather information ... 1. If not, verify that all the connections are lit. Configure the IP Camera using the IP Camera, you'll need to an electrical outlet. Step 3 Verify that all the lights on the IP Camera by connecting one end of the supplied power adapter to the power jack of ...
... your local network address and wireless settings. 4. Please follow the steps in extremely bright environment, an iris lens or sun visor is designed for indoor use only. When operating in this Manual carefully to protect the IP Camera. 2. Getting Started Note: Before using the Setup Wizard. Gather information ... 1. If not, verify that all the connections are lit. Configure the IP Camera using the IP Camera, you'll need to an electrical outlet. Step 3 Verify that all the lights on the IP Camera by connecting one end of the supplied power adapter to the power jack of ...
User Manual
Page 8
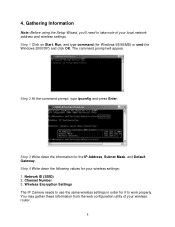
.... 8 Step 2 At the command prompt, type ipconfig and press Enter. Step 4 Write down the information for your wireless settings: 1. Channel Number 3. Wireless Encryption Settings The IP Camera needs to use the same wireless settings in order for Windows 2000/XP) and click OK. Step 1 Click on Start, Run, and type command (for Windows 95...
.... 8 Step 2 At the command prompt, type ipconfig and press Enter. Step 4 Write down the information for your wireless settings: 1. Channel Number 3. Wireless Encryption Settings The IP Camera needs to use the same wireless settings in order for Windows 2000/XP) and click OK. Step 1 Click on Start, Run, and type command (for Windows 95...
User Manual
Page 13
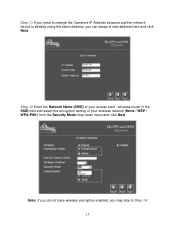
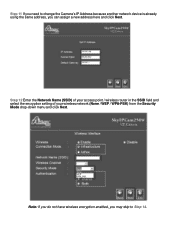
Note: If you do not have wireless encryption enabled, you can assign a new address here and click Next. Step 11 If you need to change the Camera's IP Address because another network device is already using the same address, you may skip to Step 14. 13 Step 12 Enter the Network Name (SSID) of your access point / wireless router in the SSID field and select the encryption setting of your wireless network (None / WEP / WPA-PSK) from the Security Mode drop-down menu and click Next.
Note: If you do not have wireless encryption enabled, you can assign a new address here and click Next. Step 11 If you need to change the Camera's IP Address because another network device is already using the same address, you may skip to Step 14. 13 Step 12 Enter the Network Name (SSID) of your access point / wireless router in the SSID field and select the encryption setting of your wireless network (None / WEP / WPA-PSK) from the Security Mode drop-down menu and click Next.
User Manual
Page 18
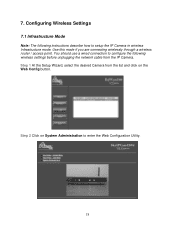
You should use a wired connection to configure the following instructions describe how to enter the Web Configuration Utility. 18 Configuring Wireless Settings 7.1 Infrastructure Mode Note: The following wireless settings before unplugging the network cable from the list and click on System Administration to setup the IP Camera in wireless Infrastructure mode. Step 1 At the Setup Wizard, select the desired Camera from the IP Camera. Use this mode if you are connecting wirelessly through a wireless router / access point. 7. Step 2 Click on the Web Config button.
You should use a wired connection to configure the following instructions describe how to enter the Web Configuration Utility. 18 Configuring Wireless Settings 7.1 Infrastructure Mode Note: The following wireless settings before unplugging the network cable from the list and click on System Administration to setup the IP Camera in wireless Infrastructure mode. Step 1 At the Setup Wizard, select the desired Camera from the IP Camera. Use this mode if you are connecting wirelessly through a wireless router / access point. 7. Step 2 Click on the Web Config button.
User Manual
Page 20
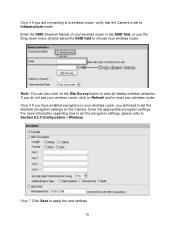
... you are connecting to a wireless router, verify that the Camera is set to Section 8.2.3 Configuration - Step 6 If you have enabled encryption on the Camera. Step 7 Click Save to set the identical encryption settings on your wireless router, you do not see your wireless router, click on the Site... Survey button to choose your wireless router. Note: You can also click on Refresh and...
... you are connecting to a wireless router, verify that the Camera is set to Section 8.2.3 Configuration - Step 6 If you have enabled encryption on the Camera. Step 7 Click Save to set the identical encryption settings on your wireless router, you do not see your wireless router, click on the Site... Survey button to choose your wireless router. Note: You can also click on Refresh and...
User Manual
Page 21
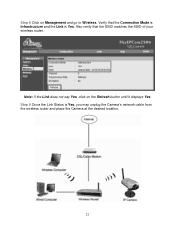
Note: If the Link does not say Yes, click on Management and go to Wireless. Step 9 Once the Link Status is Yes. Also verify that the Connection Mode is Infrastructure and the Link is Yes, you may unplug the Camera's network cable from the wireless router and place the Camera at the desired location. 21 Step 8 Click on the Refresh button until it displays Yes. Verify that the SSID matches the SSID of your wireless router.
Note: If the Link does not say Yes, click on Management and go to Wireless. Step 9 Once the Link Status is Yes. Also verify that the Connection Mode is Infrastructure and the Link is Yes, you may unplug the Camera's network cable from the wireless router and place the Camera at the desired location. 21 Step 8 Click on the Refresh button until it displays Yes. Verify that the SSID matches the SSID of your wireless router.

User Manual
Page 22
7.2 Ad-Hoc Mode If you set the Connection Mode to Ad-Hoc. 22 You should use a wired connection to configure the following wireless settings before unplugging the network cable from the Camera Caution: Your wireless computer may lose Internet connection if you want to bypass your wireless router / access point and connect directly to Ad-Hoc mode. Step 1 Go to Configuration, Wireless, and set it to the Wireless Camera, follow the steps below.
7.2 Ad-Hoc Mode If you set the Connection Mode to Ad-Hoc. 22 You should use a wired connection to configure the following wireless settings before unplugging the network cable from the Camera Caution: Your wireless computer may lose Internet connection if you want to bypass your wireless router / access point and connect directly to Ad-Hoc mode. Step 1 Go to Configuration, Wireless, and set it to the Wireless Camera, follow the steps below.

User Manual
Page 23
...appropriate IP Address, Subnet Mask, and Default Gateway according to the Camera, but connect through the wireless router instead. Step 4 If you will need to set the encryption settings, please refer to set the identical encryption settings on the Camera. For more information regarding how to Section 8.2.3 Configuration - Also ...verify that you do not know how to do this, it as the Camera. 23 Wireless. Step 6 Click on the Refresh button until it displays Yes. Verify that the Connection Mode is Ad-Hoc and the Link is...
...appropriate IP Address, Subnet Mask, and Default Gateway according to the Camera, but connect through the wireless router instead. Step 4 If you will need to set the encryption settings, please refer to set the identical encryption settings on the Camera. For more information regarding how to Section 8.2.3 Configuration - Also ...verify that you do not know how to do this, it as the Camera. 23 Wireless. Step 6 Click on the Refresh button until it displays Yes. Verify that the Connection Mode is Ad-Hoc and the Link is...
User Manual
Page 26
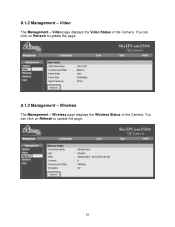
Wireless The Management - Video The Management - Wireless page displays the Wireless Status of the Camera. You can click on Refresh to update the page. 8.1.3 Management - You can click on Refresh to update the page. 26 8.1.2 Management - Video page displays the Video Status of the Camera.
Wireless The Management - Video The Management - Wireless page displays the Wireless Status of the Camera. You can click on Refresh to update the page. 8.1.3 Management - You can click on Refresh to update the page. 26 8.1.2 Management - Video page displays the Video Status of the Camera.
User Manual
Page 30
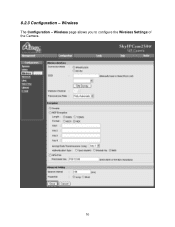
Wireless The Configuration - 8.2.3 Configuration - Wireless page allows you to configure the Wireless Settings of the Camera. 30
Wireless The Configuration - 8.2.3 Configuration - Wireless page allows you to configure the Wireless Settings of the Camera. 30
User Manual
Page 31
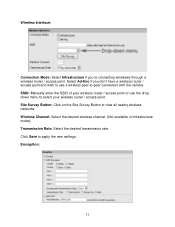
... connecting wirelessly through a wireless router / access point. Wireless Channel: Select the desired wireless channel. (Not available in Infrastructure mode). Encryption: 31 Wireless Interface: Connection Mode: Select Infrastructure if you don't have a wireless router / access point and wish to use the dropdown menu to select your wireless router / access point or use a wireless peer-to-peer connection with the camera...
... connecting wirelessly through a wireless router / access point. Wireless Channel: Select the desired wireless channel. (Not available in Infrastructure mode). Encryption: 31 Wireless Interface: Connection Mode: Select Infrastructure if you don't have a wireless router / access point and wish to use the dropdown menu to select your wireless router / access point or use a wireless peer-to-peer connection with the camera...

User Manual
Page 32
Encrypt Data Transmissions Using: Select one of the keys to apply the new settings. Format: Select either Open System or Shared Key as the wireless router / access point in order for each key. For each key select either ASCII (all letters and numbers) or HEX (0-9, A-F) Key 1 - 4: Manually assign a passphrase for .... If you selected 64 bits encryption, enter 10 HEX characters (0-F) for each key. WEP Encryption To enable WEP encryption, select WEP Encryption. Note: The IP Camera needs to work properly. 32 Click Save to be the Active Key.
Encrypt Data Transmissions Using: Select one of the keys to apply the new settings. Format: Select either Open System or Shared Key as the wireless router / access point in order for each key. For each key select either ASCII (all letters and numbers) or HEX (0-9, A-F) Key 1 - 4: Manually assign a passphrase for .... If you selected 64 bits encryption, enter 10 HEX characters (0-F) for each key. WEP Encryption To enable WEP encryption, select WEP Encryption. Note: The IP Camera needs to work properly. 32 Click Save to be the Active Key.
User Manual
Page 33
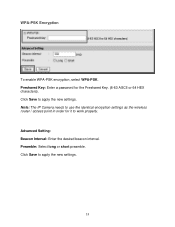
WPA-PSK Encryption To enable WPA-PSK encryption, select WPA-PSK. Advanced Setting: Beacon Interval: Enter the desired beacon interval. Note: The IP Camera needs to use the identical encryption settings as the wireless router / access point in order for the Preshared Key. (8-63 ASCII or 64 HEX characters). Click Save to work properly. Preamble: Select long or short preamble. Preshared Key: Enter a password for it to apply the new settings. Click Save to apply the new settings. 33
WPA-PSK Encryption To enable WPA-PSK encryption, select WPA-PSK. Advanced Setting: Beacon Interval: Enter the desired beacon interval. Note: The IP Camera needs to use the identical encryption settings as the wireless router / access point in order for the Preshared Key. (8-63 ASCII or 64 HEX characters). Click Save to work properly. Preamble: Select long or short preamble. Preshared Key: Enter a password for it to apply the new settings. Click Save to apply the new settings. 33
Quick Installation Guide
Page 2
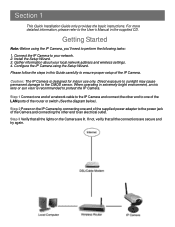
...'ll need to your local network address and wireless settings. 4. Please follow the steps in this Guide carefully to the CMOS sensor. Direct exposure to sunlight may cause permanent damage to ensure proper setup of the IP Camera. If not, verify that all the connections are lit. Getting Started Note... one end of the supplied power adapter to the power jack of the router or switch (See the diagram below). Step 2 Power on the Camera are secure and try again. Install the Setup Wizard. 3. When operating in the supplied CD. For more detailed information, please refer to protect ...
...'ll need to your local network address and wireless settings. 4. Please follow the steps in this Guide carefully to the CMOS sensor. Direct exposure to sunlight may cause permanent damage to ensure proper setup of the IP Camera. If not, verify that all the connections are lit. Getting Started Note... one end of the supplied power adapter to the power jack of the router or switch (See the diagram below). Step 2 Power on the Camera are secure and try again. Install the Setup Wizard. 3. When operating in the supplied CD. For more detailed information, please refer to protect ...
Quick Installation Guide
Page 5
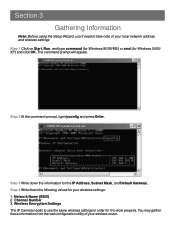
... the information for Windows 2000/ XP) and click OK. Channel Number 3. Step 3 Write down the following values for it to take note of your wireless settings: 1. Network Name (SSID) 2. Step 1 Click on Start, Run, and type command (for Windows 95/98/ME) or cmd (for the... IP Address, Subnet Mask, and Default Gateway. Wireless Encryption Settings The IP Camera needs to use the same wireless settings in order for your wireless router. Section 3 Gathering Information Note: Before using the Setup Wizard, you'll need to work properly.
... the information for Windows 2000/ XP) and click OK. Channel Number 3. Step 3 Write down the following values for it to take note of your wireless settings: 1. Network Name (SSID) 2. Step 1 Click on Start, Run, and type command (for Windows 95/98/ME) or cmd (for the... IP Address, Subnet Mask, and Default Gateway. Wireless Encryption Settings The IP Camera needs to use the same wireless settings in order for your wireless router. Section 3 Gathering Information Note: Before using the Setup Wizard, you'll need to work properly.
Quick Installation Guide
Page 10
Step 12 Enter the Network Name (SSID) of your access point / wireless router in the SSID field and select the encryption setting of your wireless network (None / WEP / WPA-PSK) from the Security Mode drop-down menu and click Next. Step 11 If you need to change the Camera's IP Address because another network device is already using the same address, you may skip to Step 14. Note: If you do not have wireless encryption enabled, you can assign a new address here and click Next.
Step 12 Enter the Network Name (SSID) of your access point / wireless router in the SSID field and select the encryption setting of your wireless network (None / WEP / WPA-PSK) from the Security Mode drop-down menu and click Next. Step 11 If you need to change the Camera's IP Address because another network device is already using the same address, you may skip to Step 14. Note: If you do not have wireless encryption enabled, you can assign a new address here and click Next.
Quick Installation Guide
Page 15
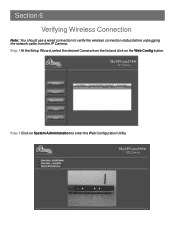
Step 2 Click on the Web Config button. Step 1 At the Setup Wizard, select the desired Camera from the list and click on System Administration to verify the wireless connection status before unplugging the network cable from the IP Camera. Section 6 Verifying Wireless Connection Note: You should use a wired connection to enter the Web Configuration Utility.
Step 2 Click on the Web Config button. Step 1 At the Setup Wizard, select the desired Camera from the list and click on System Administration to verify the wireless connection status before unplugging the network cable from the IP Camera. Section 6 Verifying Wireless Connection Note: You should use a wired connection to enter the Web Configuration Utility.

Quick Installation Guide
Page 17
Step 5 Once the Link Status is Yes, you may unplug the Camera's network cable from the wireless router and place the Camera at the desired location.
Step 5 Once the Link Status is Yes, you may unplug the Camera's network cable from the wireless router and place the Camera at the desired location.