
User Manual
Page 3
This Adapter supports WiFi Protected Access (WPA2-PSK and WPA-PSK) data encryption for the multi-path environment • Drivers support Windows 2000, XP, Vista and 7 • Simple user setup & diagnostics utilities 3 Client users are required to 54Mbps data rate • Maximum reliability, throughput and connectivity with ...
This Adapter supports WiFi Protected Access (WPA2-PSK and WPA-PSK) data encryption for the multi-path environment • Drivers support Windows 2000, XP, Vista and 7 • Simple user setup & diagnostics utilities 3 Client users are required to 54Mbps data rate • Maximum reliability, throughput and connectivity with ...

User Manual
Page 4
... you see this card. Step 2.4 Click Cancel when you that the driver was installed successfully. A window will install its built in drivers for this message, continue to install the Wireless PCI Adapter. Windows XP/2000 Users: Windows 7/Vista Users: After turning on the wireless PCI adapter. Replace the cover of your computer. Step...
... you see this card. Step 2.4 Click Cancel when you that the driver was installed successfully. A window will install its built in drivers for this message, continue to install the Wireless PCI Adapter. Windows XP/2000 Users: Windows 7/Vista Users: After turning on the wireless PCI adapter. Replace the cover of your computer. Step...

User Manual
Page 5
Step 2.5 Insert the CD into the CD drive. The Autorun screen will pop up. Windows Vista Users: At this point, you click Continue to Start, Run, and type D:\Utility\Setup.exe (where D is the letter of your CD drive) and ...click OK. Note: If the Autorun screen doesn't appear automatically, go to continue with the installation. Windows 7 Users: Select Install Driver (Windows 7) from the menu. Windows Vista/XP/2000 Users: Select Install Utility and Driver (Windows Vista/XP/2K) from the menu. Step 2.6 Click Next at the welcome screen. 5 Make sure that you...
Step 2.5 Insert the CD into the CD drive. The Autorun screen will pop up. Windows Vista Users: At this point, you click Continue to Start, Run, and type D:\Utility\Setup.exe (where D is the letter of your CD drive) and ...click OK. Note: If the Autorun screen doesn't appear automatically, go to continue with the installation. Windows 7 Users: Select Install Driver (Windows 7) from the menu. Windows Vista/XP/2000 Users: Select Install Utility and Driver (Windows Vista/XP/2K) from the menu. Step 2.6 Click Next at the welcome screen. 5 Make sure that you...

User Manual
Page 7
Please wait when Windows is installing the driver for Airlink101 802.11g Wireless Adapter and the utility, Airlink101 Wireless LAN Monitor. Step 2.9 Click Finish to complete the installation. 7 Step 2.8 Windows 2000/XP Users: Click Continue Anyway at the Windows Logo Screen. (For Windows 2000, click Yes at the Digital Signature Not Found prompt).
Please wait when Windows is installing the driver for Airlink101 802.11g Wireless Adapter and the utility, Airlink101 Wireless LAN Monitor. Step 2.9 Click Finish to complete the installation. 7 Step 2.8 Windows 2000/XP Users: Click Continue Anyway at the Windows Logo Screen. (For Windows 2000, click Yes at the Digital Signature Not Found prompt).

User Manual
Page 9
... one you are attempting to connect to has wireless encryption enabled. Step 3.1 Click on the wireless icon in Windows 7 to and click Connect. 3. The connection will pop up. Connect to Wireless Network For Windows 7 Users: You will need to use the utility built in the system tray at the bottom right-hand...
... one you are attempting to connect to has wireless encryption enabled. Step 3.1 Click on the wireless icon in Windows 7 to and click Connect. 3. The connection will pop up. Connect to Wireless Network For Windows 7 Users: You will need to use the utility built in the system tray at the bottom right-hand...

User Manual
Page 10
For Windows Vista/XP/2000 Users: Step 3.1 Open the Airlink101 802.11g Wireless LAN Monitor utility by double clicking on the icon in the system tray at the bottom right-hand corner of your screen. 10
For Windows Vista/XP/2000 Users: Step 3.1 Open the Airlink101 802.11g Wireless LAN Monitor utility by double clicking on the icon in the system tray at the bottom right-hand corner of your screen. 10
User Manual
Page 15
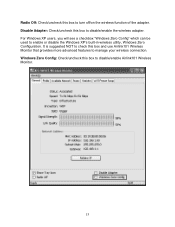
... off/on the wireless function of the adapter. Radio Off: Check/uncheck this box to disable/enable Airlink101 Wireless Monitor. 15 For Windows XP users, you will see a checkbox "Windows Zero Config" which can be used to manage your wireless connection. It is suggested NOT to check this box to disable/enable... the wireless adapter. Disable Adapter: Check/uncheck this box and use Airlink101 Wireless Monitor that provides more advanced features to enable or disable the Windows XP's built-in wireless utility...
... off/on the wireless function of the adapter. Radio Off: Check/uncheck this box to disable/enable Airlink101 Wireless Monitor. 15 For Windows XP users, you will see a checkbox "Windows Zero Config" which can be used to manage your wireless connection. It is suggested NOT to check this box to disable/enable... the wireless adapter. Disable Adapter: Check/uncheck this box and use Airlink101 Wireless Monitor that provides more advanced features to enable or disable the Windows XP's built-in wireless utility...

User Manual
Page 22
For Pin Input Config method, click Pin Input Config (PIN) button, continue to Step 4.6.2 - The router will be built in few seconds. 22 WPS button) on the back of the router and release it right away. For Push Button method, click Push Button Config (PBC) button, continue to Step 4.6.3a Step 4.6.2 When you see this window pops up, within the following 2 minutes, push the Easy Setup Button (i.e. - The connection will now start to synchronize the security settings with the wireless PCI adapter.
For Pin Input Config method, click Pin Input Config (PIN) button, continue to Step 4.6.2 - The router will be built in few seconds. 22 WPS button) on the back of the router and release it right away. For Push Button method, click Push Button Config (PBC) button, continue to Step 4.6.3a Step 4.6.2 When you see this window pops up, within the following 2 minutes, push the Easy Setup Button (i.e. - The connection will now start to synchronize the security settings with the wireless PCI adapter.
User Manual
Page 29
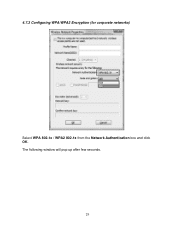
The following window will pop up after few seconds. 29 4.7.3 Configuring WPA/WPA2 Encryption (for corporate networks) Select WPA 802.1x / WPA2 802.1x from the Network Authentication box and click OK.
The following window will pop up after few seconds. 29 4.7.3 Configuring WPA/WPA2 Encryption (for corporate networks) Select WPA 802.1x / WPA2 802.1x from the Network Authentication box and click OK.

User Manual
Page 35
4.9 About The About window provides the information about the Airlink101 802.11g Wireless LAN Monitor Utility version and the current driver version. 35
4.9 About The About window provides the information about the Airlink101 802.11g Wireless LAN Monitor Utility version and the current driver version. 35
User Manual
Page 37
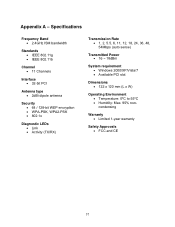
...; Link • Activity (TX/RX) Transmission Rate • 1, 2, 5.5, 6, 11, 12, 18, 24, 36, 48, 54Mbps (auto sense) Transmitted Power • 16 ~ 18dBm System requirement • Windows 2000/XP/Vista/7 • Available PCI slot Dimensions • 122 x 120 mm (L x W) Operating Environment • Temperature: 0ºC to 55ºC • Humidity: Max. 95% noncondensing...
...; Link • Activity (TX/RX) Transmission Rate • 1, 2, 5.5, 6, 11, 12, 18, 24, 36, 48, 54Mbps (auto sense) Transmitted Power • 16 ~ 18dBm System requirement • Windows 2000/XP/Vista/7 • Available PCI slot Dimensions • 122 x 120 mm (L x W) Operating Environment • Temperature: 0ºC to 55ºC • Humidity: Max. 95% noncondensing...
Quick Installation Guide
Page 1
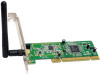
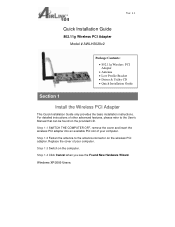
... found on the provided CD. Step 1.4 Click Cancel when you see the Found New Hardware Wizard. Windows XP/2000 Users: For detailed instructions of your computer. Ver. 1.1 Quick Installation Guide 802.11g Wireless PCI Adapter Model # AWLH3028v2 Package Contents: • 802.11g Wireless PCI Adapter • Antenna • Low Profile Bracket •...
... found on the provided CD. Step 1.4 Click Cancel when you see the Found New Hardware Wizard. Windows XP/2000 Users: For detailed instructions of your computer. Ver. 1.1 Quick Installation Guide 802.11g Wireless PCI Adapter Model # AWLH3028v2 Package Contents: • 802.11g Wireless PCI Adapter • Antenna • Low Profile Bracket •...
Quick Installation Guide
Page 2
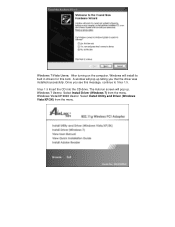
Windows Vista/XP/2000 Users: Select Install Utility and Driver (Windows Vista/XP/2K) from the menu. Once you that the driver was installed successfully. Windows 7/Vista Users: After turning on the computer, Windows will install its built in drivers for this message, continue to Step 1.5. A window will pop up telling you see this card. The Autorun screen will pop up . Windows 7 Users: Select Install Driver (Windows 7) from the menu. Step 1.5 Insert the CD into the CD drive.
Windows Vista/XP/2000 Users: Select Install Utility and Driver (Windows Vista/XP/2K) from the menu. Once you that the driver was installed successfully. Windows 7/Vista Users: After turning on the computer, Windows will install its built in drivers for this message, continue to Step 1.5. A window will pop up telling you see this card. The Autorun screen will pop up . Windows 7 Users: Select Install Driver (Windows 7) from the menu. Step 1.5 Insert the CD into the CD drive.

Quick Installation Guide
Page 3
Windows Vista Users: At this point, you click Continue to continue with the installation. Step 1.6 Click Next at the welcome screen. Note: If the Autorun screen doesn't appear automatically, go to start installing the driver/utility. Make sure that you may get a warning message like the one below. Step 1.7 Click Install to Start, Run, and type D:\Utility\Setup.exe (where D is the letter of your CD drive) and click OK.
Windows Vista Users: At this point, you click Continue to continue with the installation. Step 1.6 Click Next at the welcome screen. Note: If the Autorun screen doesn't appear automatically, go to start installing the driver/utility. Make sure that you may get a warning message like the one below. Step 1.7 Click Install to Start, Run, and type D:\Utility\Setup.exe (where D is the letter of your CD drive) and click OK.
Quick Installation Guide
Page 4
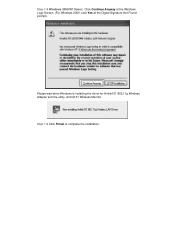
Step 1.8 Windows 2000/XP Users: Click Continue Anyway at the Windows Logo Screen. (For Windows 2000, click Yes at the Digital Signature Not Found prompt). Step 1.9 Click Finish to complete the installation. Please wait when Windows is installing the driver for Airlink101 802.11g Wireless Adapter and the utility, Airlink101 Wireless Monitor.
Step 1.8 Windows 2000/XP Users: Click Continue Anyway at the Windows Logo Screen. (For Windows 2000, click Yes at the Digital Signature Not Found prompt). Step 1.9 Click Finish to complete the installation. Please wait when Windows is installing the driver for Airlink101 802.11g Wireless Adapter and the utility, Airlink101 Wireless Monitor.

Quick Installation Guide
Page 6
... the wireless network you want to connect to has wireless encryption enabled. The connection should be now established. Currently, Airlink101 Wireless Monitor does not support Windows 7. Click OK. A list of available network will need to use the utility built in the system tray at the bottom right-hand corner of your...
... the wireless network you want to connect to has wireless encryption enabled. The connection should be now established. Currently, Airlink101 Wireless Monitor does not support Windows 7. Click OK. A list of available network will need to use the utility built in the system tray at the bottom right-hand corner of your...

Quick Installation Guide
Page 7
For Windows Vista/XP/2000 Users: Step 2.1 Open the Airlink101 Wireless Monitor utility by double clicking on the icon in the system tray at the bottom right-hand corner of your screen.
For Windows Vista/XP/2000 Users: Step 2.1 Open the Airlink101 Wireless Monitor utility by double clicking on the icon in the system tray at the bottom right-hand corner of your screen.


