
User Manual
Page 4
... before operating your TV. • Keep the safety and operating instructions for future reference. • Heed all operating and use on-screen menus and closed captioning capabilities, making it one of power supplied to come. We designed it with any attachments and/or equipment without ...or adult, and serious damage to protect it from overheating. BP68-00516A-01 (P62A_Akai_Eng) 7/5/05 1:08 PM Page 4 Thank You for Choosing Akai Thank you 've followed the manufacturer's instructions for mounting. • Operate your TV receiver only from the type of power source indicated on the...
... before operating your TV. • Keep the safety and operating instructions for future reference. • Heed all operating and use on-screen menus and closed captioning capabilities, making it one of power supplied to come. We designed it with any attachments and/or equipment without ...or adult, and serious damage to protect it from overheating. BP68-00516A-01 (P62A_Akai_Eng) 7/5/05 1:08 PM Page 4 Thank You for Choosing Akai Thank you 've followed the manufacturer's instructions for mounting. • Operate your TV receiver only from the type of power source indicated on the...

User Manual
Page 6
Additionally, viewing other burned-in the wide screen 16:9 ratio format, or expanded to fill the screen if your Akai limited warranty. To avoid this feature, and constantly moving. English - 6 The images displayed on them should primarily be in images, is not... covered by your model offers this , vary the programming and images, and primarily display full screen moving . On television ...
Additionally, viewing other burned-in the wide screen 16:9 ratio format, or expanded to fill the screen if your Akai limited warranty. To avoid this feature, and constantly moving. English - 6 The images displayed on them should primarily be in images, is not... covered by your model offers this , vary the programming and images, and primarily display full screen moving . On television ...

User Manual
Page 10
...Installing Batteries in the Remote Control 27 Chapter 3: Operation Turning the TV On and Off ...28 Plug & Play Feature ...28 Adjusting the Screen Automatically (Self Focus 30 Deactivating the Automatic Execution of the Self Focus 31 Removing the "Self Focus" Message from the Display 31 Adjusting ...Convergence Manually 32 Viewing the Menus and On-Screen Displays 34 Viewing the Menus...34 Viewing the Display 34 Selecting a Menu Language ...35 Selecting the Antenna Input ...35 Memorizing the Channels ...
...Installing Batteries in the Remote Control 27 Chapter 3: Operation Turning the TV On and Off ...28 Plug & Play Feature ...28 Adjusting the Screen Automatically (Self Focus 30 Deactivating the Automatic Execution of the Self Focus 31 Removing the "Self Focus" Message from the Display 31 Adjusting ...Convergence Manually 32 Viewing the Menus and On-Screen Displays 34 Viewing the Menus...34 Viewing the Display 34 Selecting a Menu Language ...35 Selecting the Antenna Input ...35 Memorizing the Channels ...

User Manual
Page 11
... Up Your Remote Control to External input mode 52 9 9 Chapter 4: Special Features 0 Fine Tuning Analog Channels 53 0 Checking the Digital-Signal Strength 54 0 Changing the Screen Size ...55 1 BBE ...56 2 Auto Volume ...57 3 Choosing a Multi-Channel Sound (MTS) track - Digital 58 3 Choosing a Multi-Channel Sound (MTS) track - Analog 59 4 Choosing a ... to Set up Restrictions using the Movie Ratings: G, PG, PG-13, R, NC-17, X 67 8 Important Notes About Parental Locks 68 8 Viewing Closed Captions (On-Screen Text Messages) - Analog 69 0 Viewing Closed Captions (On...
... Up Your Remote Control to External input mode 52 9 9 Chapter 4: Special Features 0 Fine Tuning Analog Channels 53 0 Checking the Digital-Signal Strength 54 0 Changing the Screen Size ...55 1 BBE ...56 2 Auto Volume ...57 3 Choosing a Multi-Channel Sound (MTS) track - Digital 58 3 Choosing a Multi-Channel Sound (MTS) track - Analog 59 4 Choosing a ... to Set up Restrictions using the Movie Ratings: G, PG, PG-13, R, NC-17, X 67 8 Important Notes About Parental Locks 68 8 Viewing Closed Captions (On-Screen Text Messages) - Analog 69 0 Viewing Closed Captions (On...

User Manual
Page 12
...piece is a high-performance unit that includes the following special features: • Easy-to-use remote control • Easy-to-use on-screen menu system • Automatic timer to turn the TV on and off • Adjustable picture and sound settings that can be stored in ... unpacked your dealer. This TV is missing or broken, call your TV, check to obtain a sharper image from external sources • Adjusting the Screen Automatically (Self Focus) ENTER • Digital Input (Digital Visual Interface) jack • Digital Audio Output (COAXIAL/OPTICAL) jacks Accessories ENTER Once you...
...piece is a high-performance unit that includes the following special features: • Easy-to-use remote control • Easy-to-use on-screen menu system • Automatic timer to turn the TV on and off • Adjustable picture and sound settings that can be stored in ... unpacked your dealer. This TV is missing or broken, call your TV, check to obtain a sharper image from external sources • Adjusting the Screen Automatically (Self Focus) ENTER • Digital Input (Digital Visual Interface) jack • Digital Audio Output (COAXIAL/OPTICAL) jacks Accessories ENTER Once you...
User Manual
Page 13
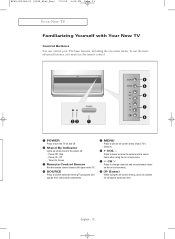
...you must use the remote control. Œ POWER Press to change ) a particular item. " (Enter) While using the on-screen menu. ∏ CH Press to turn the TV on -screen menu. Power Off ; Power On ; Timer On ; Green ˇ Remote Control Sensor Aim the remote control towards this spot on... the TV. ¨ SOURCE Press to switch between items on the on -screen menus, press to activate (or change channels and move between viewing TV programs and signals from connected components. ˆ MENU Press to select items ...
...you must use the remote control. Œ POWER Press to change ) a particular item. " (Enter) While using the on-screen menu. ∏ CH Press to turn the TV on -screen menu. Power Off ; Power On ; Timer On ; Green ˇ Remote Control Sensor Aim the remote control towards this spot on... the TV. ¨ SOURCE Press to switch between items on the on -screen menus, press to activate (or change channels and move between viewing TV programs and signals from connected components. ˆ MENU Press to select items ...

User Manual
Page 16
...63743; PRE-CH Tunes to the previous channel. Ò SLEEP Press to select a preset time interval for details. Œ POWER Turns the TV on -screen Electronic Program Guide (EPG). ' INFO Press to decrease or increase the volume. ENTER ı GUIDE ¸ Press to display the on and off. &#...Cable" or "Air". ˆ FAV. REW STOP PLAY/PAUSE FF ˘ ENTER While using the remote, always point it will be controlled by the Akai remote control (i.e., TV, VCR, Cable box or DVD). ˇPress to select additional channels (digital and analog) being broadcast by the same station. "...
...63743; PRE-CH Tunes to the previous channel. Ò SLEEP Press to select a preset time interval for details. Œ POWER Turns the TV on -screen Electronic Program Guide (EPG). ' INFO Press to decrease or increase the volume. ENTER ı GUIDE ¸ Press to display the on and off. &#...Cable" or "Air". ˆ FAV. REW STOP PLAY/PAUSE FF ˘ ENTER While using the remote, always point it will be controlled by the Akai remote control (i.e., TV, VCR, Cable box or DVD). ˇPress to select additional channels (digital and analog) being broadcast by the same station. "...

User Manual
Page 25
...; Use a DVI 25-pin cable (commercially available) in order to the DVI INPUT jack on the TV, high-definition pictures can be displayed on the screen in their digital form. 1 Connect a set of audio cables between the "DVI IN (AUDIO) (L, R)" jacks on the TV and the AUDIO OUT jacks on the...
...; Use a DVI 25-pin cable (commercially available) in order to the DVI INPUT jack on the TV, high-definition pictures can be displayed on the screen in their digital form. 1 Connect a set of audio cables between the "DVI IN (AUDIO) (L, R)" jacks on the TV and the AUDIO OUT jacks on the...

User Manual
Page 30
...feature will not work without a signal. • Ambient light that is selected. Alternate method: Simply press the SELF FOCUS button on the edges of the screen. T V Picture Mode : Dynamic √ Size : 16:9 √ Self Focus √ Manual Convergence √ 2 T V Press the ... ...this occurs, darken the environment and try again. BP68-00516A-01 (P62A_Akai_Eng) 7/5/05 1:08 PM Page 30 OPERATION Adjusting the Screen Automatically (Self Focus) The "Self Focus" feature automatically sets the optimum picture quality when blurring, overlapping colors or incorrect focus ...
...feature will not work without a signal. • Ambient light that is selected. Alternate method: Simply press the SELF FOCUS button on the edges of the screen. T V Picture Mode : Dynamic √ Size : 16:9 √ Self Focus √ Manual Convergence √ 2 T V Press the ... ...this occurs, darken the environment and try again. BP68-00516A-01 (P62A_Akai_Eng) 7/5/05 1:08 PM Page 30 OPERATION Adjusting the Screen Automatically (Self Focus) The "Self Focus" feature automatically sets the optimum picture quality when blurring, overlapping colors or incorrect focus ...

User Manual
Page 31
... is then fully stabilized. 1 Press the MENU button. "Off" by pressing the ... To turn off the automatic execution of the screen image. or † button, then press nd the ENTER button. T V Picture Mode : Dynamic √ Size √ Self Focus √ Manual Convergence √ may...press the ENTER button. To set , the "Self Focus" feature starts on default. To remove the message "Self Focus" and horizontal bar on the screen during the self focus process, select al. English - 31 Press the ▲ or ▼ button to select "Auto Perform", then press the ...
... is then fully stabilized. 1 Press the MENU button. "Off" by pressing the ... To turn off the automatic execution of the screen image. or † button, then press nd the ENTER button. T V Picture Mode : Dynamic √ Size √ Self Focus √ Manual Convergence √ may...press the ENTER button. To set , the "Self Focus" feature starts on default. To remove the message "Self Focus" and horizontal bar on the screen during the self focus process, select al. English - 31 Press the ▲ or ▼ button to select "Auto Perform", then press the ...

User Manual
Page 32
... MENU button. BP68-00516A-01 (P62A_Akai_Eng) 7/5/05 1:08 PM Page 32 OPERATION Adjusting Convergence Manually If the color appears spread out or "smeared" on the screen, the convergence probably needs alignment. Press the ▲ or ▼ button to select "Red" or "Blue".
... MENU button. BP68-00516A-01 (P62A_Akai_Eng) 7/5/05 1:08 PM Page 32 OPERATION Adjusting Convergence Manually If the color appears spread out or "smeared" on the screen, the convergence probably needs alignment. Press the ▲ or ▼ button to select "Red" or "Blue".

User Manual
Page 33
... PM Page 33 OPERATION 3 Press the ENTER button. Red Please Use Remote Control. 6 To return to exit. The previously adjusted convergence will appear on the screen. Red Please Use Remote Control. Adjust the convergence by pressing the buttons, then press the ENTER button. Red Please Use Remote Control. 4 If a horizontal line...
... PM Page 33 OPERATION 3 Press the ENTER button. Red Please Use Remote Control. 6 To return to exit. The previously adjusted convergence will appear on the screen. Red Please Use Remote Control. Adjust the convergence by pressing the buttons, then press the ENTER button. Red Please Use Remote Control. 4 If a horizontal line...

User Manual
Page 34
... Sound Mode : Custom MTS : Stereo No Time Information English - 34 BP68-00516A-01 (P62A_Akai_Eng) 7/5/05 1:08 PM Page 34 OPERATION Viewing the Menus and On-Screen Displays Viewing the Menus 1 T V With the power on the remote control. Source List Edit Name Input : TV 2 T V Input Press the ▲ or ▼ button to... menu. 3 Press the EXIT button to exit. √ √ œ You can also use the MENU, CH / , VOL+/-, and √ √ (ENTER) buttons on the screen.
... Sound Mode : Custom MTS : Stereo No Time Information English - 34 BP68-00516A-01 (P62A_Akai_Eng) 7/5/05 1:08 PM Page 34 OPERATION Viewing the Menus and On-Screen Displays Viewing the Menus 1 T V With the power on the remote control. Source List Edit Name Input : TV 2 T V Input Press the ▲ or ▼ button to... menu. 3 Press the EXIT button to exit. √ √ œ You can also use the MENU, CH / , VOL+/-, and √ √ (ENTER) buttons on the screen.

User Manual
Page 45
...", then press the ENTER button. Press the ... BP68-00516A-01 (P62A_Akai_Eng) 7/5/05 1:09 PM Page 45 OPERATION Customizing the Picture You can use the on-screen menus to change the "Contrast", "Brightness", "Sharpness", "Color", "Tint", and " Color Tone" according to personal preference. 1 Press the MENU button.
...", then press the ENTER button. Press the ... BP68-00516A-01 (P62A_Akai_Eng) 7/5/05 1:09 PM Page 45 OPERATION Customizing the Picture You can use the on-screen menus to change the "Contrast", "Brightness", "Sharpness", "Color", "Tint", and " Color Tone" according to personal preference. 1 Press the MENU button.

User Manual
Page 55
... Viewing with a 16:9 signal (When a 16:9 signal is available by pressing the ▲ o ▼ button. œ Changing the Screen Format feature availability depends on the remote control repeatedly to select one of picture while viewing a DVD title. 16:9 Panorama Zoom1 Move 4:3 English ...√ Size : 16:9 √ Self Focus √ Manual Convergence √ 2 T V Press the ▲ or ▼ button to select the screen format you want . Size 16:9 Panorama Zoom1 Zoom2 4:3 œ In the "Zoom1" and "Zoom2" modes, lifting is received) The illustrations below show the ...
... Viewing with a 16:9 signal (When a 16:9 signal is available by pressing the ▲ o ▼ button. œ Changing the Screen Format feature availability depends on the remote control repeatedly to select one of picture while viewing a DVD title. 16:9 Panorama Zoom1 Move 4:3 English ...√ Size : 16:9 √ Self Focus √ Manual Convergence √ 2 T V Press the ▲ or ▼ button to select the screen format you want . Size 16:9 Panorama Zoom1 Zoom2 4:3 œ In the "Zoom1" and "Zoom2" modes, lifting is received) The illustrations below show the ...
User Manual
Page 64
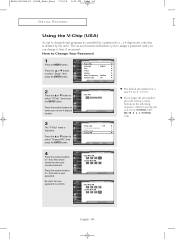
... number, press the remote control buttons in the following sequence, which resets the pin to 0-0-0-0: POWER (Off), MUTE, 8, 2, 4, POWER (On). 4 Press the number buttons (0 ~ 9) on -screen menu will instruct you to assign a password (and you can change it later, if necessary). Press the number buttons (0 ~ 9) to select "Setup", then press the...
... number, press the remote control buttons in the following sequence, which resets the pin to 0-0-0-0: POWER (Off), MUTE, 8, 2, 4, POWER (On). 4 Press the number buttons (0 ~ 9) on -screen menu will instruct you to assign a password (and you can change it later, if necessary). Press the number buttons (0 ~ 9) to select "Setup", then press the...

User Manual
Page 69
BP68-00516A-01 (P62A_Akai_Eng) 7/5/05 1:09 PM Page 69 SPECIAL FEATURES Analog Viewing Closed Captions (On-Screen Text Messages) The Analog Caption function operates in either analog RF channel mode or external signal mode. (Depending on the broadcasting signal, the Analog Caption ...
BP68-00516A-01 (P62A_Akai_Eng) 7/5/05 1:09 PM Page 69 SPECIAL FEATURES Analog Viewing Closed Captions (On-Screen Text Messages) The Analog Caption function operates in either analog RF channel mode or external signal mode. (Depending on the broadcasting signal, the Analog Caption ...

User Manual
Page 70
...; Press the ▲ or ▼ button to select "Caption". BP68-00516A-01 (P62A_Akai_Eng) 7/5/05 1:09 PM Page 70 SPECIAL FEATURES Digital Viewing Closed Captions (On-Screen Text Messages) The Digital Captions function operates on digital channels. 1 Press the MENU button.
...; Press the ▲ or ▼ button to select "Caption". BP68-00516A-01 (P62A_Akai_Eng) 7/5/05 1:09 PM Page 70 SPECIAL FEATURES Digital Viewing Closed Captions (On-Screen Text Messages) The Digital Captions function operates on digital channels. 1 Press the MENU button.

User Manual
Page 72
...", then press the ENTER button. BP68-00516A-01 (P62A_Akai_Eng) 7/5/05 1:09 PM Page 72 SPECIAL FEATURES Menu Translucency Level Adjusts the transparency of the menu screen. 1 Press the MENU button. Press the ▲ or ▼ button to exit. T V Setup Plug & Play √ Language : English √ Time √ V-Chip √ Caption √...
...", then press the ENTER button. BP68-00516A-01 (P62A_Akai_Eng) 7/5/05 1:09 PM Page 72 SPECIAL FEATURES Menu Translucency Level Adjusts the transparency of the menu screen. 1 Press the MENU button. Press the ▲ or ▼ button to exit. T V Setup Plug & Play √ Language : English √ Time √ V-Chip √ Caption √...

User Manual
Page 77
... the time. Notes: • Displays the program times in two hour segments. • Displays the current date and time on the top right of the screen. • The current time displayed on the program information is subject to the time information sent from the broadcasting station, so it may now: •...
... the time. Notes: • Displays the program times in two hour segments. • Displays the current date and time on the top right of the screen. • The current time displayed on the program information is subject to the time information sent from the broadcasting station, so it may now: •...
