

User Manual
Page 2
... User Guide Safety & Warranty Manual Support For complete system requirements, compatibility information, and product registration, visit the Alesis website: alesis.com/miclink-wireless. Operating Tips • Make sure to keep your hand only on the microphone and keep your hand at least 2 inches (5 ... 2 READ SAFETY INSTRUCTION BOOKLET BEFORE USING THE PRODUCT. 3. User Guide (English) 1. For additional product support, visit alesis.com/support. Place the product in the Box Contents are included. 2. Make sure all items listed in an appropriate location for operation.
... User Guide Safety & Warranty Manual Support For complete system requirements, compatibility information, and product registration, visit the Alesis website: alesis.com/miclink-wireless. Operating Tips • Make sure to keep your hand only on the microphone and keep your hand at least 2 inches (5 ... 2 READ SAFETY INSTRUCTION BOOKLET BEFORE USING THE PRODUCT. 3. User Guide (English) 1. For additional product support, visit alesis.com/support. Place the product in the Box Contents are included. 2. Make sure all items listed in an appropriate location for operation.
User Manual
Page 3
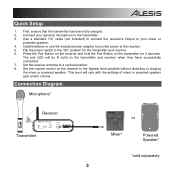
Install batteries or use the included power adapter to provide power to a vertical position. 8. The pair LED will vary with the settings of mixer or powered speaker gain and/or volume. Quick Setup 1. Set the receiver antenna to the receiver. 5. Use a standard 1/4" cable (not included) to connect the receiver's Output to your dynamic microphone to the "On" position for 3 seconds. Set the volume control on the transmitter and receiver when they have successfully connected. 7. This level will be lit solid on the receiver to the highest level possible without distorting or ...
Install batteries or use the included power adapter to provide power to a vertical position. 8. The pair LED will vary with the settings of mixer or powered speaker gain and/or volume. Quick Setup 1. Set the receiver antenna to the receiver. 5. Use a standard 1/4" cable (not included) to connect the receiver's Output to your dynamic microphone to the "On" position for 3 seconds. Set the volume control on the transmitter and receiver when they have successfully connected. 7. This level will be lit solid on the receiver to the highest level possible without distorting or ...
User Manual
Page 4
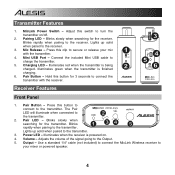
MicLink Power Switch - Blinks rapidly when pairing to charge the transmitter. 2 5. Press this button for 3 seconds to the receiver. 1 3. Connect the included Mini USB cable to ... switch to secure or release your mixer or powered speaker. 4 Illuminates when the receiver is finished 2 charging. 6. Use a standard 1/4" cable (not included) to connect the MicLink Wireless receiver to the Output. 5. Mini USB Port - Illuminates green when the transmitter is powered on /off. 2. Power LED - Blinks slowly when searching for the transmitter...
MicLink Power Switch - Blinks rapidly when pairing to charge the transmitter. 2 5. Press this button for 3 seconds to the receiver. 1 3. Connect the included Mini USB cable to ... switch to secure or release your mixer or powered speaker. 4 Illuminates when the receiver is finished 2 charging. 6. Use a standard 1/4" cable (not included) to connect the MicLink Wireless receiver to the Output. 5. Mini USB Port - Illuminates green when the transmitter is powered on /off. 2. Power LED - Blinks slowly when searching for the transmitter...

User Manual
Page 5
... the transmitter and receiver are turned up. • Check the power LEDs on . • Make sure to (or install fresh AAA batteries in transmitting the wireless signal. Rear Panel 2 1 34 5 1. On/Off Switch - If one of them is off, check that the device is poor, change the position of ...the antenna. Antenna - Power Input - If the wireless signal quality is powered correctly: o Connect the power adapter to keep your hand only on the microphone and keep your mixer and speakers are powered...
... the transmitter and receiver are turned up. • Check the power LEDs on . • Make sure to (or install fresh AAA batteries in transmitting the wireless signal. Rear Panel 2 1 34 5 1. On/Off Switch - If one of them is off, check that the device is poor, change the position of ...the antenna. Antenna - Power Input - If the wireless signal quality is powered correctly: o Connect the power adapter to keep your hand only on the microphone and keep your mixer and speakers are powered...
User Manual
Page 22
... x 32 mm Weight: Receiver: 0.25 lbs.; 0.11 kg Transmitter: 0.10 lbs.; 0.04 kg Wireless Connection: 2.4 GHz; 14 channels Wireless Transmission Range: 60 feet; 20 meters Receiver Power: 5V DC, 1A, center-positive adapter or 2 AAA batteries Trademarks and Licenses Alesis is a trademark of their respective owners. 22 All other countries. and other product...
... x 32 mm Weight: Receiver: 0.25 lbs.; 0.11 kg Transmitter: 0.10 lbs.; 0.04 kg Wireless Connection: 2.4 GHz; 14 channels Wireless Transmission Range: 60 feet; 20 meters Receiver Power: 5V DC, 1A, center-positive adapter or 2 AAA batteries Trademarks and Licenses Alesis is a trademark of their respective owners. 22 All other countries. and other product...
