User Manual
Page 16
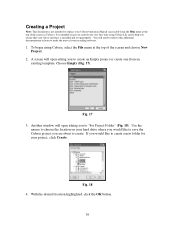
... to replace your recording software. 1. With the desired location highlighted, click the OK button. 16 It is intended to get you ensure that your Alesis interface is not intended to create. To begin using Cubase LE, and to help you started your very first time using Cubase, select the File... menu at the top of your Cubase Operation Manual (accessable from an existing template. A screen will open asking you to create an Empty project or create one from the Help menu at the...
... to replace your recording software. 1. With the desired location highlighted, click the OK button. 16 It is intended to get you ensure that your Alesis interface is not intended to create. To begin using Cubase LE, and to help you started your very first time using Cubase, select the File... menu at the top of your Cubase Operation Manual (accessable from an existing template. A screen will open asking you to create an Empty project or create one from the Help menu at the...
User Manual
Page 18
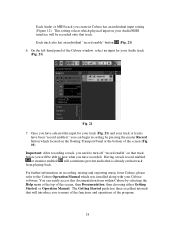
... your track or tracks have recorded. Each Audio or MIDI track you can easily access this documentation from Cubase, please refer to the Cubase Operation Manual which was installed along with your Cubase software. Each track also has an individual "record enable" button (Fig. 21) 6. This setting selects which located on.../MIDI interface will be recorded onto that track. On the left-hand panel of the screen, then Documentation, then choosing either Getting Started, or Operation Manual.
... your track or tracks have recorded. Each Audio or MIDI track you can easily access this documentation from Cubase, please refer to the Cubase Operation Manual which was installed along with your Cubase software. Each track also has an individual "record enable" button (Fig. 21) 6. This setting selects which located on.../MIDI interface will be recorded onto that track. On the left-hand panel of the screen, then Documentation, then choosing either Getting Started, or Operation Manual.
Quick Start Guide
Page 3
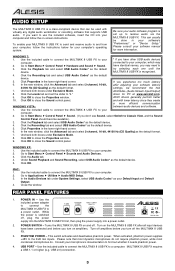
...on -screen instructions. Click the Recording tab and select USB Audio Codec* as the default format. Turn off , plug the power supply into the MULTIMIX 8 USB FX first, then plug the power supply into your software manual for more efficient communication WINDOWS VISTA: between audio devices and... the power is set the slider to your software latency 44100 Hz (CD Quality) as the default device. 5. Turns the MULTIMIX 8 USB FX on the MULTIMIX 8 USB FX after adjusting your computer, which may need to close the Sound control panel. If you want to Classic View, and the Sound...
...on -screen instructions. Click the Recording tab and select USB Audio Codec* as the default format. Turn off , plug the power supply into the MULTIMIX 8 USB FX first, then plug the power supply into your software manual for more efficient communication WINDOWS VISTA: between audio devices and... the power is set the slider to your software latency 44100 Hz (CD Quality) as the default device. 5. Turns the MULTIMIX 8 USB FX on the MULTIMIX 8 USB FX after adjusting your computer, which may need to close the Sound control panel. If you want to Classic View, and the Sound...