Quick Start Guide
Page 3
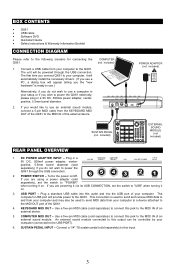
Connect a USB cable from the KEYBOARD MIDI OUT of the QX61 to the MIDI IN of the external device. COMPUTER (not included) SUSTAIN PEDAL (not included) POWER ADAPTER (not included) EXTERNAL SOUND MODULE (not included) REAR PANEL OVERVIEW 1. USB ... to "USB" when turning it on. Turns the power on . 3. If you are powering it via its USB CONNECTION, set the switch to this input. 3 KEYBOARD MIDI OUT - An external sound module connected to "POWER" when turning it on /off. 65 4 3 21 If you are using a power adapter (sold separately) if you...
Connect a USB cable from the KEYBOARD MIDI OUT of the QX61 to the MIDI IN of the external device. COMPUTER (not included) SUSTAIN PEDAL (not included) POWER ADAPTER (not included) EXTERNAL SOUND MODULE (not included) REAR PANEL OVERVIEW 1. USB ... to "USB" when turning it on. Turns the power on . 3. If you are powering it via its USB CONNECTION, set the switch to this input. 3 KEYBOARD MIDI OUT - An external sound module connected to "POWER" when turning it on /off. 65 4 3 21 If you are using a power adapter (sold separately) if you...
Quick Start Guide
Page 4
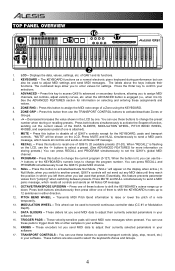
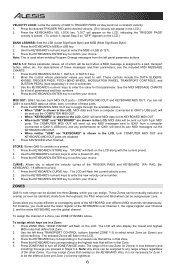
... is attached). 7. Press MUTE and NULL simultaneously to enter values for the KEYBOARD, pads and transport controls. Press this key to access QX61's advanced or secondary functions, allowing you send MIDI data to transmit continuous controller data (CC #1 or Modulation Depth). 14. ...PROGRAM - NULL - Press both buttons simultaneously to recall one . Transmits MIDI Pitch Bend information to select the keyboard's Zones and Groups. 4 of QX61's controls except for settings. The labels above the keys indicate their currently selected parameters in the...
... is attached). 7. Press MUTE and NULL simultaneously to enter values for the KEYBOARD, pads and transport controls. Press this key to access QX61's advanced or secondary functions, allowing you send MIDI data to transmit continuous controller data (CC #1 or Modulation Depth). 14. ...PROGRAM - NULL - Press both buttons simultaneously to recall one . Transmits MIDI Pitch Bend information to select the keyboard's Zones and Groups. 4 of QX61's controls except for settings. The labels above the keys indicate their currently selected parameters in the...
Quick Start Guide
Page 5
... "ZONE CHAN" will flash on the LCD. 2. CHANNEL ASSIGN: Assigns the MIDI channel over which QX61's Zone controllers will send MIDI messages: 1. "CHAN" will flash on the LCD. 2. Press the KEYBOARD's ENTER key to confirm your choice. The name of the last used controller will...desired control by following methods: A. Use the KEYBOARD's numeric keys to confirm your choice. 5 Press the KEYBOARD's ZONE CHAN key. Press the KEYBOARD's ENTER key to enter the desired MIDI message. 4. ADVANCED FEATURES FACTORY RESET: To restore QX61's factory settings, which will erase any of...
... "ZONE CHAN" will flash on the LCD. 2. CHANNEL ASSIGN: Assigns the MIDI channel over which QX61's Zone controllers will send MIDI messages: 1. "CHAN" will flash on the LCD. 2. Press the KEYBOARD's ENTER key to confirm your choice. The name of the last used controller will...desired control by following methods: A. Use the KEYBOARD's numeric keys to confirm your choice. 5 Press the KEYBOARD's ZONE CHAN key. Press the KEYBOARD's ENTER key to enter the desired MIDI message. 4. ADVANCED FEATURES FACTORY RESET: To restore QX61's factory settings, which will erase any of...
Quick Start Guide
Page 6
... in a preset: 1. DATA 1-3: Stores parameter values, all of which Zone (or Zones) you to edit. MIDI OUT: QX61 has two 5-pin MIDI OUT ports - Press ZONE RNG. Use the KEYBOARD's numeric keys to confirm your choice. COMPUTER MIDI OUT and KEYBOARD MIDI OUT. You may assign Zones that Zone. 4. Press the desired TRIGGER PAD at the desired...
... in a preset: 1. DATA 1-3: Stores parameter values, all of which Zone (or Zones) you to edit. MIDI OUT: QX61 has two 5-pin MIDI OUT ports - Press ZONE RNG. Use the KEYBOARD's numeric keys to confirm your choice. COMPUTER MIDI OUT and KEYBOARD MIDI OUT. You may assign Zones that Zone. 4. Press the desired TRIGGER PAD at the desired...
Quick Start Guide
Page 7
... shown here: Group A Group B Group C KEYBOARD PROGRAM BANK LSB BANK MSB TRIGGER PADS TRANSPORT CONTROLS DATA SLIDERS KNOBS PITCH WHEEL MODULATION WHEEL Sustain pedal (sold separately) Zone settings When you store a preset, you are finished, press ZONE GRP. Unplug the QX61 from the QX61 to the device's MIDI IN port. Press MUTE and NULL...
... shown here: Group A Group B Group C KEYBOARD PROGRAM BANK LSB BANK MSB TRIGGER PADS TRANSPORT CONTROLS DATA SLIDERS KNOBS PITCH WHEEL MODULATION WHEEL Sustain pedal (sold separately) Zone settings When you store a preset, you are finished, press ZONE GRP. Unplug the QX61 from the QX61 to the device's MIDI IN port. Press MUTE and NULL...
Quick Start Guide
Page 8
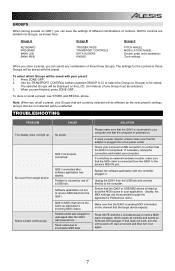
... removal of the interference. 8 SPECIFICATIONS POWER: KEYBOARD: PADS, KNOBS, SLIDERS: ACCESSORIES: MIDI OUTPUTS: USB: USB, 9V DC, 500mA, center-positive, 5.5mm barrel diameter (sold separately) 61 keys 4 velocity-sensitive pads, 8 knobs, 8 sliders Quickstart Guide, USB cable 2 5-pin jacks 1 slave connector (MIDI over USB) http://www.alesis.com/qx61 THIS DEVICE COMPLIES WITH PART 15 OF...
... removal of the interference. 8 SPECIFICATIONS POWER: KEYBOARD: PADS, KNOBS, SLIDERS: ACCESSORIES: MIDI OUTPUTS: USB: USB, 9V DC, 500mA, center-positive, 5.5mm barrel diameter (sold separately) 61 keys 4 velocity-sensitive pads, 8 knobs, 8 sliders Quickstart Guide, USB cable 2 5-pin jacks 1 slave connector (MIDI over USB) http://www.alesis.com/qx61 THIS DEVICE COMPLIES WITH PART 15 OF...


