
Owners Manual
Page 1
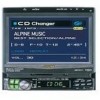
..., Pabellón, 32 01013 Vitoria (Alava)-APDO 133, Spain Phone 945-283588 SE Designed by ALPINE Japan Printed in Korea (Y) 68P02294K65-A R EN CVA-1004 MOBILE MULTIMEDIA STATION FR • OWNER'S MANUAL Please read before using this equipment. ES IT ALPINE ELECTRONICS MARKETING, INC. 1-1-8 Nishi Gotanda, Shinagawa-ku, Tokyo 141-0031, Japan Phone 03-5496-8231...
..., Pabellón, 32 01013 Vitoria (Alava)-APDO 133, Spain Phone 945-283588 SE Designed by ALPINE Japan Printed in Korea (Y) 68P02294K65-A R EN CVA-1004 MOBILE MULTIMEDIA STATION FR • OWNER'S MANUAL Please read before using this equipment. ES IT ALPINE ELECTRONICS MARKETING, INC. 1-1-8 Nishi Gotanda, Shinagawa-ku, Tokyo 141-0031, Japan Phone 03-5496-8231...
Owners Manual
Page 3
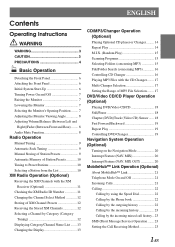
... Start-Up 6 Turning Power On and Off 7 Raising the Monitor 7 Lowering the Monitor 7 Selecting the Monitor's Opening Position ........ 7 Adjusting the Monitor Viewing Angle 8 Adjusting Volume/Balance (Between Left and Right)/Fader (Between Front and Rear) ........ 8 Audio Mute Function 8 Radio Operation Manual Tuning 9 Automatic Seek Tuning 9 Manual Storing of Station Presets 9 Automatic Memory of Station Presets 10...
... Start-Up 6 Turning Power On and Off 7 Raising the Monitor 7 Lowering the Monitor 7 Selecting the Monitor's Opening Position ........ 7 Adjusting the Monitor Viewing Angle 8 Adjusting Volume/Balance (Between Left and Right)/Fader (Between Front and Rear) ........ 8 Audio Mute Function 8 Radio Operation Manual Tuning 9 Automatic Seek Tuning 9 Manual Storing of Station Presets 9 Automatic Memory of Station Presets 10...
Owners Manual
Page 6
...the driver's attention will not be engaged for 5 seconds and then the operation mode will be operated from the CVA-1004. Alpine products equipped with the Ai-NET bus, connected to your Alpine dealer. 4-EN This will vary. The Title Input and SETUP screens cannot be on the road and not on...described in the Owner's Manual to times when the vehicle is parked. When the car is parked, the selection is made while the car is moving. For details, consult your Alpine dealer or the nearest Alpine Service Station for the safety of this , it to the CVA-1004, can be canceled. The...
...the driver's attention will not be engaged for 5 seconds and then the operation mode will be operated from the CVA-1004. Alpine products equipped with the Ai-NET bus, connected to your Alpine dealer. 4-EN This will vary. The Title Input and SETUP screens cannot be on the road and not on...described in the Owner's Manual to times when the vehicle is parked. When the car is parked, the selection is made while the car is moving. For details, consult your Alpine dealer or the nearest Alpine Service Station for the safety of this , it to the CVA-1004, can be canceled. The...

Owners Manual
Page 11
...tuned in the display. 2 Press BAND/TEL. repeatedly until "DX SEEK" and "SEEK" disappear from the display. NOTE The STEREO indicator appears on the monitor when a Stereo FM station is DX SEEK. 4 Press g or f to 5 other bands, simply select the band desired and repeat the procedure. FM1...for the stored station 4 Press g or f to seek the next Frequency of Station Presets The current Volume Level Current Time setting status Manual Tuning 1 Press SOURCE/PWR until the desired station frequency is displayed. repeatedly until a radio band and frequency appears in the Auto-Seek ...
...tuned in the display. 2 Press BAND/TEL. repeatedly until "DX SEEK" and "SEEK" disappear from the display. NOTE The STEREO indicator appears on the monitor when a Stereo FM station is DX SEEK. 4 Press g or f to 5 other bands, simply select the band desired and repeat the procedure. FM1...for the stored station 4 Press g or f to seek the next Frequency of Station Presets The current Volume Level Current Time setting status Manual Tuning 1 Press SOURCE/PWR until the desired station frequency is displayed. repeatedly until a radio band and frequency appears in the Auto-Seek ...

Owners Manual
Page 15
..., BAND, etc., are displayed). • "Channel Number" and "Clock" displays do not scroll. 13-EN The Category list is set to "MANUAL," the display scrolls only when you select AUTO in XM mode, press and hold :/J for at least 2 seconds to switch the display between the ...and Channel Name list. 3 Press g or f to "AUTO," the display scrolls. NOTES • Press the rotary encoder for at least 2 seconds. When the monitor is open: displayed in the subdisplay → Channel Number → CLOCK → Channel Name ∗3 Auxiliary Data Field (ADF) ← Song Title ←...
..., BAND, etc., are displayed). • "Channel Number" and "Clock" displays do not scroll. 13-EN The Category list is set to "MANUAL," the display scrolls only when you select AUTO in XM mode, press and hold :/J for at least 2 seconds to switch the display between the ...and Channel Name list. 3 Press g or f to "AUTO," the display scrolls. NOTES • Press the rotary encoder for at least 2 seconds. When the monitor is open: displayed in the subdisplay → Channel Number → CLOCK → Channel Name ∗3 Auxiliary Data Field (ADF) ← Song Title ←...

Owners Manual
Page 23
...incoming history will end and switch to receive an incoming call . 21-EN Functions that can be operated from CVA-1004 Incoming Calls Outgoing Calls Short Messages Automatically receive Manually receive Missed call announcement (information icon) Call out (Speed Dial) Call out (phone book) Call out (... preset buttons 1 through 6. For the sake of safety, drivers are downloaded to the Junction Box. • Please refer to the instruction manual of CVA-1004 automatically turns to DEFEAT ON. • When the call . • If you cannot perform different operations at the same time from a...
...incoming history will end and switch to receive an incoming call . 21-EN Functions that can be operated from CVA-1004 Incoming Calls Outgoing Calls Short Messages Automatically receive Manually receive Missed call announcement (information icon) Call out (Speed Dial) Call out (phone book) Call out (... preset buttons 1 through 6. For the sake of safety, drivers are downloaded to the Junction Box. • Please refer to the instruction manual of CVA-1004 automatically turns to DEFEAT ON. • When the call . • If you cannot perform different operations at the same time from a...

Owners Manual
Page 25
...the OTHER setting mode. Press and hold BAND/TEL. At the first press, the name and telephone number of the addressee is manually accepted by an icon (on the monitor) or "NEW MSG" (on the subdisplay). Then the second press places the call is indicated and the list of the last...EN The SETUP screen appears. 2 Press preset 6 to select an addressee from the incoming history. AUTO: The incoming call . 5 Press and hold BAND/TEL. MANUAL: The incoming call when the monitor is completed, press MUTE/SETUP to return to the original source mode. For any of received message is displayed.
...the OTHER setting mode. Press and hold BAND/TEL. At the first press, the name and telephone number of the addressee is manually accepted by an icon (on the monitor) or "NEW MSG" (on the subdisplay). Then the second press places the call is indicated and the list of the last...EN The SETUP screen appears. 2 Press preset 6 to select an addressee from the incoming history. AUTO: The incoming call . 5 Press and hold BAND/TEL. MANUAL: The incoming call when the monitor is completed, press MUTE/SETUP to return to the original source mode. For any of received message is displayed.

Owners Manual
Page 27
...parking brake is open, press TITLE and select the title display mode. The first character will automatically advance to normal mode. 1 When the monitor is being used. • To input a new title, one of less than 8 characters (for over 10 seconds. • Removing power...monitor will be canceled if no more titles can be repeated. For details, see "Displaying the Title/Text" (page 24). 2 Press and hold TITLE for naming. 4 Press -/J to select the desired letter/ numeral/symbol available for at a safe location. Go to step 6 to complete the title. 6 Press TITLE to "MANUAL...
...parking brake is open, press TITLE and select the title display mode. The first character will automatically advance to normal mode. 1 When the monitor is being used. • To input a new title, one of less than 8 characters (for over 10 seconds. • Removing power...monitor will be canceled if no more titles can be repeated. For details, see "Displaying the Title/Text" (page 24). 2 Press and hold TITLE for naming. 4 Press -/J to select the desired letter/ numeral/symbol available for at a safe location. Go to step 6 to complete the title. 6 Press TITLE to "MANUAL...

Owners Manual
Page 33
..., press MUTE/SETUP to return to normal mode. The SETUP screen appears. 2 Press preset 1 to select SCROLL. 3 Press g or f and select AUTO or MANUAL. AUTO: The display of CD text, title, etc., is changed, etc. After carrying out steps 1 to 3 of "To display the SETUP screen" (page 29...on page 29.) After carrying out steps 1 to 3 of "To display the SETUP screen" (page 29), perform the operation shown below. 1 When the monitor is open, press and hold MUTE/SETUP for at least 2 seconds. 2 Press preset 2 to select GENERAL Setting mode. Other Useful Features Setting the Background ...
..., press MUTE/SETUP to return to normal mode. The SETUP screen appears. 2 Press preset 1 to select SCROLL. 3 Press g or f and select AUTO or MANUAL. AUTO: The display of CD text, title, etc., is changed, etc. After carrying out steps 1 to 3 of "To display the SETUP screen" (page 29...on page 29.) After carrying out steps 1 to 3 of "To display the SETUP screen" (page 29), perform the operation shown below. 1 When the monitor is open, press and hold MUTE/SETUP for at least 2 seconds. 2 Press preset 2 to select GENERAL Setting mode. Other Useful Features Setting the Background ...

Owners Manual
Page 34
...MUTE/SETUP for at least 2 seconds. After carrying out steps 1 to 3 of Monitor You can set the Auto Opening mode. → FULL ↔ CLOSE ↔ MANUAL ← FULL: The monitor automatically opens or closes when the ignition key is turned to activate the GENERAL setting mode...g f -/J Setting Automatic Opening/ Closing of "To display the SETUP screen" described on the unit is pressed to manually open or close automatically or manually. The monitor opens manually when OPEN/CLOSE is pressed. Other Useful Features TITLE MUTE/ SETUP OPEN/CLOSE 4 After setting is completed, press MUTE...
...MUTE/SETUP for at least 2 seconds. After carrying out steps 1 to 3 of Monitor You can set the Auto Opening mode. → FULL ↔ CLOSE ↔ MANUAL ← FULL: The monitor automatically opens or closes when the ignition key is turned to activate the GENERAL setting mode...g f -/J Setting Automatic Opening/ Closing of "To display the SETUP screen" described on the unit is pressed to manually open or close automatically or manually. The monitor opens manually when OPEN/CLOSE is pressed. Other Useful Features TITLE MUTE/ SETUP OPEN/CLOSE 4 After setting is completed, press MUTE...
Owners Manual
Page 37
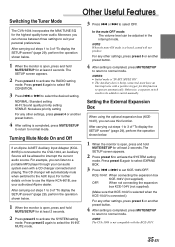
...Press g or f to activate the RADIO setting mode. Turning Mute Mode On and Off If an Alpine Ai-NET Auxiliary Input Adapter (KCA801B) is completed, press MUTE/SETUP to return to normal mode. ... the mute ON mode is "IN-INT. Otherwise, a separate switch needs to be allowed to switch manually. The SETUP screen appears. 2 Press preset 5 to the AUX Input. KCE-104V: When connecting the... SETUP screen" (page 29), perform the operation shown below . 1 When the monitor is not compatible with the KCE-103V. 35-EN NOTE The CVA-1004 is open , press and hold MUTE/SETUP for at least 2 seconds. 2 ...
...Press g or f to activate the RADIO setting mode. Turning Mute Mode On and Off If an Alpine Ai-NET Auxiliary Input Adapter (KCA801B) is completed, press MUTE/SETUP to return to normal mode. ... the mute ON mode is "IN-INT. Otherwise, a separate switch needs to be allowed to switch manually. The SETUP screen appears. 2 Press preset 5 to the AUX Input. KCE-104V: When connecting the... SETUP screen" (page 29), perform the operation shown below . 1 When the monitor is not compatible with the KCE-103V. 35-EN NOTE The CVA-1004 is open , press and hold MUTE/SETUP for at least 2 seconds. 2 ...

Owners Manual
Page 40
...seconds. to adjust settings. Displaying Spectrum Analyzer When using the optional expansion box (KCE104V), you can operate a connected external audio processor from the CVA-1004. 1 When an external audio processor is connected: (Preset 1 through 3) to select the desired function, and then g or f to ... preset 5 to normal mode. NOTE For details about external audio processor operation, see the owner's manual of "To display the SETUP screen" (page 29), perform the operation shown below. 1 When the monitor is completed, press MUTE/SETUP to return to activate the SYSTEM setting mode.
...seconds. to adjust settings. Displaying Spectrum Analyzer When using the optional expansion box (KCE104V), you can operate a connected external audio processor from the CVA-1004. 1 When an external audio processor is connected: (Preset 1 through 3) to select the desired function, and then g or f to ... preset 5 to normal mode. NOTE For details about external audio processor operation, see the owner's manual of "To display the SETUP screen" (page 29), perform the operation shown below. 1 When the monitor is completed, press MUTE/SETUP to return to activate the SYSTEM setting mode.

Owners Manual
Page 43
Other Useful Features Operation with the Monitor Closed You can operate this unit with the CD Changer 17 Multi-Changer Selection 17 DVD/Video CD/CD Player Operation (Optional) Playing DVD/Video ... Operation Turning Power On and Off 7 Adjusting Volume/Balance (Between Left and Right)/ Fader (Between Front and Rear 8 Audio Mute Function 8 Radio Operation Manual Tuning 9 Automatic Seek Tuning 9 Manual Storing of Station Presets 9 Automatic Memory of Station Presets 10 Tuning to Preset Stations 10 XM Radio Operation (Optional) Receiving the XM Channels...
Other Useful Features Operation with the Monitor Closed You can operate this unit with the CD Changer 17 Multi-Changer Selection 17 DVD/Video CD/CD Player Operation (Optional) Playing DVD/Video ... Operation Turning Power On and Off 7 Adjusting Volume/Balance (Between Left and Right)/ Fader (Between Front and Rear 8 Audio Mute Function 8 Radio Operation Manual Tuning 9 Automatic Seek Tuning 9 Manual Storing of Station Presets 9 Automatic Memory of Station Presets 10 Tuning to Preset Stations 10 XM Radio Operation (Optional) Receiving the XM Channels...
Owners Manual
Page 47
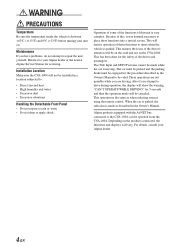
...BY EXPERTS. Be sure to prevent obstructions when driving. Use of other units (e.g. If so, please contact your ALPINE dealer. • The CVA-1004 uses female RCA-type jacks for installations or ground connections. Warning MAKE THE CORRECT CONNECTIONS. Cables or wiring that ... ACCESSORY PARTS AND INSTALL THEM SECURELY. When connecting the CVA1004 to other than designated parts may result in compliance with the manual to use . amplifier) having RCA connectors. This may obstruct forward vision or hamper movement etc. Installation and Connections Before installing...
...BY EXPERTS. Be sure to prevent obstructions when driving. Use of other units (e.g. If so, please contact your ALPINE dealer. • The CVA-1004 uses female RCA-type jacks for installations or ground connections. Warning MAKE THE CORRECT CONNECTIONS. Cables or wiring that ... ACCESSORY PARTS AND INSTALL THEM SECURELY. When connecting the CVA1004 to other than designated parts may result in compliance with the manual to use . amplifier) having RCA connectors. This may obstruct forward vision or hamper movement etc. Installation and Connections Before installing...

Owners Manual
Page 56
...6 Any product which has the serial number defaced, altered or removed. 7 Any product which has been adjusted, altered or modified without Alpine's consent. 8 Any product not distributed by accident, abuse, negligence, misuse, improper connections, improper operation or failure to offer this warranty...are covered by the warranty, and if the product was shipped to an Authorized Alpine Service Center or Alpine, Alpine will , at one year from an Authorized Alpine Dealer. ! Products purchased in the Owner's manual. 3 Damage caused by act of God, including without charge. are warranted for ...
...6 Any product which has the serial number defaced, altered or removed. 7 Any product which has been adjusted, altered or modified without Alpine's consent. 8 Any product not distributed by accident, abuse, negligence, misuse, improper connections, improper operation or failure to offer this warranty...are covered by the warranty, and if the product was shipped to an Authorized Alpine Service Center or Alpine, Alpine will , at one year from an Authorized Alpine Dealer. ! Products purchased in the Owner's manual. 3 Damage caused by act of God, including without charge. are warranted for ...
