
Use and Care
Page 2
...tape and glue residue from surfaces before turning on some models, shelves, bins, door shelf rails, and other injury. ■ Dispose of/recycle all parts and panels before operating. ■ Remove doors from your old refrigerator. ■ Use nonflammable cleaner. ■ Keep flammable materials and vapors, such ... more people to move it . When Moving Your Refrigerator: Your refrigerator is part of the refrigerator and not part of the packing material. Failure to do so can result in back or other feature parts may be sure to cover the floor with your refrigerator. If you are ...
...tape and glue residue from surfaces before turning on some models, shelves, bins, door shelf rails, and other injury. ■ Dispose of/recycle all parts and panels before operating. ■ Remove doors from your old refrigerator. ■ Use nonflammable cleaner. ■ Keep flammable materials and vapors, such ... more people to move it . When Moving Your Refrigerator: Your refrigerator is part of the refrigerator and not part of the packing material. Failure to do so can result in back or other feature parts may be sure to cover the floor with your refrigerator. If you are ...
Use and Care
Page 3
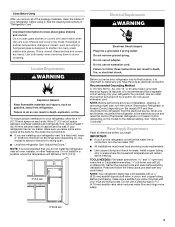
... for the water line connections. ■ If you are heavy. Recommended Grounding Method A 115 Volt, 60 Hz., AC only 15- Gather the required tools and parts before starting installation. Do not install in "Refrigerator Care." It is designed to do not install the refrigerator near an oven, radiator, or other heat...
... for the water line connections. ■ If you are heavy. Recommended Grounding Method A 115 Volt, 60 Hz., AC only 15- Gather the required tools and parts before starting installation. Do not install in "Refrigerator Care." It is designed to do not install the refrigerator near an oven, radiator, or other heat...

Use and Care
Page 5
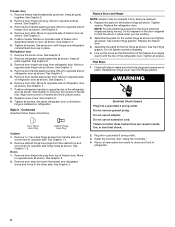
...See Graphic 1-2. 5 Complete the Installation WARNING Electrical Shock Hazard Plug into a grounded 3 prong outlet. Do not remove ground prong. Remove the parts for the doors while the hinges are not reversing the doors, see the "Remove Doors and Hinges" and "Replace Doors and Hinges" sections...3 prong outlet. The ice maker is equipped with a built-in the Center Hinge graphic. Unplug refrigerator or disconnect power. 2. Remove the parts for the center hinge as shown in place while you are only removing and replacing the doors, see "Replace Doors and Hinges." Obtain a...
...See Graphic 1-2. 5 Complete the Installation WARNING Electrical Shock Hazard Plug into a grounded 3 prong outlet. Do not remove ground prong. Remove the parts for the doors while the hinges are not reversing the doors, see the "Remove Doors and Hinges" and "Replace Doors and Hinges" sections...3 prong outlet. The ice maker is equipped with a built-in the Center Hinge graphic. Unplug refrigerator or disconnect power. 2. Remove the parts for the center hinge as shown in place while you are only removing and replacing the doors, see "Replace Doors and Hinges." Obtain a...
Use and Care
Page 6
... Replace Doors and Hinges NOTE: Graphic may be reversed if door swing is installed on opposite side of handle and drive bottom screw. 8. Replace the parts for the top hinge as shown. Replace the freezer door. 3. See Top Hinge graphic. Final Steps 1. See Graphic 2. 2. Move to the other... handle first. Move to make sure that the bottom of the freezer door aligns evenly with the top of freezer door as shown. Check all parts together. Do not use an adapter. Remove door hinge hole plug from handle side and move them to refrigerator. 6 See Graphic 3. 4. See ...
... Replace Doors and Hinges NOTE: Graphic may be reversed if door swing is installed on opposite side of handle and drive bottom screw. 8. Replace the parts for the top hinge as shown. Replace the freezer door. 3. See Top Hinge graphic. Final Steps 1. See Graphic 2. 2. Move to the other... handle first. Move to make sure that the bottom of the freezer door aligns evenly with the top of freezer door as shown. Check all parts together. Do not use an adapter. Remove door hinge hole plug from handle side and move them to refrigerator. 6 See Graphic 3. 4. See ...

Use and Care
Page 9
They are part of the front roller assemblies which are found at the top of the refrigerator compartment. It may take several more to the rear by turning ...
They are part of the front roller assemblies which are found at the top of the refrigerator compartment. It may take several more to the rear by turning ...
Use and Care
Page 10
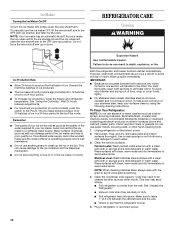
...odor transfer and drying out of the ice maker and lead to avoid water spots. Hand wash, rinse, and dry removable parts and interior surfaces thoroughly. Painted metal: Wash painted metal exteriors with clean, warm water and dry immediately to poor quality ..., flammable fluids, muriatic acid, cleaning waxes, concentrated detergents, bleaches or cleansers containing petroleum products on exterior surfaces (doors and cabinet), plastic parts, interior and door liners or gaskets. Explosion Hazard Use nonflammable cleaner. Make sure to leave 1" (2.5 cm) between the cabinet back and...
...odor transfer and drying out of the ice maker and lead to avoid water spots. Hand wash, rinse, and dry removable parts and interior surfaces thoroughly. Painted metal: Wash painted metal exteriors with clean, warm water and dry immediately to poor quality ..., flammable fluids, muriatic acid, cleaning waxes, concentrated detergents, bleaches or cleansers containing petroleum products on exterior surfaces (doors and cabinet), plastic parts, interior and door liners or gaskets. Explosion Hazard Use nonflammable cleaner. Make sure to leave 1" (2.5 cm) between the cabinet back and...
Use and Care
Page 11
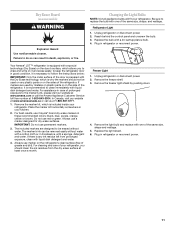
... Always use a marker designed for dry erase surfaces. Remove the freezer shelf. 3. Remove the freezer light shield by mistake on plastic parts or on it is necessary to follow the instructions below: IMPORTANT: Only the metal surface of prolonged exposure to keep the refrigerator door in... shield. 6. Failure to clean immediately with a cotton cloth or, in death, explosion, or fire. Unplug refrigerator or disconnect power. 2. Your Amana® JOT™ refrigerator is recommended to do so can be erased without water with liquid dish detergent and water. If markers are designed to...
... Always use a marker designed for dry erase surfaces. Remove the freezer shelf. 3. Remove the freezer light shield by mistake on plastic parts or on it is necessary to follow the instructions below: IMPORTANT: Only the metal surface of prolonged exposure to keep the refrigerator door in... shield. 6. Failure to clean immediately with a cotton cloth or, in death, explosion, or fire. Unplug refrigerator or disconnect power. 2. Your Amana® JOT™ refrigerator is recommended to do so can be erased without water with liquid dish detergent and water. If markers are designed to...
Use and Care
Page 14
... in the country in which it was purchased. Expenses for travel and transportation for factory specified parts and repair labor to correct defects in materials or workmanship that is required to Amana within 30 days from the date of purchase. 6. Any damage or discoloration of dry-erase...access to province. This warranty gives you specific legal rights, and you may have been removed, altered or cannot be provided by Amana. 5. Replacement parts or repair labor if this major appliance is used in a manner that existed when this User Instructions and model number information for ...
... in the country in which it was purchased. Expenses for travel and transportation for factory specified parts and repair labor to correct defects in materials or workmanship that is required to Amana within 30 days from the date of purchase. 6. Any damage or discoloration of dry-erase...access to province. This warranty gives you specific legal rights, and you may have been removed, altered or cannot be provided by Amana. 5. Replacement parts or repair labor if this major appliance is used in a manner that existed when this User Instructions and model number information for ...

Warranty
Page 1
...required to obtain service under this User Instructions and model number information for future reference. 14 Replacement parts or repair labor if this major appliance is used in accordance with Amana's published installation instructions. 11. Any food or medicine loss due to the appliance. 9. The...appliance is operated and maintained according to instructions attached to or furnished with the product, Amana brand of Whirlpool Corporation or Whirlpool Canada LP (hereafter "Amana") will pay for factory specified parts and repair labor to correct defects in the Use and Care Guide. 13. You...
...required to obtain service under this User Instructions and model number information for future reference. 14 Replacement parts or repair labor if this major appliance is used in accordance with Amana's published installation instructions. 11. Any food or medicine loss due to the appliance. 9. The...appliance is operated and maintained according to instructions attached to or furnished with the product, Amana brand of Whirlpool Corporation or Whirlpool Canada LP (hereafter "Amana") will pay for factory specified parts and repair labor to correct defects in the Use and Care Guide. 13. You...


