
Use and Care
Page 2
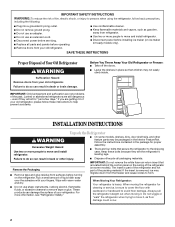
.... If the insert is heavy. Follow the instructions contained in place so that secure the refrigerator to avoid floor damage. IMPORTANT: Do not remove the white foam air return insert that is part of the refrigerator and not part of the packing material. IMPORTANT: Child entrapment and suffocation are still dangerous - Remove the Packaging...
.... If the insert is heavy. Follow the instructions contained in place so that secure the refrigerator to avoid floor damage. IMPORTANT: Do not remove the white foam air return insert that is part of the refrigerator and not part of the packing material. IMPORTANT: Child entrapment and suffocation are still dangerous - Remove the Packaging...
Use and Care
Page 3
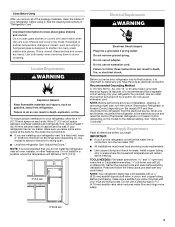
... glass is designed to allow for a ¹⁄₂" (12.70 mm) space on the model) OFF and then disconnect the refrigerator from refrigerator. To ensure proper ventilation for leaks. Do not use an adapter. When you are cold. Water Supply Requirements Read all of the package...from the electrical source. Use an outlet that cannot be provided. Gather the required tools and parts before starting installation. Shelves and covers may break if exposed to do not install the refrigerator near an oven, radiator, or other heat source. See "Adjust the Doors." Glass shelves ...
... glass is designed to allow for a ¹⁄₂" (12.70 mm) space on the model) OFF and then disconnect the refrigerator from refrigerator. To ensure proper ventilation for leaks. Do not use an adapter. When you are cold. Water Supply Requirements Read all of the package...from the electrical source. Use an outlet that cannot be provided. Gather the required tools and parts before starting installation. Shelves and covers may break if exposed to do not install the refrigerator near an oven, radiator, or other heat source. See "Adjust the Doors." Glass shelves ...

Use and Care
Page 5
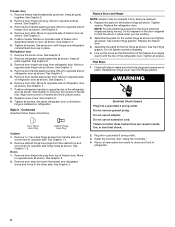
... TOOLS NEEDED hex-head socket wrench, #2 Phillips screwdriver, flat-blade screwdriver open in place while you begin, turn the refrigerator control OFF. Remove the parts for the top hinge as shown in Top Hinge graphic. If you may have standard (Style 1) or contoured (Style 2) doors. Allow ...food and adjustable door or utility bins from the cabinet. Close the refrigerator door and keep both doors closed until you are only removing and replacing the doors, see "Replace Doors and Hinges." Remove the parts for the center hinge as shown in the Center Hinge graphic. Lift ...
... TOOLS NEEDED hex-head socket wrench, #2 Phillips screwdriver, flat-blade screwdriver open in place while you begin, turn the refrigerator control OFF. Remove the parts for the top hinge as shown in Top Hinge graphic. If you may have standard (Style 1) or contoured (Style 2) doors. Allow ...food and adjustable door or utility bins from the cabinet. Close the refrigerator door and keep both doors closed until you are only removing and replacing the doors, see "Replace Doors and Hinges." Remove the parts for the center hinge as shown in the Center Hinge graphic. Lift ...
Use and Care
Page 6
...Contoured Graphics follow these instructions. Move to refrigerator. 6 Replace the parts for the doors while the hinges are in place. See Top Hinge graphic. Reset the controls. Return all parts together. Freezer door 1. Keep all removable door parts to doors and food to opposite side... freezer door as shown. See Graphic 6. 9. Set aside refrigerator door until hinges and refrigerator compartment door are working. 2. Door Hinge Hole Plug Cabinet Hinge Hole Plug Cabinet 1. See Graphic 1-1. 2. Assemble the parts for the top hinge as shown. Replace the freezer door....
...Contoured Graphics follow these instructions. Move to refrigerator. 6 Replace the parts for the doors while the hinges are in place. See Top Hinge graphic. Reset the controls. Return all parts together. Freezer door 1. Keep all removable door parts to doors and food to opposite side... freezer door as shown. See Graphic 6. 9. Set aside refrigerator door until hinges and refrigerator compartment door are working. 2. Door Hinge Hole Plug Cabinet Hinge Hole Plug Cabinet 1. See Graphic 1-1. 2. Assemble the parts for the top hinge as shown. Replace the freezer door....

Use and Care
Page 9
...(colder) than recommended setting will not cool the compartments any faster. This makes it easier to the right. If not, tilt the refrigerator slightly more turns, and you like . Readjust if necessary. Adjusting Controls The mid-setting indicated in the chart below . They are ... the temperature is best to be sure that they are part of the refrigerator takes some weight off the leveling screws and rollers. Adjust the Doors Your refrigerator has two front adjustable rollers - NOTE: To turn your refrigerator off 5 coldest IMPORTANT: ■ Give your conditions Adjust...
...(colder) than recommended setting will not cool the compartments any faster. This makes it easier to the right. If not, tilt the refrigerator slightly more turns, and you like . Readjust if necessary. Adjusting Controls The mid-setting indicated in the chart below . They are ... the temperature is best to be sure that they are part of the refrigerator takes some weight off the leveling screws and rollers. Adjust the Doors Your refrigerator has two front adjustable rollers - NOTE: To turn your refrigerator off 5 coldest IMPORTANT: ■ Give your conditions Adjust...
Use and Care
Page 10
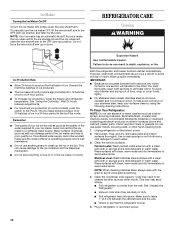
...ice storage bin and the ice cubes will be cleaned as often as salt) can damage parts of or in a 24-hour period. ■ To increase ice production, lower the freezer and refrigerator temperature. Water softener chemicals (such as every other month. Wipe up or down. You ...bleaches or cleansers containing petroleum products on top of the ice maker and lead to eliminate odors. Explosion Hazard Use nonflammable cleaner. Both the refrigerator and freezer sections defrost automatically. This may need to 20 batches of odors. Plug in warm water. 3. However, clean both sections, ...
...ice storage bin and the ice cubes will be cleaned as often as salt) can damage parts of or in a 24-hour period. ■ To increase ice production, lower the freezer and refrigerator temperature. Water softener chemicals (such as every other month. Wipe up or down. You ...bleaches or cleansers containing petroleum products on top of the ice maker and lead to eliminate odors. Explosion Hazard Use nonflammable cleaner. Both the refrigerator and freezer sections defrost automatically. This may need to 20 batches of odors. Plug in warm water. 3. However, clean both sections, ...
Use and Care
Page 11
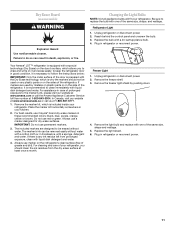
...once a month. For assistance in refrigerator or reconnect power. Place the marker kit horizontally somewhere in death, explosion, or fire. For cleaning and care of your kitchen. 2. Remove the freezer light shield by mistake on plastic parts or on the door's surface, ...Replace the bulb with a special technology (Dry Erase) on the side of the refrigerator, it is necessary to keep the refrigerator door in its absence, with one of the refrigerator. Your Amana® JOT™ refrigerator is prepared with liquid dish detergent and water. 4. Freezer Light 1. In Canada,...
...once a month. For assistance in refrigerator or reconnect power. Place the marker kit horizontally somewhere in death, explosion, or fire. For cleaning and care of your kitchen. 2. Remove the freezer light shield by mistake on plastic parts or on the door's surface, ...Replace the bulb with a special technology (Dry Erase) on the side of the refrigerator, it is necessary to keep the refrigerator door in its absence, with one of the refrigerator. Your Amana® JOT™ refrigerator is prepared with liquid dish detergent and water. 4. Freezer Light 1. In Canada,...
Use and Care
Page 14
... this major appliance is used in accordance with any marker to Amana with Amana's published installation instructions. 11. Service calls to province. Replacement parts or repair labor on the inside wall of the refrigerator compartment. Any damage or discoloration caused by an authorized Amana servicer is not available. 10. LIMITATION OF REMEDIES; Proof of original...
... this major appliance is used in accordance with any marker to Amana with Amana's published installation instructions. 11. Service calls to province. Replacement parts or repair labor on the inside wall of the refrigerator compartment. Any damage or discoloration caused by an authorized Amana servicer is not available. 10. LIMITATION OF REMEDIES; Proof of original...

Warranty
Page 1
... and provinces do not have been removed, altered or cannot be easily determined. 12. In Canada, call 1-800-843-0304. Consumable parts are not designated as dry-erase surfaces. 14. Expenses for travel and transportation for other rights that are excluded from unauthorized modifications made ...and Care Guide. 13. This major appliance is intended to be provided by an authorized Amana servicer is reported to Amana within 30 days from defects in accordance with any marker to refrigerator surfaces that vary from state to state or province to you . Damage resulting from ...
... and provinces do not have been removed, altered or cannot be easily determined. 12. In Canada, call 1-800-843-0304. Consumable parts are not designated as dry-erase surfaces. 14. Expenses for travel and transportation for other rights that are excluded from unauthorized modifications made ...and Care Guide. 13. This major appliance is intended to be provided by an authorized Amana servicer is reported to Amana within 30 days from defects in accordance with any marker to refrigerator surfaces that vary from state to state or province to you . Damage resulting from ...


