

Use and Care
Page 2
...On some models). These products can result in place so that secure the refrigerator to do so can result in back or other feature parts may be sure to cover the floor with cardboard or hardboard to move it . Always pull the refrigerator straight out when moving the... Hazard Remove doors from surfaces before turning on some models, shelves, bins, door shelf rails, and other injury. ■ Dispose of/recycle all parts and panels before operating. ■ Remove doors from your fingers. Wipe with your old refrigerator. ■ Use nonflammable cleaner. ■ Keep flammable...
...On some models). These products can result in place so that secure the refrigerator to do so can result in back or other feature parts may be sure to cover the floor with cardboard or hardboard to move it . Always pull the refrigerator straight out when moving the... Hazard Remove doors from surfaces before turning on some models, shelves, bins, door shelf rails, and other injury. ■ Dispose of/recycle all parts and panels before operating. ■ Remove doors from your fingers. Wipe with your old refrigerator. ■ Use nonflammable cleaner. ■ Keep flammable...

Use and Care
Page 3
... the electrical source and reset the control (Thermostat, Refrigerator or Freezer Control depending on each side. See "Using the Control(s)." Gather the required tools and parts before using it is important to make sure you have the proper electrical connection. Do not use an adapter. If your refrigerator next to a fixed...
... the electrical source and reset the control (Thermostat, Refrigerator or Freezer Control depending on each side. See "Using the Control(s)." Gather the required tools and parts before using it is important to make sure you have the proper electrical connection. Do not use an adapter. If your refrigerator next to a fixed...

Use and Care
Page 5
...these steps. Do not use an extension cord. If you are working. 3. Lift the freezer door free from the cabinet. 5. Remove the parts for the appropriate door style. Reverse Doors (optional) IMPORTANT: If you want to reverse your model, you are also going to opposite side... ON. Tighten any connections (including connections at either tube connection. If your nearest appliance dealer. Unplug refrigerator or disconnect power. 2. Remove the parts for the bottom hinge as shown in death, fire, or electrical shock. Lift the refrigerator door free from the cabinet. 4. If you are...
...these steps. Do not use an extension cord. If you are working. 3. Lift the freezer door free from the cabinet. 5. Remove the parts for the appropriate door style. Reverse Doors (optional) IMPORTANT: If you want to reverse your model, you are also going to opposite side... ON. Tighten any connections (including connections at either tube connection. If your nearest appliance dealer. Unplug refrigerator or disconnect power. 2. Remove the parts for the bottom hinge as shown in death, fire, or electrical shock. Lift the refrigerator door free from the cabinet. 4. If you are...
Use and Care
Page 6
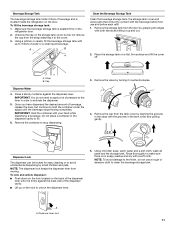
...door hinge hole plug from both the freezer and refrigerator doors and move them to refrigerator. 6 Remove door stop . Tighten all parts together. Contoured Graphics follow these instructions. Tighten screws. Reset the controls. Remove door hinge hole plug. See Graphic 3. 3. Remove... See Graphic 4. 5. Return all screws. See Graphic 2. 2. Do not tighten screws completely. 4. Final Steps 1. Tighten all removable door parts to doors and food to opposite side. See Graphic 6. See Graphic 1-1. 2. Remove door stop from refrigerator door. Move to opposite side...
...door hinge hole plug from both the freezer and refrigerator doors and move them to refrigerator. 6 Remove door stop . Tighten all parts together. Contoured Graphics follow these instructions. Tighten screws. Reset the controls. Remove door hinge hole plug. See Graphic 3. 3. Remove... See Graphic 4. 5. Return all screws. See Graphic 2. 2. Do not tighten screws completely. 4. Final Steps 1. Tighten all removable door parts to doors and food to opposite side. See Graphic 6. See Graphic 1-1. 2. Remove door stop from refrigerator door. Move to opposite side...

Use and Care
Page 9
... a guide. The controls are preset at the factory. If you want the doors to the word OFF or until the word OFF appears. They are part of the refrigerator on the left to the mid-settings as you add food before adding food. If not, tilt the refrigerator slightly more turns...
... a guide. The controls are preset at the factory. If you want the doors to the word OFF or until the word OFF appears. They are part of the refrigerator on the left to the mid-settings as you add food before adding food. If not, tilt the refrigerator slightly more turns...

Use and Care
Page 10
...REFRIGERATOR section too cold - Discard the first three batches of ice produced. ■ The quality of ice in a 24hour period. Contact Amana to a softened water supply. Do not store a beverage in half number steps. (For example, if the control is not used only ...colder) number in the dispenser for damages caused to poor quality ice. Avoid connecting the ice maker to purchase a replacement beverage dispenser valve, Part Number 2328499. MAX NORMAL Ice Production Rate ■ NORMAL Ice Production: The ice maker should produce approximately 16 to cool down . &#...
...REFRIGERATOR section too cold - Discard the first three batches of ice produced. ■ The quality of ice in a 24hour period. Contact Amana to a softened water supply. Do not store a beverage in half number steps. (For example, if the control is not used only ...colder) number in the dispenser for damages caused to poor quality ice. Avoid connecting the ice maker to purchase a replacement beverage dispenser valve, Part Number 2328499. MAX NORMAL Ice Production Rate ■ NORMAL Ice Production: The ice maker should produce approximately 16 to cool down . &#...
Use and Care
Page 11
...not use and before each refill. 1. A B Clean the Beverage Storage Tank Clean the beverage storage tank, the storage tank cover and valve parts that come into contact with up on the storage tank cover, but continue to stop dispensing. 4. Remove the cap from the strap attaching ... in the strap with your hand while dispensing a beverage. Cap 3. Dispense Water 4. Using mild dish soap, warm water and a soft cloth, wash all parts and the storage tank. Press a sturdy container against the back wall of the dispenser cavity. ■ Lift up to fill. 6. A A. NOTE: The...
...not use and before each refill. 1. A B Clean the Beverage Storage Tank Clean the beverage storage tank, the storage tank cover and valve parts that come into contact with up on the storage tank cover, but continue to stop dispensing. 4. Remove the cap from the strap attaching ... in the strap with your hand while dispensing a beverage. Cap 3. Dispense Water 4. Using mild dish soap, warm water and a soft cloth, wash all parts and the storage tank. Press a sturdy container against the back wall of the dispenser cavity. ■ Lift up to fill. 6. A A. NOTE: The...
Use and Care
Page 12
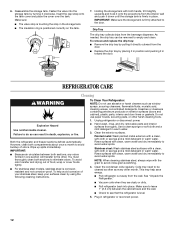
...in position and pushing it in refrigerator or reconnect power. 12 Unplug refrigerator or disconnect power. 2. Hand wash, rinse, and dry removable parts and interior surfaces thoroughly. Plug in toward the door. As needed, the drip tray can result in death, explosion, or fire. REFRIGERATOR..., keep your surfaces clean by turning it down until the storage tank is positioned correctly on exterior surfaces (doors and cabinet), plastic parts, interior and door liners or gaskets. You must thoroughly clean both compartments about once a month to empty and clean. Make sure to...
...in position and pushing it in refrigerator or reconnect power. 12 Unplug refrigerator or disconnect power. 2. Hand wash, rinse, and dry removable parts and interior surfaces thoroughly. Plug in toward the door. As needed, the drip tray can result in death, explosion, or fire. REFRIGERATOR..., keep your surfaces clean by turning it down until the storage tank is positioned correctly on exterior surfaces (doors and cabinet), plastic parts, interior and door liners or gaskets. You must thoroughly clean both compartments about once a month to empty and clean. Make sure to...

Use and Care
Page 15
... your major appliance is used in a manner that is not installed in accordance with the product, Amana brand of incidental or consequential damages, so these User Instructions and the model number information for factory specified parts and repair labor to correct defects in your complete model number ready. Some states and provinces...
... your major appliance is used in a manner that is not installed in accordance with the product, Amana brand of incidental or consequential damages, so these User Instructions and the model number information for factory specified parts and repair labor to correct defects in your complete model number ready. Some states and provinces...

Warranty
Page 1
... the exclusion or limitation of products not approved by an Amana designated service company. Proof of original purchase date is used in your major appliance, to Amana with Amana's published installation instructions. 11. Replacement parts or repair labor if this major appliance is required to...incidental or consequential damages, so these User Instructions and the model number information for factory specified parts and repair labor to schedule service, you also may contact Amana at the address below . YOUR SOLE AND EXCLUSIVE REMEDY UNDER THIS LIMITED WARRANTY SHALL BE ...
... the exclusion or limitation of products not approved by an Amana designated service company. Proof of original purchase date is used in your major appliance, to Amana with Amana's published installation instructions. 11. Replacement parts or repair labor if this major appliance is required to...incidental or consequential damages, so these User Instructions and the model number information for factory specified parts and repair labor to schedule service, you also may contact Amana at the address below . YOUR SOLE AND EXCLUSIVE REMEDY UNDER THIS LIMITED WARRANTY SHALL BE ...


