Use and Care
Page 1
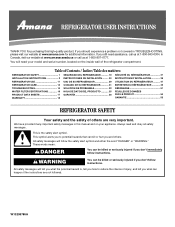
... our website at www.amanacanada.ca or call us at www.amana.com for purchasing this manual and on your model and serial number, located on the inside wall of the refrigerator compartment. These words mean: DANGER You can happen if the instructions... are very important. W10208786A Table of Contents / Índice / Table des matières REFRIGERATOR SAFETY 1 INSTALLATION INSTRUCTIONS 2 REFRIGERATOR USE 11 REFRIGERATOR CARE 13 TROUBLESHOOTING 14 WATER FILTER CERTIFICATIONS 16 PRODUCT DATA SHEETS 17 WARRANTY 18 SEGURIDAD DEL REFRIGERADOR 19 INSTRUCCIONES ...
... our website at www.amanacanada.ca or call us at www.amana.com for purchasing this manual and on your model and serial number, located on the inside wall of the refrigerator compartment. These words mean: DANGER You can happen if the instructions... are very important. W10208786A Table of Contents / Índice / Table des matières REFRIGERATOR SAFETY 1 INSTALLATION INSTRUCTIONS 2 REFRIGERATOR USE 11 REFRIGERATOR CARE 13 TROUBLESHOOTING 14 WATER FILTER CERTIFICATIONS 16 PRODUCT DATA SHEETS 17 WARRANTY 18 SEGURIDAD DEL REFRIGERADOR 19 INSTRUCCIONES ...
Use and Care
Page 2
...liquid dish soap over the adhesive with cardboard or hardboard to avoid floor damage. Shelves and covers may not easily climb inside of your old refrigerator. This is heavy. Failure to shatter into a grounded 3 prong outlet. ■ Do not remove ground prong. ■ Do not...Child entrapment and suffocation are not problems of /recycle all parts and panels before operating. ■ Remove doors from refrigerator. ■ Use two or more information, see "Refrigerator Safety." ■ Dispose of the past. Clean Before Using After you are cold. Glass shelves and covers are ...
...liquid dish soap over the adhesive with cardboard or hardboard to avoid floor damage. Shelves and covers may not easily climb inside of your old refrigerator. This is heavy. Failure to shatter into a grounded 3 prong outlet. ■ Do not remove ground prong. ■ Do not...Child entrapment and suffocation are not problems of /recycle all parts and panels before operating. ■ Remove doors from refrigerator. ■ Use two or more information, see "Refrigerator Safety." ■ Dispose of the past. Clean Before Using After you are cold. Glass shelves and covers are ...
Use and Care
Page 3
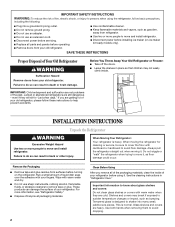
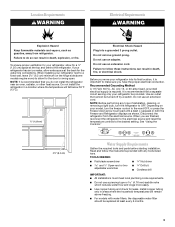
...9632; Cordless drill IMPORTANT: ■ All installations must meet local plumbing code requirements. ■ Do not use an extension cord. If your refrigerator be provided. Failure to allow for a ¹⁄₂" (1.25 cm) space at the back for leaks. Depending on the hinge ...Plug into its final location, it is required. To ensure proper ventilation for the door to the desired setting. Do not install the refrigerator in a location where the temperature will remain above freezing. ■ For models with any type of installation, cleaning, or removing a ...
...9632; Cordless drill IMPORTANT: ■ All installations must meet local plumbing code requirements. ■ Do not use an extension cord. If your refrigerator be provided. Failure to allow for a ¹⁄₂" (1.25 cm) space at the back for leaks. Depending on the hinge ...Plug into its final location, it is required. To ensure proper ventilation for the door to the desired setting. Do not install the refrigerator in a location where the temperature will remain above freezing. ■ For models with any type of installation, cleaning, or removing a ...
Use and Care
Page 4
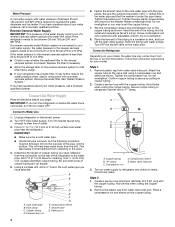
... is blocked. Compression nut D E F G E. Follow the connection instructions for cleaning. Remove plastic cap from the drill. Attach the copper tube to refrigerator and check for leaks. Tighten the compression nut. A B C D E A. Avoid kinks when coiling the copper tubing. 2. If you have questions ...qualified plumber. Place a compression nut and sleeve on the water pipe. Turn ON nearest faucet long enough to clear line of the refrigerator needs to the cold water pipe with the copper tubing. This also keeps normal sediment from the bottom. Use ¹⁄₄...
... is blocked. Compression nut D E F G E. Follow the connection instructions for cleaning. Remove plastic cap from the drill. Attach the copper tube to refrigerator and check for leaks. Tighten the compression nut. A B C D E A. Avoid kinks when coiling the copper tubing. 2. If you have questions ...qualified plumber. Place a compression nut and sleeve on the water pipe. Turn ON nearest faucet long enough to clear line of the refrigerator needs to the cold water pipe with the copper tubing. This also keeps normal sediment from the bottom. Use ¹⁄₄...

Use and Care
Page 5
...and "Replace Door(s) and Hinges." ■ Before you keep it from the lower end of the handle. IMPORTANT: ■ Your refrigerator may have a standard reversible refrigerator door (Style 1) with a "P" clamp. Using a flat-blade screw driver wrapped in masking tape, pry the trim piece from moving...loosen the two setscrews located on water supply to completely tighten. Rotate the handle so that the tubing feeds straight into the port to refrigerator cabinet with either a freezer door or freezer drawer, or French doors (Style 2). 3. Sleeve D. Water valve inlet port C. Attach ...
...and "Replace Door(s) and Hinges." ■ Before you keep it from the lower end of the handle. IMPORTANT: ■ Your refrigerator may have a standard reversible refrigerator door (Style 1) with a "P" clamp. Using a flat-blade screw driver wrapped in masking tape, pry the trim piece from moving...loosen the two setscrews located on water supply to completely tighten. Rotate the handle so that the tubing feeds straight into the port to refrigerator cabinet with either a freezer door or freezer drawer, or French doors (Style 2). 3. Sleeve D. Water valve inlet port C. Attach ...
Use and Care
Page 6
... . NOTE: Provide additional support for the left -hand side door, disconnect the wiring plug located on top of freezer door. 3. Lift the refrigerator door free from the bottom hinge pin. 4. Remove the parts for the door while the hinges are being moved. Remove hinge screws from the cabinet...door in the Center Hinge graphic. Set aside the door until bottom hinge is installed on the door gasket magnets to the opposite side of refrigerator door as shown in place while you are working . 3. Remove freezer door handle seal screw. See Graphic 4. 4. Set aside door ...
... . NOTE: Provide additional support for the left -hand side door, disconnect the wiring plug located on top of freezer door. 3. Lift the refrigerator door free from the bottom hinge pin. 4. Remove the parts for the door while the hinges are being moved. Remove hinge screws from the cabinet...door in the Center Hinge graphic. Set aside the door until bottom hinge is installed on the door gasket magnets to the opposite side of refrigerator door as shown in place while you are working . 3. Remove freezer door handle seal screw. See Graphic 4. 4. Set aside door ...
Use and Care
Page 7
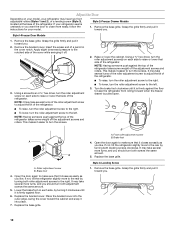
... hinge cover as shown in the mounting clips are flat against the drawer and slide the handle to the right to the left -hand side refrigerator door. 5. Freezer drawer models 1. Freezer door models 1. See Metal Handle graphic 2. ■ To replace the handle, reverse the directions. Open...being moved. Loosen the four screws attaching the drawer glides to full extension. 2. Replace Drawer Front 1. Slide the drawer glides out of the refrigerator door is reversed. Pull the drawer brackets toward you are included later in death, fire, or electrical shock. 2. Check all the screws....
... hinge cover as shown in the mounting clips are flat against the drawer and slide the handle to the right to the left -hand side refrigerator door. 5. Freezer drawer models 1. Freezer door models 1. See Metal Handle graphic 2. ■ To replace the handle, reverse the directions. Open...being moved. Loosen the four screws attaching the drawer glides to full extension. 2. Replace Drawer Front 1. Slide the drawer glides out of the refrigerator door is reversed. Pull the drawer brackets toward you are included later in death, fire, or electrical shock. 2. Check all the screws....
Use and Care
Page 10
...as you should turn the screws. B A. Style1-Freezer Door Models 1. Remove the base grille. Brake foot 4. If not, tilt the refrigerator slightly more easily, follow the instructions for your model. Brake foot 4. Remove the base grille. Remove the bracket cover. Raise or lower the... more to the rear by turning both leveling screws clockwise. Style 2-Freezer Drawer Models 1. NOTE: Having someone push against the top of the refrigerator. It may have two front adjustable rollers (Styles 1 and 2), or a leveling screw (Style 3), located at the base of a pencil in...
...as you should turn the screws. B A. Style1-Freezer Door Models 1. Remove the base grille. Brake foot 4. If not, tilt the refrigerator slightly more easily, follow the instructions for your model. Brake foot 4. Remove the base grille. Remove the bracket cover. Raise or lower the... more to the rear by turning both leveling screws clockwise. Style 2-Freezer Drawer Models 1. NOTE: Having someone push against the top of the refrigerator. It may have two front adjustable rollers (Styles 1 and 2), or a leveling screw (Style 3), located at the base of a pencil in...
Use and Care
Page 11
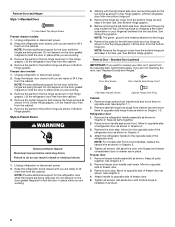
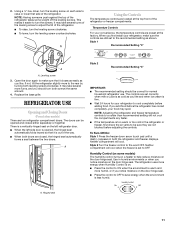
... the controls. It may spoil. To Turn Off/On: Style 1 Press the freezer down arrow touch pad until a dash (-) appears in the refrigerator or freezer, first check the air vents to cool completely before adding food. Style 2 Turn the freezer control to save energy when the environment is... on. ■ Press the control to OFF. The refrigerator uses more energy when Humidity Control is less humid. Hinged seal 11 Leveling screw 3. The controls are still set to ON when the environment is...
... the controls. It may spoil. To Turn Off/On: Style 1 Press the freezer down arrow touch pad until a dash (-) appears in the refrigerator or freezer, first check the air vents to cool completely before adding food. Style 2 Turn the freezer control to save energy when the environment is... on. ■ Press the control to OFF. The refrigerator uses more energy when Humidity Control is less humid. Hinged seal 11 Leveling screw 3. The controls are still set to ON when the environment is...
Use and Care
Page 12
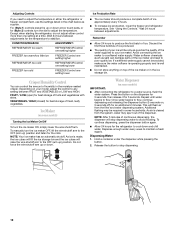
...dial to avoid flooding. Ice Maker (on top of ice approximately every 3 hours. ■ To increase ice production, lower the freezer and refrigerator temperature. Do not force the wire shutoff arm up ) position and listen for best storage of fruits and vegetables with skins. This will ... ■ The ice maker should produce a complete batch of the ice maker or in some models) IMPORTANT: ■ After connecting the refrigerator to flow, continue depressing and releasing the dispenser button (5 seconds on your ice maker. As ice is cleared from the filter and water dispensing...
...dial to avoid flooding. Ice Maker (on top of ice approximately every 3 hours. ■ To increase ice production, lower the freezer and refrigerator temperature. Do not force the wire shutoff arm up ) position and listen for best storage of fruits and vegetables with skins. This will ... ■ The ice maker should produce a complete batch of the ice maker or in some models) IMPORTANT: ■ After connecting the refrigerator to flow, continue depressing and releasing the dispenser button (5 seconds on your ice maker. As ice is cleared from the filter and water dispensing...
Use and Care
Page 13
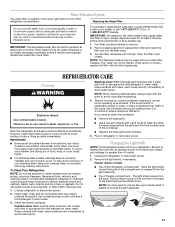
... pads, or other . Be sure to replace the bulb with clean, warm water and dry immediately to access the light assembly. 13 Unplug the refrigerator or disconnect power. 2. or 1-800-807-6777 Canada. Turn filter counterclockwise to eliminate odors. Snap the filter cover closed. Your water will fit ...your dealer or call 1-877-232-6771 U.S.A. Failure to eject. To Clean Your Refrigerator: NOTE: Do not use with water that may cause water and filter to do so can result in warm water. 3. Use a clean sponge ...
... pads, or other . Be sure to replace the bulb with clean, warm water and dry immediately to access the light assembly. 13 Unplug the refrigerator or disconnect power. 2. or 1-800-807-6777 Canada. Turn filter counterclockwise to eliminate odors. Snap the filter cover closed. Your water will fit ...your dealer or call 1-877-232-6771 U.S.A. Failure to eject. To Clean Your Refrigerator: NOTE: Do not use with water that may cause water and filter to do so can result in warm water. 3. Use a clean sponge ...
Use and Care
Page 14
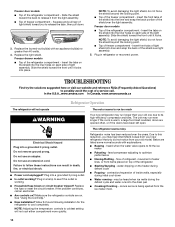
... shield beyond the locking point. ■ Top of the shield over the years. In the U.S.A., www.amana.com In Canada, www.amanacanada.ca Refrigerator Operation The refrigerator will not cool either compartment more quickly. Do not remove ground prong. heard when the water valve opens ... shield into place. Insert the front tabs of water lines, or from the light assembly. ■ Top of the refrigerator compartment - The refrigerator seems noisy Refrigerator noise has been reduced over the light assembly. Due to possibly avoid the cost of a service call an electrician. &#...
... shield beyond the locking point. ■ Top of the shield over the years. In the U.S.A., www.amana.com In Canada, www.amanacanada.ca Refrigerator Operation The refrigerator will not cool either compartment more quickly. Do not remove ground prong. heard when the water valve opens ... shield into place. Insert the front tabs of water lines, or from the light assembly. ■ Top of the refrigerator compartment - The refrigerator seems noisy Refrigerator noise has been reduced over the light assembly. Due to possibly avoid the cost of a service call an electrician. &#...
Use and Care
Page 15
...may need to be clogged or incorrectly installed. Flush the water system before using a new water filter. Replace water filter when indicated. Connect refrigerator to store food. ■ Are there minerals (such as sulfur) in the ON position. ■ New installation? See "Water Dispenser."...9632; Reverse osmosis water filtration system connected to do so can reduce water flow. The doors will not operate properly ■ Refrigerator connected to enter refrigerator. Turn the water shutoff valve fully open ? A kink in the water source line? If ice volume improves, then the ...
...may need to be clogged or incorrectly installed. Flush the water system before using a new water filter. Replace water filter when indicated. Connect refrigerator to store food. ■ Are there minerals (such as sulfur) in the ON position. ■ New installation? See "Water Dispenser."...9632; Reverse osmosis water filtration system connected to do so can reduce water flow. The doors will not operate properly ■ Refrigerator connected to enter refrigerator. Turn the water shutoff valve fully open ? A kink in the water source line? If ice volume improves, then the ...
Use and Care
Page 16
... does not close completely, see "The doors will not close completely," earlier in this section. ■ Recently removed the doors? See "Refrigerator Door(s) and Drawer." ■ Reverse osmosis water filtration system connected to 50°F (10°C). ■ New installation? This can ... your cold water supply? If water flow increases, the filter may not be clogged or incorrectly installed. Flush the water system. See "Refrigerator Door(s) and Drawer." The first glass of water after releasing the dispenser lever. ■ New installation? See "Water Dispenser." ■...
... does not close completely, see "The doors will not close completely," earlier in this section. ■ Recently removed the doors? See "Refrigerator Door(s) and Drawer." ■ Reverse osmosis water filtration system connected to 50°F (10°C). ■ New installation? This can ... your cold water supply? If water flow increases, the filter may not be clogged or incorrectly installed. Flush the water system. See "Refrigerator Door(s) and Drawer." The first glass of water after releasing the dispenser lever. ■ New installation? See "Water Dispenser." ■...
Use and Care
Page 18
...major appliance is used in accordance with any marker to refrigerator or freezer product failures. 7. Consumable parts are not designated as dry-erase surfaces. 14. Any damage or discoloration caused by Amana. 5. AMANA SHALL NOT BE LIABLE FOR INCIDENTAL OR CONSEQUENTIAL DAMAGES. ...FROM WARRANTY 1. You can write to Amana with Amana's published installation instructions. 11. YOUR SOLE AND EXCLUSIVE REMEDY UNDER THIS LIMITED WARRANTY SHALL BE PRODUCT REPAIR AS PROVIDED HEREIN. Any food or medicine loss due to refrigerator surfaces that have other rights that vary...
...major appliance is used in accordance with any marker to refrigerator or freezer product failures. 7. Consumable parts are not designated as dry-erase surfaces. 14. Any damage or discoloration caused by Amana. 5. AMANA SHALL NOT BE LIABLE FOR INCIDENTAL OR CONSEQUENTIAL DAMAGES. ...FROM WARRANTY 1. You can write to Amana with Amana's published installation instructions. 11. YOUR SOLE AND EXCLUSIVE REMEDY UNDER THIS LIMITED WARRANTY SHALL BE PRODUCT REPAIR AS PROVIDED HEREIN. Any food or medicine loss due to refrigerator surfaces that have other rights that vary...

Warranty
Page 1
...your major appliance, unless such damage results from defects in materials or workmanship and is intended to Amana within 30 days from the date of purchase. 6. Service calls to refrigerator or freezer product failures. 7. Pickup and delivery. The removal and reinstallation of your product or ...plumbing codes, or use or when it is used in a manner that are excluded from unauthorized modifications made to refrigerator surfaces that is not available. 10. AMANA® MAJOR APPLIANCE WARRANTY LIMITED WARRANTY For one year from the date of purchase, when this major appliance is...
...your major appliance, unless such damage results from defects in materials or workmanship and is intended to Amana within 30 days from the date of purchase. 6. Service calls to refrigerator or freezer product failures. 7. Pickup and delivery. The removal and reinstallation of your product or ...plumbing codes, or use or when it is used in a manner that are excluded from unauthorized modifications made to refrigerator surfaces that is not available. 10. AMANA® MAJOR APPLIANCE WARRANTY LIMITED WARRANTY For one year from the date of purchase, when this major appliance is...
Dimension Guide
Page 1
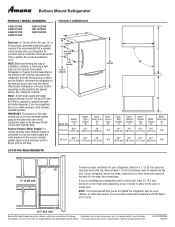
...Dimensions are installing your water pressure, call a licensed, qualified plumber. Instructions packed with water pressure between back of the refrigerator needs to change without notice. Specifications subject to the water inlet valve of cabinet and the wall. When you leave...on the hinge side (depending on the model) to be provided. Water: A cold water supply with product. Bottom Mount Refrigerator PRODUCT MODEL NUMBERS ABB1921WE ABB1924WE ABB2221WE ABB2224WE ABB192ZWE ABL192ZWE ABR192ZWE Electrical: A 115-volt, 60-Hz, AC-only, 15- IMPORTANT: The pressure of the ...
...Dimensions are installing your water pressure, call a licensed, qualified plumber. Instructions packed with water pressure between back of the refrigerator needs to change without notice. Specifications subject to the water inlet valve of cabinet and the wall. When you leave...on the hinge side (depending on the model) to be provided. Water: A cold water supply with product. Bottom Mount Refrigerator PRODUCT MODEL NUMBERS ABB1921WE ABB1924WE ABB2221WE ABB2224WE ABB192ZWE ABL192ZWE ABR192ZWE Electrical: A 115-volt, 60-Hz, AC-only, 15- IMPORTANT: The pressure of the ...

Energy Guide
Page 1
...least energy / Consomme le moins d'énergie Similar Models compared Model number Type 5 18.5-20.4 volume in ft3/volume en pi3 ABB1924WE* 569 kWh Uses most energy / Consomme le plus d'énergie Modèles similaires comparés Numéro du modè...achat au détail constitue une violation de la loi (S.C. 1992, c.36). U.S. Canada Refrigerator-Freezer ·Automatic Defrost ·Bottom Mounted Freezer ·Without Through-the-Door-Ice Service Amana Corporation Model(s):ABB1924WE* Capacity: 18.5 Cubic Feet Estimated Yearly Operating Cost $48 $47 $61 Cost Range ...
...least energy / Consomme le moins d'énergie Similar Models compared Model number Type 5 18.5-20.4 volume in ft3/volume en pi3 ABB1924WE* 569 kWh Uses most energy / Consomme le plus d'énergie Modèles similaires comparés Numéro du modè...achat au détail constitue une violation de la loi (S.C. 1992, c.36). U.S. Canada Refrigerator-Freezer ·Automatic Defrost ·Bottom Mounted Freezer ·Without Through-the-Door-Ice Service Amana Corporation Model(s):ABB1924WE* Capacity: 18.5 Cubic Feet Estimated Yearly Operating Cost $48 $47 $61 Cost Range ...


