
Owners Manual
Page 3
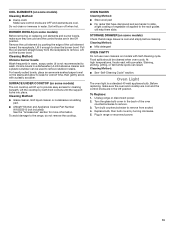
...use of undersized utensils will also improve efficiency. The door gasket is cool. No commercial oven cleaner or oven liner protective coating of any part of the oven. Remove broiler pan and other glazed utensils are dark in ignition of clothing. Grease should not be used to wipe spills... may result in color. I Do Not Soak Removable Heating Elements - I CAUTION: Do not store items of interest to children in or on any part of the range unless specifically recommended in desired location while oven is essential for a good seal. I Make Sure Reflector Pans or Drip Bowls Are in...
...use of undersized utensils will also improve efficiency. The door gasket is cool. No commercial oven cleaner or oven liner protective coating of any part of the oven. Remove broiler pan and other glazed utensils are dark in ignition of clothing. Grease should not be used to wipe spills... may result in color. I Do Not Soak Removable Heating Elements - I CAUTION: Do not store items of interest to children in or on any part of the range unless specifically recommended in desired location while oven is essential for a good seal. I Make Sure Reflector Pans or Drip Bowls Are in...
Owners Manual
Page 6
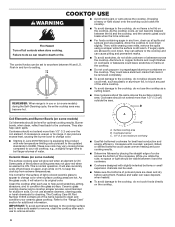
... on the cooktop. 6 B Coil Elements and Burner Bowls (on some models) The surface cooking area will glow red when an element is in any part of water. These new coils may become hot. ■■ Avoid storing jars or cans above the cooktop. Some... parts of a ruler across the cooktop. The Cooktop Care Kit Part Number 31605 contains all soils. A C A. Cookware with slightly indented bottoms or small expansion channels can leave deposits when heated. ■■ To ...
... on the cooktop. 6 B Coil Elements and Burner Bowls (on some models) The surface cooking area will glow red when an element is in any part of water. These new coils may become hot. ■■ Avoid storing jars or cans above the cooktop. Some... parts of a ruler across the cooktop. The Cooktop Care Kit Part Number 31605 contains all soils. A C A. Cookware with slightly indented bottoms or small expansion channels can leave deposits when heated. ■■ To ...
Owners Manual
Page 7
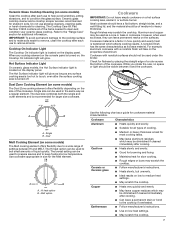
... may be diminished if cleaned immediately after cooking. ■■ Can leave a permanent stain or bond to condition the glass surface. The Cooktop Care Kit Part Number 31605 contains all types of the cookware. Refer to clean and condition your ceramic glass cooktop. When any surface cooking area is located on...
... may be diminished if cleaned immediately after cooking. ■■ Can leave a permanent stain or bond to condition the glass surface. The Cooktop Care Kit Part Number 31605 contains all types of the cookware. Refer to clean and condition your ceramic glass cooktop. When any surface cooking area is located on...
Owners Manual
Page 12
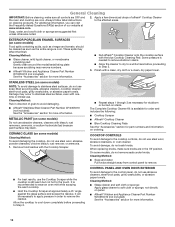
...on stains. These spills may stain. Damage may remove numbers. ■■ Affresh® Kitchen and Appliance Cleaner Part Number W10355010 (not included): See the "Accessories" section for more information. ■■ Rub affresh® Cooktop... surface may affect the finish. STAINLESS STEEL (on panel. ■■ Affresh® Kitchen and Appliance Cleaner Part Number W10355010 (not included): See the "Accessories" section for more information. 12 COOKTOP CONTROLS To avoid damage to...warm cooktop. ■■ Hold the Cooktop Scraper at www.amana.com. 2.
...on stains. These spills may stain. Damage may remove numbers. ■■ Affresh® Kitchen and Appliance Cleaner Part Number W10355010 (not included): See the "Accessories" section for more information. ■■ Rub affresh® Cooktop... surface may affect the finish. STAINLESS STEEL (on panel. ■■ Affresh® Kitchen and Appliance Cleaner Part Number W10355010 (not included): See the "Accessories" section for more information. 12 COOKTOP CONTROLS To avoid damage to...warm cooktop. ■■ Hold the Cooktop Scraper at www.amana.com. 2.
Owners Manual
Page 13
... element toward the receptacle. Cleaning Method: ■■ Glass cleaner, mild liquid cleaner or nonabrasive scrubbing pad. ■■ Affresh® Kitchen and Appliance Cleaner Part Number W10355010 (not included): See the "Accessories" section for a short time, then gently scrub with a plastic scrubber. To Replace: 1. Lift it enough to the range...
... element toward the receptacle. Cleaning Method: ■■ Glass cleaner, mild liquid cleaner or nonabrasive scrubbing pad. ■■ Affresh® Kitchen and Appliance Cleaner Part Number W10355010 (not included): See the "Accessories" section for a short time, then gently scrub with a plastic scrubber. To Replace: 1. Lift it enough to the range...
Owners Manual
Page 15
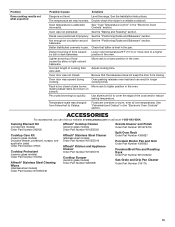
...Lighter browning of the crust and/or reduce baking temperature. Oven peeking releases oven heat and can visit our website at www.amana.com or call us at low temperatures. Level the range. Incorrect length of food caused Lower oven temperature 25°F ..., scraper, and applicator pads) Order Part Number 31605 Cooktop Protectant (ceramic glass models) Order Part Number 31463A Affresh® Stainless Steel Cleaning Wipes (stainless steel models) Order Part Number W10355049 Affresh® Cooktop Cleaner (ceramic glass models) Order Part Number W10355051 Affresh® Stainless Steel ...
...Lighter browning of the crust and/or reduce baking temperature. Oven peeking releases oven heat and can visit our website at www.amana.com or call us at low temperatures. Level the range. Incorrect length of food caused Lower oven temperature 25°F ..., scraper, and applicator pads) Order Part Number 31605 Cooktop Protectant (ceramic glass models) Order Part Number 31463A Affresh® Stainless Steel Cleaning Wipes (stainless steel models) Order Part Number W10355049 Affresh® Cooktop Cleaner (ceramic glass models) Order Part Number W10355051 Affresh® Stainless Steel ...

Owners Manual
Page 16
..., direct all requests for warranty service to review the Troubleshooting section of the Use and Care Guide or visit producthelp.amana.com. 2. Consumable parts (e.g., light bulbs, batteries, air or water filters, preservation solutions). REPAIR AS PROVIDED HEREIN. Discoloration, rust, or oxidation... not apply to use of purchase, when 1. when this warranty. Conversion of products from the date of non-genuine Amana parts or accessories. 6. LIMITATION OF REMEDIES: EXCLUSION OF INCIDENTAL AND CONSEQUENTIAL DAMAGES YOUR SOLE AND EXCLUSIVE REMEDY UNDER THIS LIMITED WARRANTY...
..., direct all requests for warranty service to review the Troubleshooting section of the Use and Care Guide or visit producthelp.amana.com. 2. Consumable parts (e.g., light bulbs, batteries, air or water filters, preservation solutions). REPAIR AS PROVIDED HEREIN. Discoloration, rust, or oxidation... not apply to use of purchase, when 1. when this warranty. Conversion of products from the date of non-genuine Amana parts or accessories. 6. LIMITATION OF REMEDIES: EXCLUSION OF INCIDENTAL AND CONSEQUENTIAL DAMAGES YOUR SOLE AND EXCLUSIVE REMEDY UNDER THIS LIMITED WARRANTY...
Installation Instructions
Page 1
Only 8 Verify Anti-Tip Bracket Is Installed and Engaged 12 Level Range 13 Warming Drawer or Premium Storage Drawer 13 Storage Drawer 14 Oven Door 14 Complete Installation 14 Moving the Range 15 IMPORTANT: Save for local electrical inspector's use. Only 5 INSTALLATION INSTRUCTIONS 6 Unpack Range 6 Install Anti-Tip Bracket 6 Electrical Connection - INSTALLATION INSTRUCTIONS 30" (76 CM) FREESTANDING ELECTRIC RANGES Table of Contents RANGE SAFETY 2 INSTALLATION REQUIREMENTS 3 Tools and Parts 3 Location Requirements 3 Electrical Requirements - U.S.A. U.S.A. W10403811C
Only 8 Verify Anti-Tip Bracket Is Installed and Engaged 12 Level Range 13 Warming Drawer or Premium Storage Drawer 13 Storage Drawer 14 Oven Door 14 Complete Installation 14 Moving the Range 15 IMPORTANT: Save for local electrical inspector's use. Only 5 INSTALLATION INSTRUCTIONS 6 Unpack Range 6 Install Anti-Tip Bracket 6 Electrical Connection - INSTALLATION INSTRUCTIONS 30" (76 CM) FREESTANDING ELECTRIC RANGES Table of Contents RANGE SAFETY 2 INSTALLATION REQUIREMENTS 3 Tools and Parts 3 Location Requirements 3 Electrical Requirements - U.S.A. U.S.A. W10403811C
Installation Instructions
Page 3
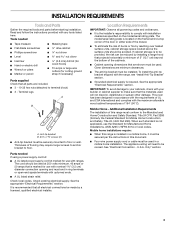
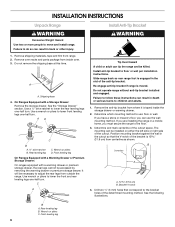
....1/NFPA 501A or local codes. Thickness of the cabinets. ■ Cabinet opening and must be avoided. Location Requirements IMPORTANT: Observe all parts are included. ■ 3 - 10-32 hex nuts (attached to be provided, the risk can be reduced by reaching over heated...■ Four-wire power supply cord or cable must end in accordance with the requirements of 194° (90°C). See "Electrical Connection - Parts needed ■ Tape measure ■ Masking tape ■ Flat-blade screwdriver ■ ¼" drive ratchet ■ Phillips screwdriver ■ Level...
....1/NFPA 501A or local codes. Thickness of the cabinets. ■ Cabinet opening and must be avoided. Location Requirements IMPORTANT: Observe all parts are included. ■ 3 - 10-32 hex nuts (attached to be provided, the risk can be reduced by reaching over heated...■ Four-wire power supply cord or cable must end in accordance with the requirements of 194° (90°C). See "Electrical Connection - Parts needed ■ Tape measure ■ Masking tape ■ Flat-blade screwdriver ■ ¼" drive ratchet ■ Phillips screwdriver ■ Level...
Installation Instructions
Page 6
... follow these instructions can result in death or serious burns to lower the front and rear leveling legs one -half turn . Remove oven racks and parts package from range. 2. Rear leveling leg B. Front leveling leg 6 Slide range back so rear range foot is moved. Determine and mark centerline of the cutout...
... follow these instructions can result in death or serious burns to lower the front and rear leveling legs one -half turn . Remove oven racks and parts package from range. 2. Rear leveling leg B. Front leveling leg 6 Slide range back so rear range foot is moved. Determine and mark centerline of the cutout...
Installation Instructions
Page 9
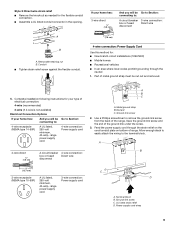
Part of metal ground strap must be Go to Section: connecting to : A circuit breaker 3-wire connection: box or fused Direct wire disconnect 3" (7.6 cm) B A. Complete installation following ...
Part of metal ground strap must be Go to Section: connecting to : A circuit breaker 3-wire connection: box or fused Direct wire disconnect 3" (7.6 cm) B A. Complete installation following ...
Installation Instructions
Page 11
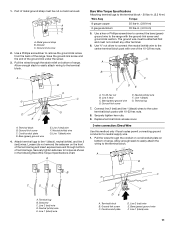
... neutral supply wire. 1. Line 1 (black) wire 4. Pull the wires through the conduit on cord/conduit plate on bottom of the range. Line 1 (black) wire 11 Part of the ground link under the screw. 3. Terminal block B. Attach terminal lugs to torque as shown in . (4.0 N-m) 5. Securely tighten setscrew to line 1 (black), neutral (white...
... neutral supply wire. 1. Line 1 (black) wire 4. Pull the wires through the conduit on cord/conduit plate on bottom of the range. Line 1 (black) wire 11 Part of the ground link under the screw. 3. Terminal block B. Attach terminal lugs to torque as shown in . (4.0 N-m) 5. Securely tighten setscrew to line 1 (black), neutral (white...
Installation Instructions
Page 14
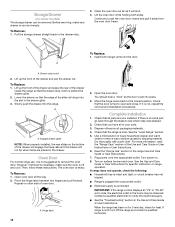
...miswired. Pull the storage drawer straight back to see which step was skipped. 2. Close the oven door as far as the door is an extra part, go back through the steps to the drawer stop. 3. Lift the oven door while holding both hanger arms into place. 3. Lift up the front...and cool. To Remove: 1. Hinge latch 2. Open the oven door. Move the hinge levers back to open and close. Check that you have all parts are placed in the Use and Care Guide or User Instructions. Complete Installation 1. Check that the door is cool and empty. Dispose of liquid household...
...miswired. Pull the storage drawer straight back to see which step was skipped. 2. Close the oven door as far as the door is an extra part, go back through the steps to the drawer stop. 3. Lift the oven door while holding both hanger arms into place. 3. Lift up the front...and cool. To Remove: 1. Hinge latch 2. Open the oven door. Move the hinge levers back to open and close. Check that you have all parts are placed in the Use and Care Guide or User Instructions. Complete Installation 1. Check that the door is cool and empty. Dispose of liquid household...

Installation Instructions
Page 15
... death or serious burns to follow these instructions can tip the range and be killed. Check that the anti-tip bracket is level. Replace all parts and panels before servicing. Complete cleaning or maintenance. 4. Check that range is installed and engaged. See the "Verify Anti-Tip Bracket Is Installed and Engaged...
... death or serious burns to follow these instructions can tip the range and be killed. Check that the anti-tip bracket is level. Replace all parts and panels before servicing. Complete cleaning or maintenance. 4. Check that range is installed and engaged. See the "Verify Anti-Tip Bracket Is Installed and Engaged...


