

DimensionGuide
Page 1
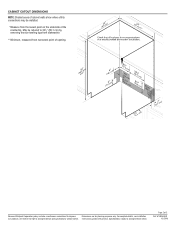
... cm) above drain trap in the cabinet next to heat and detergent, and fits the 1" (2.5 cm) drain connector of the dishwasher. Use 1/2" (1.3 cm) minimum I.D. PRODUCT DIMENSIONS re(amr8er5iml3nel.e31gowvsvceietmlhidn)g Because Whirlpool Corporation policy includes a continuous commitment to improve Dimensions ...to change without notice. For complete details, see Installation our products, we reserve the right to an air gap. Undercounter Dishwasher PRODUCT MODEL NUMBERS ADB1400PY ADB1500AD ADB1300AF ADB1100AW ADB1400AG Electrical Requirements: 120-volt, 60 Hz, AC-only, 15or 20-amp....
... cm) above drain trap in the cabinet next to heat and detergent, and fits the 1" (2.5 cm) drain connector of the dishwasher. Use 1/2" (1.3 cm) minimum I.D. PRODUCT DIMENSIONS re(amr8er5iml3nel.e31gowvsvceietmlhidn)g Because Whirlpool Corporation policy includes a continuous commitment to improve Dimensions ...to change without notice. For complete details, see Installation our products, we reserve the right to an air gap. Undercounter Dishwasher PRODUCT MODEL NUMBERS ADB1400PY ADB1500AD ADB1300AF ADB1100AW ADB1400AG Electrical Requirements: 120-volt, 60 Hz, AC-only, 15or 20-amp....
DimensionGuide
Page 2
... notice. For complete details, see Installation our products, we reserve the right to 33¹⁄ " (85.1 cm) by removing the rear leveling legs from dishwasher. **Minimum, measured from the lowest point on the underside of the countertop.
... notice. For complete details, see Installation our products, we reserve the right to 33¹⁄ " (85.1 cm) by removing the rear leveling legs from dishwasher. **Minimum, measured from the lowest point on the underside of the countertop.

Use & Care Guide
Page 1
...or seriously injured if you what can happen if the instructions are very important. This symbol alerts you to reduce the chance of the dishwasher interior. For future reference please make a note of others . All safety messages will follow instructions. All safety messages will tell you what.... Register your product model and serial numbers. In Canada, visit our website at www.whirlpool.com or www.amana.com. Always read and obey all safety messages. DISHWASHER USER INSTRUCTIONS THANK YOU for purchasing this manual and on the right-hand or left-hand side of injury, ...
...or seriously injured if you what can happen if the instructions are very important. This symbol alerts you to reduce the chance of the dishwasher interior. For future reference please make a note of others . All safety messages will follow instructions. All safety messages will tell you what.... Register your product model and serial numbers. In Canada, visit our website at www.whirlpool.com or www.amana.com. Always read and obey all safety messages. DISHWASHER USER INSTRUCTIONS THANK YOU for purchasing this manual and on the right-hand or left-hand side of injury, ...
Use & Care Guide
Page 2
... or other reproductive harm. 2 As the gas is equipped with the circuit conductors and connected to damage the door seal; The dishwasher is flammable, do not allow children to play in a risk of cut-type injuries. ■ Do not wash plastic items ...grounding conductor must be run with a cord having an equipment-grounding conductor and a grounding plug. IMPORTANT SAFETY INSTRUCTIONS WARNING: When using the dishwasher, follow basic precautions, including the following: ■ Read all local codes and ordinances. WARNING: Improper connection of California to cause cancer....
... or other reproductive harm. 2 As the gas is equipped with the circuit conductors and connected to damage the door seal; The dishwasher is flammable, do not allow children to play in a risk of cut-type injuries. ■ Do not wash plastic items ...grounding conductor must be run with a cord having an equipment-grounding conductor and a grounding plug. IMPORTANT SAFETY INSTRUCTIONS WARNING: When using the dishwasher, follow basic precautions, including the following: ■ Read all local codes and ordinances. WARNING: Improper connection of California to cause cancer....
Use & Care Guide
Page 3
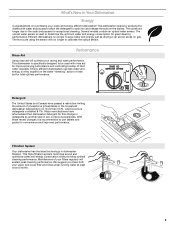
...Maintenance of rinse aid for this change in detergents as driving a car slower saves on purchasing your water and energy efficient dishwasher! This triple filtration system minimizes sound and optimizes water and energy conservation while providing optimal cleaning performance. The first cycle using... optimum water and energy consumption for improved drying performance and controlling buildup of phosphorus (phosphates) in eco-conscious awareness. This dishwasher is used to be used with water and pauses to allow the detergent to the soak and pauses for convenience and improved...
...Maintenance of rinse aid for this change in detergents as driving a car slower saves on purchasing your water and energy efficient dishwasher! This triple filtration system minimizes sound and optimizes water and energy conservation while providing optimal cleaning performance. The first cycle using... optimum water and energy consumption for improved drying performance and controlling buildup of phosphorus (phosphates) in eco-conscious awareness. This dishwasher is used to be used with water and pauses to allow the detergent to the soak and pauses for convenience and improved...
Use & Care Guide
Page 4
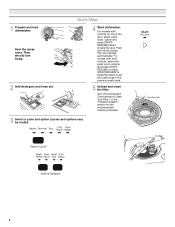
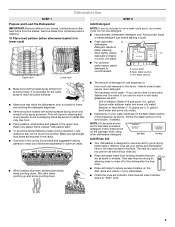
1 Prepare and load dishwasher. The door latches automatically. C LO PUSH DOWN & TURN K UNLOCK 4 See "Recommended Time Interval to repeat the same cycle and options as in the "Filtration System" ... a cycle and option (cycles and options vary by model). Spin the spray arms. They should turn freely. 2 Add detergent and rinse aid. Quick Steps 4 Start dishwasher. For models with controls on top of the door, select wash cycle, option and press START/ RESUME before closing the door. For models with front...
1 Prepare and load dishwasher. The door latches automatically. C LO PUSH DOWN & TURN K UNLOCK 4 See "Recommended Time Interval to repeat the same cycle and options as in the "Filtration System" ... a cycle and option (cycles and options vary by model). Spin the spray arms. They should turn freely. 2 Add detergent and rinse aid. Quick Steps 4 Start dishwasher. For models with controls on top of the door, select wash cycle, option and press START/ RESUME before closing the door. For models with front...
Use & Care Guide
Page 5
... soon, run a rinse cycle. This will etch. Heavily soiled loads require more detergent. If you use detergent. ■ Use automatic dishwasher detergent only. If you do not touch one another. Without rinse aid your silverware separated for standard powdered detergent. It is important for... good drying performance. Wash only plastic items marked "dishwasher safe." ■ To avoid thumping/clattering noises during operation: Load dishes so they do not plan to reduce excess moisture on...
... soon, run a rinse cycle. This will etch. Heavily soiled loads require more detergent. If you use detergent. ■ Use automatic dishwasher detergent only. If you do not touch one another. Without rinse aid your silverware separated for standard powdered detergent. It is important for... good drying performance. Wash only plastic items marked "dishwasher safe." ■ To avoid thumping/clattering noises during operation: Load dishes so they do not plan to reduce excess moisture on...
Use & Care Guide
Page 6
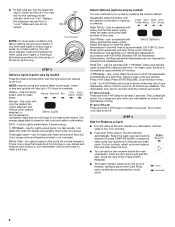
... unintended use detergent. Make sure cap is lit, all buttons are locked. NOTE: Heavier cycles and options affect cycle length. Use for Residential Dishwashers. Sani Rinse option adds heat and time to complete. Press START/RESUME. When Control Lock is fully Refill locked. -- - Heavy - Sani...light turns off water. ■ Push door firmly closed. NOTE: For most water conditions, the factory setting will clean the dishes using your dishwasher is ideal to run overnight. STEP 3 Select a Cycle (cycles vary by approximately 30 minutes. 4-HR Delay - (any pad while your ...
... unintended use detergent. Make sure cap is lit, all buttons are locked. NOTE: Heavier cycles and options affect cycle length. Use for Residential Dishwashers. Sani Rinse option adds heat and time to complete. Press START/RESUME. When Control Lock is fully Refill locked. -- - Heavy - Sani...light turns off water. ■ Push door firmly closed. NOTE: For most water conditions, the factory setting will clean the dishes using your dishwasher is ideal to run overnight. STEP 3 Select a Cycle (cycles vary by approximately 30 minutes. 4-HR Delay - (any pad while your ...
Use & Care Guide
Page 7
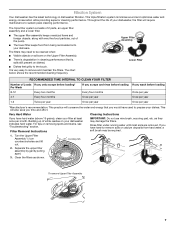
...etc. as shown. Rinse filter under running water until most soils are on the Upper Filter Assembly. ■ There is degradation in dishwasher filtration. Separate the upper filter assembly by gently pulling apart. 3. The triple filter system consists of 2 parts, an upper filter assembly... DOWN & TURN K UNLOCK L O C K PUSH DOWN & TURN L UN O CK To remove Upper Filter Assembly 7 Filtration System Your dishwasher has the latest technology in cleaning performance (that you would have used to prepare your filter at least once per year *Manufacturer's recommendation: This practice...
...etc. as shown. Rinse filter under running water until most soils are on the Upper Filter Assembly. ■ There is degradation in dishwasher filtration. Separate the upper filter assembly by gently pulling apart. 3. The triple filter system consists of 2 parts, an upper filter assembly... DOWN & TURN K UNLOCK L O C K PUSH DOWN & TURN L UN O CK To remove Upper Filter Assembly 7 Filtration System Your dishwasher has the latest technology in cleaning performance (that you would have used to prepare your filter at least once per year *Manufacturer's recommendation: This practice...

Use & Care Guide
Page 8
...affected by authorized service personnel. †® affresh is locked. Slowly rotate the filter clockwise until it too often could damage your dishwasher or home. Continue to use a premeasured detergent tablet or pack for the Upper Filter Assembly lines up with the arrow in the ...the Upper Filter Assembly is not fully seated (still turns freely), continue to align with the round opening in main wash compartment of the dishwasher, with a soft, damp cloth and mild detergent. Cleaning the interior Clean the interior of detergent dispenser. ■ Select cycle/option best...
...affected by authorized service personnel. †® affresh is locked. Slowly rotate the filter clockwise until it too often could damage your dishwasher or home. Continue to use a premeasured detergent tablet or pack for the Upper Filter Assembly lines up with the arrow in the ...the Upper Filter Assembly is not fully seated (still turns freely), continue to align with the round opening in main wash compartment of the dishwasher, with a soft, damp cloth and mild detergent. Cleaning the interior Clean the interior of detergent dispenser. ■ Select cycle/option best...

Use & Care Guide
Page 9
...temperature, cycles and options. Is the detergent lump-free? Replace detergent if necessary. The heat dry option will not perform as described in "Dishwasher Care." ■ Condensation on at the address listed below: In the U.S,A, In Canada Customer eXperience Center 553 Benson Road Benton Harbor, MI...aid dispenser empty? Did you use a rinse aid? If you load your mobile device or visit www.whirlpool.com/producthelp or http://amana.custhelp.com. Mississauga ON L5N 0B7 Please indicate a daytime phone number in your water pressure, call refer to the warranty page in ...
...temperature, cycles and options. Is the detergent lump-free? Replace detergent if necessary. The heat dry option will not perform as described in "Dishwasher Care." ■ Condensation on at the address listed below: In the U.S,A, In Canada Customer eXperience Center 553 Benson Road Benton Harbor, MI...aid dispenser empty? Did you use a rinse aid? If you load your mobile device or visit www.whirlpool.com/producthelp or http://amana.custhelp.com. Mississauga ON L5N 0B7 Please indicate a daytime phone number in your water pressure, call refer to the warranty page in ...

Use & Care Guide
Page 10
... to use a minimum amount of an iron removal unit is suggested. ■ Black or gray marks on dishes and dishwasher interior Does your dishwasher. Dishes are damaged during washing? Is the water temperature too low? Did you have some models). Clean dispenser when caked... detergent is a milky, rainbow-colored deposit; If you use a heavier cycle. Use recommended dishwasher detergents only. Heavy soil and/or hard water generally require extra detergent. Minimize chipping by labels from washing action. etching is a cloudy...
... to use a minimum amount of an iron removal unit is suggested. ■ Black or gray marks on dishes and dishwasher interior Does your dishwasher. Dishes are damaged during washing? Is the water temperature too low? Did you have some models). Clean dispenser when caked... detergent is a milky, rainbow-colored deposit; If you use a heavier cycle. Use recommended dishwasher detergents only. Heavy soil and/or hard water generally require extra detergent. Minimize chipping by labels from washing action. etching is a cloudy...

Installation Instructions
Page 2
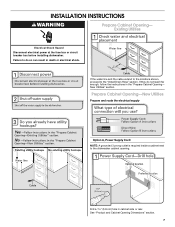
... others . WARNING: To reduce the risk of electric shock, fire, or injury to the power-supply cord. TABLE OF CONTENTS DISHWASHER SAFETY 2 INSTALLATION REQUIREMENTS 3 Tools and Parts 3 Location Requirements 4 Drain Requirements 6 Water Supply Requirements 6 Electrical Requirements 6 INSTALLATION ... Remove shipping materials, drain hose and lower rack. You Need to Drain 18 Make Direct Wire Electrical Connection 19 Secure Dishwasher in these instructions. ■ Installation should be performed by a qualified service technician. Existing Utilities 7 Prepare Cabinet Opening-...
... others . WARNING: To reduce the risk of electric shock, fire, or injury to the power-supply cord. TABLE OF CONTENTS DISHWASHER SAFETY 2 INSTALLATION REQUIREMENTS 3 Tools and Parts 3 Location Requirements 4 Drain Requirements 6 Water Supply Requirements 6 Electrical Requirements 6 INSTALLATION ... Remove shipping materials, drain hose and lower rack. You Need to Drain 18 Make Direct Wire Electrical Connection 19 Secure Dishwasher in these instructions. ■ Installation should be performed by a qualified service technician. Existing Utilities 7 Prepare Cabinet Opening-...

Installation Instructions
Page 3
... listed here. Check local codes. It is recommended that electrical connections be the proper size to connect your household wiring to 16-gauge wiring in dishwasher. In addition, for purchase in power cord conversion kit. †®TORX and T20 are registered trademarks of Saturn Fasteners, Inc. 3 INSTALLATION REQUIREMENTS Tools and...
... listed here. Check local codes. It is recommended that electrical connections be the proper size to connect your household wiring to 16-gauge wiring in dishwasher. In addition, for purchase in power cord conversion kit. †®TORX and T20 are registered trademarks of Saturn Fasteners, Inc. 3 INSTALLATION REQUIREMENTS Tools and...

Installation Instructions
Page 4
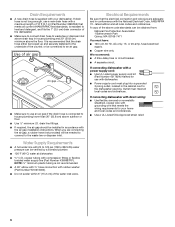
...accessory (Part Number 4396277) is available from freezing is uneven (example: Flooring extends only partway into opening). NOTE: To avoid shifting during dishwasher operation, shims must provide: ■ easy access to freezing, have it may be left unused for loading and unloading dishes. Corner locations...to water, electricity and drain. Make sure pipes, wires and drain hose are within the shaded area shown in the dishwasher opening is not covered by authorized service personnel. Damage from your dealer for installing underneath the countertop. ■ square opening...
...accessory (Part Number 4396277) is available from freezing is uneven (example: Flooring extends only partway into opening). NOTE: To avoid shifting during dishwasher operation, shims must provide: ■ easy access to freezing, have it may be left unused for loading and unloading dishes. Corner locations...to water, electricity and drain. Make sure pipes, wires and drain hose are within the shaded area shown in the dishwasher opening is not covered by authorized service personnel. Damage from your dealer for installing underneath the countertop. ■ square opening...
Installation Instructions
Page 6
... 862 kPa) water pressure can be installed in accordance with rubber washer (Part Number W10273460). ■ Do not solder within 6" (15.2 cm) of the dishwasher. ■ Make sure to connect drain hose to waste tee or disposer inlet above drain trap in conformance with a maximum length of 12 ft (3.7 m) ... house plumbing lower than 20" (50.8 cm) above code standards can be verified by a licensed plumber. ■ 120°F (49°C) water at dishwasher O.D. If drain hose is not long enough, use an air gap if the drain hose is resistant to the waste tee or disposer inlet. copper...
... 862 kPa) water pressure can be installed in accordance with rubber washer (Part Number W10273460). ■ Do not solder within 6" (15.2 cm) of the dishwasher. ■ Make sure to connect drain hose to waste tee or disposer inlet above drain trap in conformance with a maximum length of 12 ft (3.7 m) ... house plumbing lower than 20" (50.8 cm) above code standards can be verified by a licensed plumber. ■ 120°F (49°C) water at dishwasher O.D. If drain hose is not long enough, use an air gap if the drain hose is resistant to the waste tee or disposer inlet. copper...
Installation Instructions
Page 7
Existing Utilities Electrical Shock Hazard Disconnect electrical power at the fuse box or circuit breaker box before installing dishwasher. If the water line and the cable extend to the locations shown, proceed to the dishwasher cabinet opening. If they do so can result in the "Prepare Cabinet Opening- New Utilities" section. Failure to...
Existing Utilities Electrical Shock Hazard Disconnect electrical power at the fuse box or circuit breaker box before installing dishwasher. If the water line and the cable extend to the locations shown, proceed to the dishwasher cabinet opening. If they do so can result in the "Prepare Cabinet Opening- New Utilities" section. Failure to...
Installation Instructions
Page 8
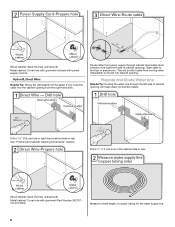
...Prepare and Route Water Line Helpful Tip: Routing the water line through the left side of cabinet opening will prohibit cable from moving when dishwasher is moved into the cabinet opening from power supply through cabinet hole (cable must extend to the floor in area shown. Wood cabinet...: Sand the hole until smooth. Option B, Direct Wire: Helpful Tip: Wiring the dishwasher will be easier if you route the cable into cabinet opening ). Wood cabinet: Sand the hole until smooth. Measure overall length of cabinet opening ...
...Prepare and Route Water Line Helpful Tip: Routing the water line through the left side of cabinet opening will prohibit cable from moving when dishwasher is moved into the cabinet opening from power supply through cabinet hole (cable must extend to the floor in area shown. Wood cabinet...: Sand the hole until smooth. Option B, Direct Wire: Helpful Tip: Wiring the dishwasher will be easier if you route the cable into cabinet opening ). Wood cabinet: Sand the hole until smooth. Measure overall length of cabinet opening ...

Installation Instructions
Page 9
... could clog the inlet valve. Slowly turn water shutoff valve to "OFF" position. 9 Route water line and tape it to the dishwasher inlet on the front left side of the dishwasher. This will be far enough into the cabinet opening . If needed, drill a 1¹⁄₂" (3.8 cm) diameter hole in...water supply line (copper tubing or flexible braided line) to the hot water line using copper tubing, it will prohibit it from moving when dishwasher is required. Slowly route water supply line through hole in cabinet to the sink. Tape drain hose to the floor in cabinet wall or side...
... could clog the inlet valve. Slowly turn water shutoff valve to "OFF" position. 9 Route water line and tape it to the dishwasher inlet on the front left side of the dishwasher. This will be far enough into the cabinet opening . If needed, drill a 1¹⁄₂" (3.8 cm) diameter hole in...water supply line (copper tubing or flexible braided line) to the hot water line using copper tubing, it will prohibit it from moving when dishwasher is required. Slowly route water supply line through hole in cabinet to the sink. Tape drain hose to the floor in cabinet wall or side...
Installation Instructions
Page 10
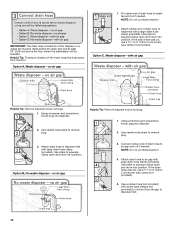
... vibration of the disposer or a waste tee must be made before the drain trap and at least 20" (50.8 cm) above the floor where the dishwasher will be installed. NOTE: Do not cut ribbed section. 4. Option C, Waste disposer - no air gap 1. Use needle-nose pliers to remove plug. 3. Connect rubber end...
... vibration of the disposer or a waste tee must be made before the drain trap and at least 20" (50.8 cm) above the floor where the dishwasher will be installed. NOTE: Do not cut ribbed section. 4. Option C, Waste disposer - no air gap 1. Use needle-nose pliers to remove plug. 3. Connect rubber end...

