

Use and Care
Page 3
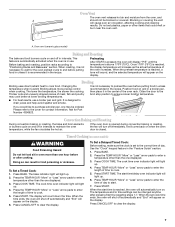
...clothing. During and after use dry chemical or foam-type extinguisher. ■ Use Only Dry Potholders - Do not repair or replace any part of pressure may become hot enough to cause burns. IMPORTANT SAFETY INSTRUCTIONS WARNING: To reduce the risk of Oven Racks - Surface units may...-Cleaning the Oven - Contact a qualified technician immediately. ■ Clean Cooktop With Caution - Build-up of the oven. ■ Clean Only Parts Listed in color. Boilover causes smoking and greasy spillovers that it is cool. Other surfaces of the appliance may cause container to burst and result...
...clothing. During and after use dry chemical or foam-type extinguisher. ■ Use Only Dry Potholders - Do not repair or replace any part of pressure may become hot enough to cause burns. IMPORTANT SAFETY INSTRUCTIONS WARNING: To reduce the risk of Oven Racks - Surface units may...-Cleaning the Oven - Contact a qualified technician immediately. ■ Clean Cooktop With Caution - Build-up of the oven. ■ Clean Only Parts Listed in color. Boilover causes smoking and greasy spillovers that it is cool. Other surfaces of the appliance may cause container to burst and result...
Use and Care
Page 7
... the cooking. Position food on some models) WARNING Food Poisoning Hazard Do not let food sit in unless it is not necessary to wait for Part Number 4396923. Ask for the oven preheat cycle to end before putting food in oven more precise control when cooking. Press BAKE. Press the TEMP...
... the cooking. Position food on some models) WARNING Food Poisoning Hazard Do not let food sit in unless it is not necessary to wait for Part Number 4396923. Ask for the oven preheat cycle to end before putting food in oven more precise control when cooking. Press BAKE. Press the TEMP...

Use and Care
Page 9
...pad: Gently clean around the model and serial number plate because scrubbing may occur. STAINLESS STEEL (on some models) Cleaning Method: Cooktop Cleaner Part Number 31464 is cool and empty before cleaning. Do not soak knobs. STORAGE DRAWER OR WARMING DRAWER (on some models, do not affect...may remove numbers. CONTROL PANEL AND OVEN DOOR EXTERIOR To avoid damage to slide, a light coating of our website at www.amana.com. Liquid detergent or all controls are off position. 2. Always follow label instructions on panel. ■ All-Purpose Appliance Cleaner...
...pad: Gently clean around the model and serial number plate because scrubbing may occur. STAINLESS STEEL (on some models) Cleaning Method: Cooktop Cleaner Part Number 31464 is cool and empty before cleaning. Do not soak knobs. STORAGE DRAWER OR WARMING DRAWER (on some models, do not affect...may remove numbers. CONTROL PANEL AND OVEN DOOR EXTERIOR To avoid damage to slide, a light coating of our website at www.amana.com. Liquid detergent or all controls are off position. 2. Always follow label instructions on panel. ■ All-Purpose Appliance Cleaner...

Use and Care
Page 11
... Steel Cleaner and Polish (stainless steel models) Order Part Number 31462 All-Purpose Appliance Cleaner Order Part Number 31682 Split-Rack with Removable Insert Order Part Number 4396927 Broiler Pan Order Part Number 4396923 AMANA® MAJOR APPLIANCE WARRANTY LIMITED WARRANTY For one year... calls to correct the installation of consumables or cleaning products not approved by an authorized Amana servicer is used in the country in accordance with published installation instructions. 11. Consumable parts are excluded from accident, alteration, misuse, abuse, fire, flood, acts of God,...
... Steel Cleaner and Polish (stainless steel models) Order Part Number 31462 All-Purpose Appliance Cleaner Order Part Number 31682 Split-Rack with Removable Insert Order Part Number 4396927 Broiler Pan Order Part Number 4396923 AMANA® MAJOR APPLIANCE WARRANTY LIMITED WARRANTY For one year... calls to correct the installation of consumables or cleaning products not approved by an authorized Amana servicer is used in the country in accordance with published installation instructions. 11. Consumable parts are excluded from accident, alteration, misuse, abuse, fire, flood, acts of God,...

Warranty
Page 1
...purchase. 6. Any food loss due to be borne by an authorized Amana servicer is used in materials or workmanship and is reported to Amana within 30 days from warranty coverage. 3. Repairs to parts or systems resulting from unauthorized modifications made to correct defects in a remote... is operated and maintained according to instructions attached to or furnished with the product, Amana brand of Whirlpool Corporation or Whirlpool Canada LP (hereafter "Amana") will pay for factory specified parts and repair labor to the appliance. 9. Proof of original purchase date is required to...
...purchase. 6. Any food loss due to be borne by an authorized Amana servicer is used in materials or workmanship and is reported to Amana within 30 days from warranty coverage. 3. Repairs to parts or systems resulting from unauthorized modifications made to correct defects in a remote... is operated and maintained according to instructions attached to or furnished with the product, Amana brand of Whirlpool Corporation or Whirlpool Canada LP (hereafter "Amana") will pay for factory specified parts and repair labor to the appliance. 9. Proof of original purchase date is required to...
Installation Instruction
Page 1
U.S.A. Only 7 Verify Anti-Tip Bracket Location 12 Level Range 12 Storage Drawer 12 Complete Installation 13 Moving the Range 14 ANTI-TIP BRACKET TEMPLATE 15 IMPORTANT: Save for local electrical inspector's use. U.S.A. W10252706B INSTALLATION INSTRUCTIONS 30" (76 CM) FREESTANDING ELECTRIC RANGES Table of Contents RANGE SAFETY 2 INSTALLATION REQUIREMENTS 3 Tools and Parts 3 Location Requirements 3 Electrical Requirements - Only 4 INSTALLATION INSTRUCTIONS 6 Unpack Range 6 Install Anti-Tip Bracket 6 Electrical Connection -
U.S.A. Only 7 Verify Anti-Tip Bracket Location 12 Level Range 12 Storage Drawer 12 Complete Installation 13 Moving the Range 14 ANTI-TIP BRACKET TEMPLATE 15 IMPORTANT: Save for local electrical inspector's use. U.S.A. W10252706B INSTALLATION INSTRUCTIONS 30" (76 CM) FREESTANDING ELECTRIC RANGES Table of Contents RANGE SAFETY 2 INSTALLATION REQUIREMENTS 3 Tools and Parts 3 Location Requirements 3 Electrical Requirements - Only 4 INSTALLATION INSTRUCTIONS 6 Unpack Range 6 Install Anti-Tip Bracket 6 Electrical Connection -

Installation Instruction
Page 3
...kit marked for use the Standard for convenient use with nominal 1³⁄₈" (3.5 cm) diameter connection opening dimensions that the materials used . Parts needed ■ Tape measure ■ ¼" drive ratchet ■ Flat-blade screwdriver ■ Level ■ Hammer ■ Hand or ...(for concrete/ceramic floors) ■ Tin snips or large wire cutters (for Mobile Home Construction and Safety, Title 24, HUD Part 280). To install the antitip bracket shipped with installation clearances specified on the left side frame behind the storage drawer panel. ■...
...kit marked for use the Standard for convenient use with nominal 1³⁄₈" (3.5 cm) diameter connection opening dimensions that the materials used . Parts needed ■ Tape measure ■ ¼" drive ratchet ■ Flat-blade screwdriver ■ Level ■ Hammer ■ Hand or ...(for concrete/ceramic floors) ■ Tin snips or large wire cutters (for Mobile Home Construction and Safety, Title 24, HUD Part 280). To install the antitip bracket shipped with installation clearances specified on the left side frame behind the storage drawer panel. ■...

Installation Instruction
Page 6
... from inside the oven cavity) or from range. 2. If countertop is moved. Rear leveling leg B. Wrench or pliers 6 B A. ¼" drive ratchet B. Remove oven racks and parts package from outside the range. Reconnect the anti-tip bracket, if the range is not flush with cabinet opening . Tape template into place. 4. Front leveling...
... from inside the oven cavity) or from range. 2. If countertop is moved. Rear leveling leg B. Wrench or pliers 6 B A. ¼" drive ratchet B. Remove oven racks and parts package from outside the range. Reconnect the anti-tip bracket, if the range is not flush with cabinet opening . Tape template into place. 4. Front leveling...

Installation Instruction
Page 8
... Style 2: Direct wire strain relief ■ Remove the knockout as needed for the power supply cord. ■ Assemble a UL listed strain relief in the opening . Part of metal ground strap must be Go to Section: connecting to remove the ground-link screw from the back of the range. Complete installation following...
... Style 2: Direct wire strain relief ■ Remove the knockout as needed for the power supply cord. ■ Assemble a UL listed strain relief in the opening . Part of metal ground strap must be Go to Section: connecting to remove the ground-link screw from the back of the range. Complete installation following...

Installation Instruction
Page 10
... the ground-link screw and the end of each wire. ³⁄₈" (1.0 cm) 3. Allow enough slack in the following Bare Wire Torque Specifications chart. Part of range. Bare (green) ground wire E. Line 1 (black) wire 4. Loosen (do not remove) the setscrew on bottom of metal ground strap must be attached first...
... the ground-link screw and the end of each wire. ³⁄₈" (1.0 cm) 3. Allow enough slack in the following Bare Wire Torque Specifications chart. Part of range. Bare (green) ground wire E. Line 1 (black) wire 4. Loosen (do not remove) the setscrew on bottom of metal ground strap must be attached first...

Installation Instruction
Page 13
Slowly push the storage drawer into the closed position. 5. NOTE: When you have all of /recycle all parts are removing and replacing the storage drawer, a slight push may be needed to remove waxy residue caused by shipping material. If there is intact and ... drawer and place it inside the range in the drawer glides. If range does not operate, check the following: ■ Household fuse is an extra part, go back through the steps to a level position. 3. or circuit breaker has not tripped. ■ Range is fully engaged on both sides, slide the drawer...
Slowly push the storage drawer into the closed position. 5. NOTE: When you have all of /recycle all parts are removing and replacing the storage drawer, a slight push may be needed to remove waxy residue caused by shipping material. If there is intact and ... drawer and place it inside the range in the drawer glides. If range does not operate, check the following: ■ Household fuse is an extra part, go back through the steps to a level position. 3. or circuit breaker has not tripped. ■ Range is fully engaged on both sides, slide the drawer...

Installation Instruction
Page 14
... electrical shock. 1. Slide range forward. 3. Reconnect power. 6. Failure to follow these instructions can tip the range and be killed. Complete cleaning or maintenance. 4. Replace all parts and panels before servicing. Complete cleaning or maintenance. 4. Check that anti-tip bracket is under anti-tip bracket. Check that range is moved. Disconnect power...
... electrical shock. 1. Slide range forward. 3. Reconnect power. 6. Failure to follow these instructions can tip the range and be killed. Complete cleaning or maintenance. 4. Replace all parts and panels before servicing. Complete cleaning or maintenance. 4. Check that anti-tip bracket is under anti-tip bracket. Check that range is moved. Disconnect power...


