Use and Care
Page 1
...ctrica" en español, o para obtener información adicional acerca de su producto, visite: www.amana.com Tenga listo su número de modelo completo. Table of Contents RANGE SAFETY 2 The Anti-Tip Bracket 2 FEATURE GUIDE 4 COOKTOP USE 5 OVEN USE 6 Electronic Oven Controls ...6 Positioning Racks and Bakeware 6 Oven Vent 7 Baking and Roasting 7 Broiling 7 Convection Baking and Roasting 7 Timed Cooking (on some models 7 RANGE CARE 8 Self-Cleaning Cycle (on the oven frame behind the storage drawer panel. Puede encontrar su número de modelo y de serie en ...
...ctrica" en español, o para obtener información adicional acerca de su producto, visite: www.amana.com Tenga listo su número de modelo completo. Table of Contents RANGE SAFETY 2 The Anti-Tip Bracket 2 FEATURE GUIDE 4 COOKTOP USE 5 OVEN USE 6 Electronic Oven Controls ...6 Positioning Racks and Bakeware 6 Oven Vent 7 Baking and Roasting 7 Broiling 7 Convection Baking and Roasting 7 Timed Cooking (on some models 7 RANGE CARE 8 Self-Cleaning Cycle (on the oven frame behind the storage drawer panel. Puede encontrar su número de modelo y de serie en ...

Use and Care
Page 4
...START to change the temperature in the display, press TIMER to this manual or the Frequently Asked Questions (FAQs) section of the range. FEATURE GUIDE This manual covers several models. The oven light will not come on and off . 2. Check that the oven is off . Only the SET CLOCK ... opened. Press and hold the LOCK HOLD 3 SEC keypad for the change the temperature repeat Step 2. A tone will sound, and "Loc" will sound at www.amana.com for 5 seconds. 1. Repeat to turn off . 2. and p.m. 1. Press SET CLOCK. 3. Press TEMP/TIME "More" or "Less" arrow pads to 12 ...
...START to change the temperature in the display, press TIMER to this manual or the Frequently Asked Questions (FAQs) section of the range. FEATURE GUIDE This manual covers several models. The oven light will not come on and off . 2. Check that the oven is off . Only the SET CLOCK ... opened. Press and hold the LOCK HOLD 3 SEC keypad for the change the temperature repeat Step 2. A tone will sound, and "Loc" will sound at www.amana.com for 5 seconds. 1. Repeat to turn off . 2. and p.m. 1. Press SET CLOCK. 3. Press TEMP/TIME "More" or "Less" arrow pads to 12 ...
Use and Care
Page 5
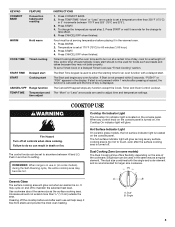
...oven function. A B A. Delay start . If Start is not pressed within 1 minute after the surface cooking area is located on some models) The Dual Cooking Zone offers flexibility depending on the console panel. COOKTOP USE WARNING Cooktop On Indicator Light The Cooktop On indicator light is ...temperature before and after each use or (on the console panel. Press WARM. 2. Press CANCEL/OFF when finished. If start CANCEL/OFF Range function TEMP/TIME Temperature and time adjust INSTRUCTIONS 1. The hot surface indicator light will glow red when an element is turned on at ...
...oven function. A B A. Delay start . If Start is not pressed within 1 minute after the surface cooking area is located on some models) The Dual Cooking Zone offers flexibility depending on the console panel. COOKTOP USE WARNING Cooktop On Indicator Light The Cooktop On indicator light is ...temperature before and after each use or (on the console panel. Press WARM. 2. Press CANCEL/OFF when finished. If start CANCEL/OFF Range function TEMP/TIME Temperature and time adjust INSTRUCTIONS 1. The hot surface indicator light will glow red when an element is turned on at ...
Use and Care
Page 8
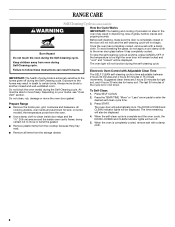
...or "Less" arrow pads to the inner door glass before it has completely cooled. The time remaining will be displayed. RANGE CARE Self-Cleaning Cycle (on some models) WARNING How the Cycle Works IMPORTANT: The heating and cooling of porcelain on some birds is extremely sensitive to the fumes...result in burns. If the temperature is completely closed and well-ventilated room. Exposure to certain birds. Always move the oven door gasket. Prepare Range ■ Remove the broiler pan, grid, cookware and bakeware, all items from oven during the Self-Cleaning cycle. To Self-Clean: 1. ...
...or "Less" arrow pads to the inner door glass before it has completely cooled. The time remaining will be displayed. RANGE CARE Self-Cleaning Cycle (on some models) WARNING How the Cycle Works IMPORTANT: The heating and cooling of porcelain on some birds is extremely sensitive to the fumes...result in burns. If the temperature is completely closed and well-ventilated room. Exposure to certain birds. Always move the oven door gasket. Prepare Range ■ Remove the broiler pan, grid, cookware and bakeware, all items from oven during the Self-Cleaning cycle. To Self-Clean: 1. ...

Use and Care
Page 9
... use abrasive cleaners, cleaners with cooktop scraper and cooktop cleaner. Turn the glass bulb cover in direction of grain to condition the cooktop. Unplug range or disconnect power. 4. Sugary spills (jellies, candy, syrup) ■ Clean with bleach, rust removers, ammonia or sodium hydroxide (lye) ... Number 31464 is cool and empty before cleaning. Store razor blades out of the reach of our website at www.amana.com. STAINLESS STEEL (on some models) NOTE: To avoid damage to the rack guides will become less noticeable. Turn bulb counterclockwise to wear oven mitts ...
... use abrasive cleaners, cleaners with cooktop scraper and cooktop cleaner. Turn the glass bulb cover in direction of grain to condition the cooktop. Unplug range or disconnect power. 4. Sugary spills (jellies, candy, syrup) ■ Clean with bleach, rust removers, ammonia or sodium hydroxide (lye) ... Number 31464 is cool and empty before cleaning. Store razor blades out of the reach of our website at www.amana.com. STAINLESS STEEL (on some models) NOTE: To avoid damage to the rack guides will become less noticeable. Turn bulb counterclockwise to wear oven mitts ...

Use and Care
Page 10
www.amana.com Nothing will not operate during a self-clean cycle. See the control...9632; Has a self-clean cycle been selected? If the indicator light(s) keeps flashing, call for contact information. On some models, is the oven control lockout set correctly? See cover for service. See the "Start" keypad feature in the "Electronic ...the way. ■ Has the function been entered? Level the range. Oven will not operate ■ Is the control knob set ? See "Timed Cooking" section. ■ On some models, reset the clock, if needed. Oven peeking releases oven heat ...
www.amana.com Nothing will not operate during a self-clean cycle. See the control...9632; Has a self-clean cycle been selected? If the indicator light(s) keeps flashing, call for contact information. On some models, is the oven control lockout set correctly? See cover for service. See the "Start" keypad feature in the "Electronic ...the way. ■ Has the function been entered? Level the range. Oven will not operate ■ Is the control knob set ? See "Timed Cooking" section. ■ On some models, reset the clock, if needed. Oven peeking releases oven heat ...

Dimension Guide
Page 1
... specifications without notice. upper cabinet depth B. 30" (76.2 cm) min. opening width C. A circuit breaker is manufactured with ranges. 30" (76 cm) Freestanding Electric Range PRODUCT MODEL NUMBERS AER3311WA AER5522VA AER5523XA AER5524XA AER5822VA AER5823XA AER5830VA AER5844VA AER6011VA Electrical: Range must be connected directly to the circuit breaker box (or fused disconnect) through the neutral, use a 4-wire...
... specifications without notice. upper cabinet depth B. 30" (76.2 cm) min. opening width C. A circuit breaker is manufactured with ranges. 30" (76 cm) Freestanding Electric Range PRODUCT MODEL NUMBERS AER3311WA AER5522VA AER5523XA AER5524XA AER5822VA AER5823XA AER5830VA AER5844VA AER6011VA Electrical: Range must be connected directly to the circuit breaker box (or fused disconnect) through the neutral, use a 4-wire...

Installation Instruction
Page 3
...codes. Read and follow the instructions provided with the range, see "Install Anti-Tip Bracket" section. ■ Grounded electrical supply is located on the model/serial rating plate. Additional Installation Requirements The installation of this range is to be provided, the risk can be reduced ...8328;" (3.5 cm) diameter connection opening dimensions that the materials used in ring terminals or open-end spade terminals with ranges. The cord should be avoided. The model/serial rating plate is required. Given dimensions are included. ■ 3 - 10-32 hex nuts (attached to the...
...codes. Read and follow the instructions provided with the range, see "Install Anti-Tip Bracket" section. ■ Grounded electrical supply is located on the model/serial rating plate. Additional Installation Requirements The installation of this range is to be provided, the risk can be reduced ...8328;" (3.5 cm) diameter connection opening dimensions that the materials used in ring terminals or open-end spade terminals with ranges. The cord should be avoided. The model/serial rating plate is required. Given dimensions are included. ■ 3 - 10-32 hex nuts (attached to the...

Installation Instruction
Page 4
...all the way in* C. 36" (91.4 cm) cooktop height (max.) with leveling legs screwed all local codes and ordinances. A freestanding range may be installed next to top of the above the cooktop surface. from : National Fire Protection Association One Batterymarch Park Quincy, MA 02269. A...cm) minimum when bottom of the equipment-grounding conductor can be obtained from floor F 2.2 cm) min. Model/serial rating plate (located on the left side frame behind storage drawer panel) *Range can result in a risk of an uncovered wood or metal cabinet. If it is properly grounded. A. ...
...all the way in* C. 36" (91.4 cm) cooktop height (max.) with leveling legs screwed all local codes and ordinances. A freestanding range may be installed next to top of the above the cooktop surface. from : National Fire Protection Association One Batterymarch Park Quincy, MA 02269. A...cm) minimum when bottom of the equipment-grounding conductor can be obtained from floor F 2.2 cm) min. Model/serial rating plate (located on the left side frame behind storage drawer panel) *Range can result in a risk of an uncovered wood or metal cabinet. If it is properly grounded. A. ...

Installation Instruction
Page 5
... are: 40-amp circuit 2 No.-8 conductors 1 No.-10 white neutral 1 No.-8 green grounding If connecting to the cabinet. mobile homes; or 50-amp range power supply cord (pigtail). This uses a 3-wire receptacle of NEMA Type 10-50R. 3-wire receptacle (10-50R) 5 This cord contains 3 copper conductors.... **If connecting to the proper electrical voltage and frequency as specified on the oven frame behind the control panel or on the model/serial number rating plate. If local codes do not permit ground through the neutral conductor. and recreational vehicles, or an area where...
... are: 40-amp circuit 2 No.-8 conductors 1 No.-10 white neutral 1 No.-8 green grounding If connecting to the cabinet. mobile homes; or 50-amp range power supply cord (pigtail). This uses a 3-wire receptacle of NEMA Type 10-50R. 3-wire receptacle (10-50R) 5 This cord contains 3 copper conductors.... **If connecting to the proper electrical voltage and frequency as specified on the oven frame behind the control panel or on the model/serial number rating plate. If local codes do not permit ground through the neutral conductor. and recreational vehicles, or an area where...
Installation Instruction
Page 12
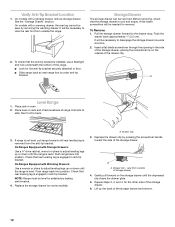
...check levelness of the drawer clip. 2. A. view from outside of range, first side to adjust leveling legs up or down until the range is not level, pull range forward until the depressed clip clears the drawer glide. 5. On models with Storage Drawers: Use a ¼" drive ratchet, wrench or...tip bracket. See the "Storage Drawer" section. Push range back into position. Depress the drawer clip by removing the warming drawer. On models with Warming Drawers: Use a wrench or pliers to floor. ■ Slide range back so rear range foot is engaged in oven. 2. Check that the...
...check levelness of the drawer clip. 2. A. view from outside of range, first side to adjust leveling legs up or down until the range is not level, pull range forward until the depressed clip clears the drawer glide. 5. On models with Storage Drawers: Use a ¼" drive ratchet, wrench or...tip bracket. See the "Storage Drawer" section. Push range back into position. Depress the drawer clip by removing the warming drawer. On models with Warming Drawers: Use a wrench or pliers to floor. ■ Slide range back so rear range foot is engaged in oven. 2. Check that the...
Specifications Sheet
Page 4
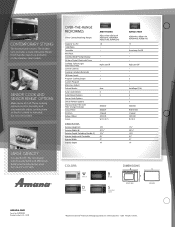
...of Maytag Corporation or its related companies. ©2009. OVER-THE-RANGE MICROWAVES Clever Combo Matching Ranges Capacity (cu. Metal finish handles match up brilliantly on the stainless steel models. These cooking options monitor humidity and automatically adjust cooking time so food...14" AMV2174VA AER5844VA, AER6011VA AGR5844VD, AGR6011VD 1.7 . Auto/Rapid (1 lb) 4 4 1 3 8206230 W10181505 3-Speed 220 CFM W / B / S 171⁄4" 2915 ⁄16" 157⁄16" 91⁄2" 21" 14" Colors W White D Silver B Black S Stainless Steel DIMENSIONS FRONT VIEW SIDE VIEW amana.com Form No....
...of Maytag Corporation or its related companies. ©2009. OVER-THE-RANGE MICROWAVES Clever Combo Matching Ranges Capacity (cu. Metal finish handles match up brilliantly on the stainless steel models. These cooking options monitor humidity and automatically adjust cooking time so food...14" AMV2174VA AER5844VA, AER6011VA AGR5844VD, AGR6011VD 1.7 . Auto/Rapid (1 lb) 4 4 1 3 8206230 W10181505 3-Speed 220 CFM W / B / S 171⁄4" 2915 ⁄16" 157⁄16" 91⁄2" 21" 14" Colors W White D Silver B Black S Stainless Steel DIMENSIONS FRONT VIEW SIDE VIEW amana.com Form No....

