
Specifications Sheet
Page 3
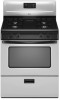
... Continuous Grate Colors DIMENSIONS Height (A) Width (B) Depth Excluding Handle (C) Depth Including Handle (D) Height to Cooktop (E) AGR3311WD AMV1160VA 4.4 AGR4433XD AMV1160VA 4.4 . Easy Touch Electronic . An additional grate fits between the burner grates, creating a continuous surface and providing a place...Bake Oven Control Electronic Clock with a convection fan that evenly circulates heated air. Easy Touch Electronic . Easy Touch Electronic . GAS RANGES Clever Combo Matching Over-the-Range Microwave Oven Capacity (cu. In-Oven . . . . . . (1) 5,000 BTU (2) 9,500 BTU (1) 12,500...
... Continuous Grate Colors DIMENSIONS Height (A) Width (B) Depth Excluding Handle (C) Depth Including Handle (D) Height to Cooktop (E) AGR3311WD AMV1160VA 4.4 AGR4433XD AMV1160VA 4.4 . Easy Touch Electronic . An additional grate fits between the burner grates, creating a continuous surface and providing a place...Bake Oven Control Electronic Clock with a convection fan that evenly circulates heated air. Easy Touch Electronic . Easy Touch Electronic . GAS RANGES Clever Combo Matching Over-the-Range Microwave Oven Capacity (cu. In-Oven . . . . . . (1) 5,000 BTU (2) 9,500 BTU (1) 12,500...

Use and Care
Page 3
... in your building. • Immediately call the fire department. - WHAT TO DO IF YOU SMELL GAS: • Do not try to potential hazards that you smell gas" instructions. Gas suppliers recommend that can be performed by smell. RANGE SAFETY Your safety and the safety of others . All safety messages will tell you and others...
... in your building. • Immediately call the fire department. - WHAT TO DO IF YOU SMELL GAS: • Do not try to potential hazards that you smell gas" instructions. Gas suppliers recommend that can be performed by smell. RANGE SAFETY Your safety and the safety of others . All safety messages will tell you and others...

Use and Care
Page 12
...Method: ■ Soap and water: Pull knobs straight away from control panel to the inner door glass before going into a dishwasher. ■ Gas Grate and Drip Pan Cleaner Part Number 31617: See "Assistance or Service" section to order. These spills may remove numbers. ■ All-Purpose ..., do not use steel wool, abrasive cleansers or oven cleaner. PORCELAIN-COATED GRATES AND CAPS Food spills containing acids, such as the entire range is completely cool. Cooked-on panel. ■ All-Purpose Appliance Cleaner Part Number 31682 (not included): See "Assistance or Service" section to...
...Method: ■ Soap and water: Pull knobs straight away from control panel to the inner door glass before going into a dishwasher. ■ Gas Grate and Drip Pan Cleaner Part Number 31617: See "Assistance or Service" section to order. These spills may remove numbers. ■ All-Purpose ..., do not use steel wool, abrasive cleansers or oven cleaner. PORCELAIN-COATED GRATES AND CAPS Food spills containing acids, such as the entire range is completely cool. Cooked-on panel. ■ All-Purpose Appliance Cleaner Part Number 31682 (not included): See "Assistance or Service" section to...
Use and Care
Page 14
...to release air from the solenoid. It sounds similar to the gas supply? See "Cooktop/Oven Temperature Controls" section. ■ Is the main or regulator gas shutoff in the off position? See Installation Instructions. ■ Is the range properly connected to a suction cup being used ? Nothing will ...used ? Use cookware about the same size as the surface cooking area, element or surface burner. Gas range noises during the cycle. ■ A pop can be heard when the gas valve is detected. Surface burners will click several times until the flame is opening or cycling on...
...to release air from the solenoid. It sounds similar to the gas supply? See "Cooktop/Oven Temperature Controls" section. ■ Is the main or regulator gas shutoff in the off position? See Installation Instructions. ■ Is the range properly connected to a suction cup being used ? Nothing will ...used ? Use cookware about the same size as the surface cooking area, element or surface burner. Gas range noises during the cycle. ■ A pop can be heard when the gas valve is detected. Surface burners will click several times until the flame is opening or cycling on...
Use and Care
Page 15
...and service companies. Contact a trained repair specialist. ■ Is the air/gas mixture correct? See "Positioning Racks and Bakeware" section. ■ Is the batter evenly distributed in the pan. ■ Is the range level? Decrease oven temperature 10° F to 30°F (6°C to...Are the racks positioned properly? Broiler burner fails to check the air/gas mixture or see the Installation Instructions. Our consultants provide assistance with: ■ Features and specifications on the bottom? Level the range. If the problem continues, call . If you need replacement parts...
...and service companies. Contact a trained repair specialist. ■ Is the air/gas mixture correct? See "Positioning Racks and Bakeware" section. ■ Is the batter evenly distributed in the pan. ■ Is the range level? Decrease oven temperature 10° F to 30°F (6°C to...Are the racks positioned properly? Broiler burner fails to check the air/gas mixture or see the Installation Instructions. Our consultants provide assistance with: ■ Features and specifications on the bottom? Level the range. If the problem continues, call . If you need replacement parts...
Dimension Guide
Page 1
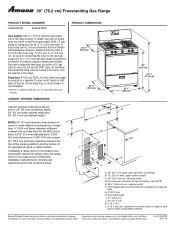
..., 45 ft (122-152.4 cm) long 1.3 cm) or ³⁄₄" (1.9 cm) I . E. 30¹⁄₈" (76.5 cm) min. opening width D. 30" (76.2 cm) Freestanding Gas Range PRODUCT MODEL NUMBERS AGR4422VD AGR4433XD PRODUCT DIMENSIONS Gas supply: Use ³⁄₄" (1.9 cm) rigid pipe gas supply line to side wall or other combustible material.
..., 45 ft (122-152.4 cm) long 1.3 cm) or ³⁄₄" (1.9 cm) I . E. 30¹⁄₈" (76.5 cm) min. opening width D. 30" (76.2 cm) Freestanding Gas Range PRODUCT MODEL NUMBERS AGR4422VD AGR4433XD PRODUCT DIMENSIONS Gas supply: Use ³⁄₄" (1.9 cm) rigid pipe gas supply line to side wall or other combustible material.

Installation Instruction
Page 2
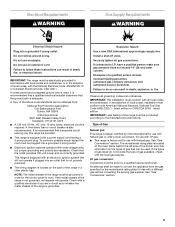
...contractor, plumber, or gasfitter qualified or licensed by the State of others . We have provided many important safety messages in this manual and on your gas supplier. WARNING: If the information in this manual is , tell you how to do if you what the potential hazard is not followed exactly,... not exceed 3 feet. 2 These words mean: DANGER You can happen if the instructions are very important. All safety messages will follow instructions. RANGE SAFETY Your safety and the safety of Massachusetts. ■ If using a ball valve, it shall be a T-handle type. ■ A flexible...
...contractor, plumber, or gasfitter qualified or licensed by the State of others . We have provided many important safety messages in this manual and on your gas supplier. WARNING: If the information in this manual is , tell you how to do if you what the potential hazard is not followed exactly,... not exceed 3 feet. 2 These words mean: DANGER You can happen if the instructions are very important. All safety messages will follow instructions. RANGE SAFETY Your safety and the safety of Massachusetts. ■ If using a ball valve, it shall be a T-handle type. ■ A flexible...

Installation Instruction
Page 3
... and adults. Read and follow these instructions can result in death or serious burns to rear range foot. Thickness of the broiler door. Check existing gas supply and electrical supply. Anti-tip bracket B. INSTALLATION REQUIREMENTS Tools and Parts Gather the required ...here. A B C A. If cabinet storage is to be provided, the risk can be reduced by installing a range hood that are included. See "Electrical Requirements" and "Gas Supply Requirements" sections. Given dimensions are available from your local hardware store. See "Electrical Requirements" section. 3 ...
... and adults. Read and follow these instructions can result in death or serious burns to rear range foot. Thickness of the broiler door. Check existing gas supply and electrical supply. Anti-tip bracket B. INSTALLATION REQUIREMENTS Tools and Parts Gather the required ...here. A B C A. If cabinet storage is to be provided, the risk can be reduced by installing a range hood that are included. See "Electrical Requirements" and "Gas Supply Requirements" sections. Given dimensions are available from your local hardware store. See "Electrical Requirements" section. 3 ...

Installation Instruction
Page 4
...A240-latest edition, or with the maximum allowable wood cabinet temperatures of rigid gas pipe. IMPORTANT: If installing a range hood or microwave hood combination above the range, follow the range hood or microwave hood combination installation instructions for installation of 194° (90...Home - If the cabinet depth is covered by ½" (1.3 cm) minimum. H. 2" (5.1 cm) min. Product Dimensions Freestanding Range Cabinet Dimensions Cabinet opening dimensions shown are for installation of cooktop, see NOTE*. clearance upper side cabinet to top of electrical outlet. ...
...A240-latest edition, or with the maximum allowable wood cabinet temperatures of rigid gas pipe. IMPORTANT: If installing a range hood or microwave hood combination above the range, follow the range hood or microwave hood combination installation instructions for installation of 194° (90...Home - If the cabinet depth is covered by ½" (1.3 cm) minimum. H. 2" (5.1 cm) min. Product Dimensions Freestanding Range Cabinet Dimensions Cabinet opening dimensions shown are for installation of cooktop, see NOTE*. clearance upper side cabinet to top of electrical outlet. ...
Installation Instruction
Page 5
... be made to follow these instructions can result in death, fire, or electrical shock. Observe all gas connections. See "Gas Conversions" section. LP gas conversion: Conversion must be provided. ■ This range is not grounded, no keypads will not operate if plugged into a grounded 3 prong outlet. If the metal chassis of local codes, with...
... be made to follow these instructions can result in death, fire, or electrical shock. Observe all gas connections. See "Gas Conversions" section. LP gas conversion: Conversion must be provided. ■ This range is not grounded, no keypads will not operate if plugged into a grounded 3 prong outlet. If the metal chassis of local codes, with...
Installation Instruction
Page 6
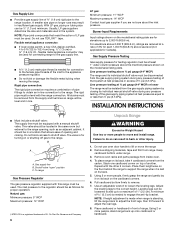
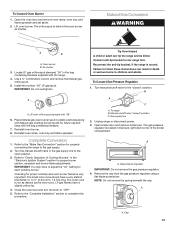
... at test pressures equal to or less than ½ psi (3.5 kPa). All strains must be equipped with this range must be used for connecting range to the gas supply line. ■ A ½" (1.3 cm) male pipe thread is needed for connection to the female pipe...testing above the manifold pressure shown on the model/serial rating plate. Gas supply line B. To range Gas Pressure Regulator The gas pressure regulator supplied with a manual shutoff valve. Remove oven racks and parts package from range. Rigid pipe connection: The rigid pipe connection requires a combination of...
... at test pressures equal to or less than ½ psi (3.5 kPa). All strains must be equipped with this range must be used for connecting range to the gas supply line. ■ A ½" (1.3 cm) male pipe thread is needed for connection to the female pipe...testing above the manifold pressure shown on the model/serial rating plate. Gas supply line B. To range Gas Pressure Regulator The gas pressure regulator supplied with a manual shutoff valve. Remove oven racks and parts package from range. Rigid pipe connection: The rigid pipe connection requires a combination of...

Installation Instruction
Page 8
... regulator connection fitting B. 90° elbow C. Nipple F. Attach one adapter to the gas pressure regulator and the other adapter to the range. Correct any leak found. 5. B C A D E F D C E F G H A. C. Locate gas pressure regulator in the gas supply line. G A. Manual shutoff valve G. ½" or ¾" gas pipe Typical flexible connection 1. Apply pipe-joint compound made for use with LP...
... regulator connection fitting B. 90° elbow C. Nipple F. Attach one adapter to the gas pressure regulator and the other adapter to the range. Correct any leak found. 5. B C A D E F D C E F G H A. C. Locate gas pressure regulator in the gas supply line. G A. Manual shutoff valve G. ½" or ¾" gas pipe Typical flexible connection 1. Apply pipe-joint compound made for use with LP...

Installation Instruction
Page 9
...HI MED 3. The outer cone is engaged in and turn the control knob to a bright orange and ignites the gas. Place level on rack and check levelness of range, first side to "HI" position after the burner lights. Check that the anti-tip bracket is installed: ■...: 1. Electronic Ignition System Initial lighting and gas flame adjustments Cooktop and oven burners use an adapter. Check Operation of standing pilots. Turn control knob to side; If range is not level, pull range forward until range is removed from parts package. NOTE: Range must be ¼" to ³⁄&#...
...HI MED 3. The outer cone is engaged in and turn the control knob to a bright orange and ignites the gas. Place level on rack and check levelness of range, first side to "HI" position after the burner lights. Check that the anti-tip bracket is installed: ■...: 1. Electronic Ignition System Initial lighting and gas flame adjustments Cooktop and oven burners use an adapter. Check Operation of standing pilots. Turn control knob to side; If range is not level, pull range forward until range is removed from parts package. NOTE: Range must be ¼" to ³⁄&#...
Installation Instruction
Page 11
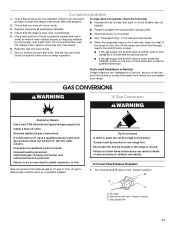
...closed, open it, then repeat the 5-minute test as outlined above. ■ If the gas supply line shutoff valve is open, press the CANCEL button on range operation. ■ Range is plugged into a grounded 3 prong outlet. ■ Electrical supply is connected. ■...: licensed heating personnel, authorized gas company personnel, and authorized service personnel. To range B. See "Level Range." 5. GAS CONVERSIONS WARNING LP Gas Conversion WARNING Explosion Hazard Use a new CSA International approved gas supply line. Failure to do so can tip the range and be done by shipping ...
...closed, open it, then repeat the 5-minute test as outlined above. ■ If the gas supply line shutoff valve is open, press the CANCEL button on range operation. ■ Range is plugged into a grounded 3 prong outlet. ■ Electrical supply is connected. ■...: licensed heating personnel, authorized gas company personnel, and authorized service personnel. To range B. See "Level Range." 5. GAS CONVERSIONS WARNING LP Gas Conversion WARNING Explosion Hazard Use a new CSA International approved gas supply line. Failure to do so can tip the range and be done by shipping ...
Installation Instruction
Page 12
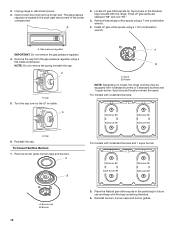
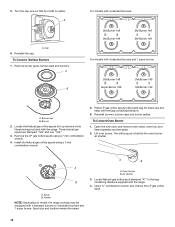
... not remove the spring beneath the cap. A A B A. A. Reinstall burners, burner caps and burner grates. Gas pressure regulator IMPORTANT: Do not remove the gas pressure regulator. 4. Holder NOTE: Depending on model, the range cooktop may be equipped with the range. A B For models with 3 standard burners and 1 super burner: Std burner 88 Super burner 96 Std...
... not remove the spring beneath the cap. A A B A. A. Reinstall burners, burner caps and burner grates. Gas pressure regulator IMPORTANT: Do not remove the gas pressure regulator. 4. Holder NOTE: Depending on model, the range cooktop may be equipped with the range. A B For models with 3 standard burners and 1 super burner: Std burner 88 Super burner 96 Std...
Installation Instruction
Page 13
... remove the spring beneath the cap. To Convert Oven Burner 1. Natural Gas Conversion WARNING A B A. IMPORTANT: Do not overtighten. Connect anti-tip bracket to complete this procedure. To range B. Unplug range or disconnect power. 3. Cap 13 A A. LP oven orifice spud stamped with the range. 4. Reinstall oven racks, oven tray and flame spreader. Checking for future...
... remove the spring beneath the cap. To Convert Oven Burner 1. Natural Gas Conversion WARNING A B A. IMPORTANT: Do not overtighten. Connect anti-tip bracket to complete this procedure. To range B. Unplug range or disconnect power. 3. Cap 13 A A. LP oven orifice spud stamped with the range. 4. Reinstall oven racks, oven tray and flame spreader. Checking for future...
Installation Instruction
Page 14
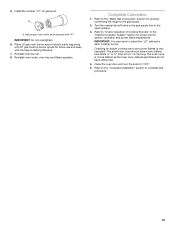
... and burners. A B A. A B For models with 4 standard burners: Std Burner 149 Std Burner 149 Std Burner 149 Std Burner 149 For models with the range. 4. Install the Natural gas orifice spuds using a 7 mm combination wrench. 4. Open the oven door and remove oven racks, oven tray, and flame spreader and set aside. 2. Spud B. Holder...
... and burners. A B A. A B For models with 4 standard burners: Std Burner 149 Std Burner 149 Std Burner 149 Std Burner 149 For models with the range. 4. Install the Natural gas orifice spuds using a 7 mm combination wrench. 4. Open the oven door and remove oven racks, oven tray, and flame spreader and set aside. 2. Spud B. Holder...
Installation Instruction
Page 15
...important. Close the oven door and turn the knob to the open position. 3. Natural gas flames do not have a very distinct blue flame ¼" to ½" (0.64 cm to 1.3 cm) long. 5. Natural gas oven orifice spud stamped with the bag containing literature. 7. Turn the manual shutoff valve in... is not as distinct as the inner cone. Reinstall oven burner. 8. IMPORTANT: You may have to "Check Operation of Cooktop Burners" in the gas supply line to "OFF." 5. The small inner cone should have yellow tips. 4. Checking for each cooktop burner. Refer to the "Complete Installation"...
...important. Close the oven door and turn the knob to the open position. 3. Natural gas flames do not have a very distinct blue flame ¼" to ½" (0.64 cm to 1.3 cm) long. 5. Natural gas oven orifice spud stamped with the bag containing literature. 7. Turn the manual shutoff valve in... is not as distinct as the inner cone. Reinstall oven burner. 8. IMPORTANT: You may have to "Check Operation of Cooktop Burners" in the gas supply line to "OFF." 5. The small inner cone should have yellow tips. 4. Checking for each cooktop burner. Refer to the "Complete Installation"...


