
Dimension Guide
Page 1
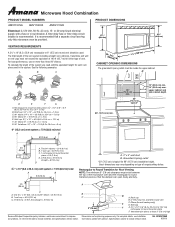
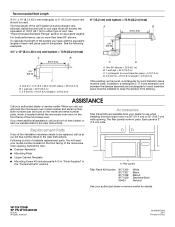
... (0.6 m) + 6 ft (1.8 m) straight = 8 ft (2.4 m) B C 3" (7.6 cm) D A. For complete details, see Installation our products, we reserve the right to Round Transition for planning purposes only. Rectangular to round transition piece: 3 " x 10" to ...notice. diameter round vent C. Microwave Hood Combination PRODUCT MODEL NUMBERS AMV1150VA AMV1160VA AMV2174VA Electrical: A 120-Volt, 60-Hz, AC-only,...transition piece so that a separate circuit serving only this microwave oven be inside the upper cabinet. Instructions packed with a fuse or circuit breaker. Roof cap: 3 " x 10" = 24 ft ...
... (0.6 m) + 6 ft (1.8 m) straight = 8 ft (2.4 m) B C 3" (7.6 cm) D A. For complete details, see Installation our products, we reserve the right to Round Transition for planning purposes only. Rectangular to round transition piece: 3 " x 10" to ...notice. diameter round vent C. Microwave Hood Combination PRODUCT MODEL NUMBERS AMV1150VA AMV1160VA AMV2174VA Electrical: A 120-Volt, 60-Hz, AC-only,...transition piece so that a separate circuit serving only this microwave oven be inside the upper cabinet. Instructions packed with a fuse or circuit breaker. Roof cap: 3 " x 10" = 24 ft ...
Installation Instruction
Page 1
...cm) wide. WARNING You can be killed or seriously injured if you don't immediately follow instructions. These installation instructions cover different models. All safety messages will follow instructions. We have provided many important safety messages in Rear Wall 7 Attach Mounting Plate to reduce ... manual and on your particular model may differ slightly from the illustration in these installation instructions. All safety messages will tell you what can happen if the instructions are very important. W10247296B These words mean: DANGER You can be killed or ...
...cm) wide. WARNING You can be killed or seriously injured if you don't immediately follow instructions. These installation instructions cover different models. All safety messages will follow instructions. We have provided many important safety messages in Rear Wall 7 Attach Mounting Plate to reduce ... manual and on your particular model may differ slightly from the illustration in these installation instructions. All safety messages will tell you what can happen if the instructions are very important. W10247296B These words mean: DANGER You can be killed or ...

Installation Instruction
Page 2
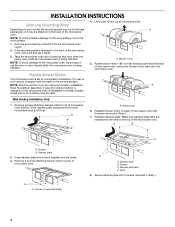
...any obstructions so that the damper blade can open freely and fully. Read and follow the instructions provided with your builder or cabinet supplier to back of microwave oven) Cardboard template (part of installation. Toggle nuts (2) E. 1/4" x 2" lag screws (2) F. Power supply cord bushing .... The piece inside upper cabinet. See "Electrical Requirements" section. Sheet metal screws (2) G. See User Instructions.) NOTE: Depending on model, charcoal filters may be installed. Set the cardboard template to the side and refer to withstand the heat produced by the microwave oven...
...any obstructions so that the damper blade can open freely and fully. Read and follow the instructions provided with your builder or cabinet supplier to back of microwave oven) Cardboard template (part of installation. Toggle nuts (2) E. 1/4" x 2" lag screws (2) F. Power supply cord bushing .... The piece inside upper cabinet. See "Electrical Requirements" section. Sheet metal screws (2) G. See User Instructions.) NOTE: Depending on model, charcoal filters may be installed. Set the cardboard template to the side and refer to withstand the heat produced by the microwave oven...

Installation Instruction
Page 3
... range/cooktop below. If the power supply cord is properly grounded. Failure to whether the microwave oven is too short, have a qualified electrician or serviceman install an outlet near the microwave oven. A B Electrical Requirements WARNING 66" (167.6 cm) min. 30" (76.2 cm) min. 30" (76.2 cm) typical* 12" (30...;⁄₄" (43.8 cm) 16¹⁄₄" (41.3 cm) (401.05³c⁄₄m") 29⁷⁄₈" (76.0 cm) GROUNDING INSTRUCTIONS ■ For all governing codes and ordinances. Consult a qualified electrician or serviceman if the grounding...
... range/cooktop below. If the power supply cord is properly grounded. Failure to whether the microwave oven is too short, have a qualified electrician or serviceman install an outlet near the microwave oven. A B Electrical Requirements WARNING 66" (167.6 cm) min. 30" (76.2 cm) min. 30" (76.2 cm) typical* 12" (30...;⁄₄" (43.8 cm) 16¹⁄₄" (41.3 cm) (401.05³c⁄₄m") 29⁷⁄₈" (76.0 cm) GROUNDING INSTRUCTIONS ■ For all governing codes and ordinances. Consult a qualified electrician or serviceman if the grounding...
Installation Instruction
Page 4
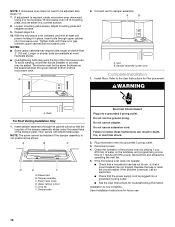
...cover the work surface. 1. Reattach blower motor to the back of the microwave oven. Make sure damper plate tabs are using recirculation installation. Damper plate 2. A A. Damper plate tabs D. Secure damper plate with 2 screws removed in another location where wall or roof venting...Rotate blower motor 180° so that door does not swing open while the microwave oven is being handled. Wall Venting Installation Only 1. A B A. Screws B. INSTALLATION INSTRUCTIONS Remove Mounting Plate Depending on your model, the mounting plate may be in recessed holes) D A. Remove 2 screws ...
...cover the work surface. 1. Reattach blower motor to the back of the microwave oven. Make sure damper plate tabs are using recirculation installation. Damper plate 2. A A. Damper plate tabs D. Secure damper plate with 2 screws removed in another location where wall or roof venting...Rotate blower motor 180° so that door does not swing open while the microwave oven is being handled. Wall Venting Installation Only 1. A B A. Screws B. INSTALLATION INSTRUCTIONS Remove Mounting Plate Depending on your model, the mounting plate may be in recessed holes) D A. Remove 2 screws ...
Installation Instruction
Page 10
... a cook time of the damper plate. Upper cabinet cutout E. Failure to follow these instructions can result in place, insert bolts through the cabinet cutout so that the long tab of the damper assembly slides under vent) Complete Installation 1. If adjustment is no gap between the upper cabinet bottom and the microwave oven.... Damper assembly C. Sheet metal screw D. Do not use an adapter. If the problem continues, call an electrician. ■ Check that a circuit breaker has not tripped. Installation is now complete. Save Installation Instructions for filter placement.
... a cook time of the damper plate. Upper cabinet cutout E. Failure to follow these instructions can result in place, insert bolts through the cabinet cutout so that the long tab of the damper assembly slides under vent) Complete Installation 1. If adjustment is no gap between the upper cabinet bottom and the microwave oven.... Damper assembly C. Sheet metal screw D. Do not use an adapter. If the problem continues, call an electrician. ■ Check that a circuit breaker has not tripped. Installation is now complete. Save Installation Instructions for filter placement.
Installation Instruction
Page 12
... our toll free number or visit our website listed in the "Tools and Parts" section) A A. See "Recommended Standard Fittings" section for either type of the installation hardware needs to round transition piece = 5 ft (1.5 m) D. 2 ft (0.6 m) + 6 ft (1.8 m) straight = 8 ft (2.4 m) If the existing ...; Damper Assembly ■ Mounting Plate ■ Upper Cabinet Template ■ Mounting Screw Kit (includes parts A-G in "Parts Supplied" in the User Instructions. Recommended Vent Length A 3¹⁄₄" x 10" (8.3 x 25.4 cm) rectangular or 6" (15.2 cm) round vent should be used...
... our toll free number or visit our website listed in the "Tools and Parts" section) A A. See "Recommended Standard Fittings" section for either type of the installation hardware needs to round transition piece = 5 ft (1.5 m) D. 2 ft (0.6 m) + 6 ft (1.8 m) straight = 8 ft (2.4 m) If the existing ...; Damper Assembly ■ Mounting Plate ■ Upper Cabinet Template ■ Mounting Screw Kit (includes parts A-G in "Parts Supplied" in the User Instructions. Recommended Vent Length A 3¹⁄₄" x 10" (8.3 x 25.4 cm) rectangular or 6" (15.2 cm) round vent should be used...

Use and Care
Page 1
... of burns, electric shock, fire, injury to persons, or exposure to excessive microwave energy: ■ Install or locate the microwave oven only in accordance with the provided Installation Instructions. ■ Read all safety messages. This is , tell you and others are not followed. MICROWAVE... many important safety messages in this section and in the shell and sealed containers - You will need assistance, call us at www.amana.com for additional information. Para obtener acceso a "Instrucciones para el usuario de la combinación microondas campana" en español...
... of burns, electric shock, fire, injury to persons, or exposure to excessive microwave energy: ■ Install or locate the microwave oven only in accordance with the provided Installation Instructions. ■ Read all safety messages. This is , tell you and others are not followed. MICROWAVE... many important safety messages in this section and in the shell and sealed containers - You will need assistance, call us at www.amana.com for additional information. Para obtener acceso a "Instrucciones para el usuario de la combinación microondas campana" en español...
Use and Care
Page 3
... electrical supply with Part 18 of electric shock by providing an escape wire for FAST. 3. The microwave oven is properly installed and grounded. Consult a qualified electrician or serviceman if the grounding instructions are not completely understood, or if doubt exists as cooling fan during any cook function. Enter time. 3. Vent Fan High...
... electrical supply with Part 18 of electric shock by providing an escape wire for FAST. 3. The microwave oven is properly installed and grounded. Consult a qualified electrician or serviceman if the grounding instructions are not completely understood, or if doubt exists as cooling fan during any cook function. Enter time. 3. Vent Fan High...

Use and Care
Page 6
...correspondence. Costs associated with published installation instructions. 11. THIS WARRANTY GIVES YOU SPECIFIC LEGAL RIGHTS, AND YOU MAY ALSO HAVE OTHER RIGHTS WHICH VARY FROM STATE TO STATE OR PROVINCE TO PROVINCE. You can write to Amana with original model/serial numbers .... Outside the 50 United States and Canada, this limited warranty. This major appliance is reported to published user or operator instructions and/or installation instructions. 4. If outside the 50 United States and Canada, contact your major appliance, unless such damage results from warranty coverage...
...correspondence. Costs associated with published installation instructions. 11. THIS WARRANTY GIVES YOU SPECIFIC LEGAL RIGHTS, AND YOU MAY ALSO HAVE OTHER RIGHTS WHICH VARY FROM STATE TO STATE OR PROVINCE TO PROVINCE. You can write to Amana with original model/serial numbers .... Outside the 50 United States and Canada, this limited warranty. This major appliance is reported to published user or operator instructions and/or installation instructions. 4. If outside the 50 United States and Canada, contact your major appliance, unless such damage results from warranty coverage...

Warranty
Page 1
... and repair labor to correct house wiring or plumbing. 2. Service must be borne by an Amana designated service company. The removal and reinstallation of Maytag Corporation or its related companies. 461966101051 5/10 Printed in accordance with published installation instructions. 11. Have your major appliance if it was purchased. For assistance or service, call...
... and repair labor to correct house wiring or plumbing. 2. Service must be borne by an Amana designated service company. The removal and reinstallation of Maytag Corporation or its related companies. 461966101051 5/10 Printed in accordance with published installation instructions. 11. Have your major appliance if it was purchased. For assistance or service, call...
