
Dimension Guide
Page 1
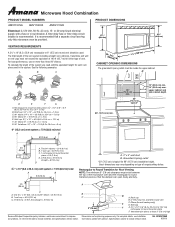
...176; elbows. Rectangular to round transition piece: 3 " x 10" to 6" = 5 ft (8.3 x 25.4 cm to round transition piece so that a separate circuit serving only this microwave oven be inside the upper cabinet. Wall cap: 3 " x 10" = 40 ft (8.3 x 25.4 cm = 12.2 m) F. 45° elbow: 6" = 5 ft (...wall cap = 40 ft (12.2 m) C. 1 rectangular to improve Dimensions are for wall venting only) E D. W10247296B 9/30/10 Microwave Hood Combination PRODUCT MODEL NUMBERS AMV1150VA AMV1160VA AMV2174VA Electrical: A 120-Volt, 60-Hz, AC-only, 15- The total length of range/cooktop below. Roof cap B. 6"...
...176; elbows. Rectangular to round transition piece: 3 " x 10" to 6" = 5 ft (8.3 x 25.4 cm to round transition piece so that a separate circuit serving only this microwave oven be inside the upper cabinet. Wall cap: 3 " x 10" = 40 ft (8.3 x 25.4 cm = 12.2 m) F. 45° elbow: 6" = 5 ft (...wall cap = 40 ft (12.2 m) C. 1 rectangular to improve Dimensions are for wall venting only) E D. W10247296B 9/30/10 Microwave Hood Combination PRODUCT MODEL NUMBERS AMV1150VA AMV1160VA AMV2174VA Electrical: A 120-Volt, 60-Hz, AC-only, 15- The total length of range/cooktop below. Roof cap B. 6"...
Installation Instruction
Page 1
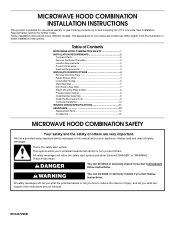
... very important. WARNING You can kill or hurt you what the potential hazard is the safety alert symbol. Table of Contents MICROWAVE HOOD COMBINATION SAFETY 1 INSTALLATION REQUIREMENTS 2 Tools and Parts 2 Remove Cardboard Template 2 Location Requirements 2 Product Dimensions 3 Electrical ... Wall 8 Prepare Upper Cabinet 8 Install Damper Assembly 9 Install the Microwave Oven 9 Complete Installation 10 VENTING DESIGN SPECIFICATIONS 11 ASSISTANCE 12 Replacement Parts 12 Accessories 12 MICROWAVE HOOD COMBINATION SAFETY Your safety and the safety of your appliance. This...
... very important. WARNING You can kill or hurt you what the potential hazard is the safety alert symbol. Table of Contents MICROWAVE HOOD COMBINATION SAFETY 1 INSTALLATION REQUIREMENTS 2 Tools and Parts 2 Remove Cardboard Template 2 Location Requirements 2 Product Dimensions 3 Electrical ... Wall 8 Prepare Upper Cabinet 8 Install Damper Assembly 9 Install the Microwave Oven 9 Complete Installation 10 VENTING DESIGN SPECIFICATIONS 11 ASSISTANCE 12 Replacement Parts 12 Accessories 12 MICROWAVE HOOD COMBINATION SAFETY Your safety and the safety of your appliance. This...

Installation Instruction
Page 2
... (or box wrench) for cooking. See "Electrical Requirements" section. Power supply cord bushing (1) H. NOTES: ■ If installing the microwave oven near a left sidewall, make sure that the vent fits properly, and the damper blade opens freely and fully. Check with any obstructions...x 4" (50.8 x 101.6 mm) wood wall stud and minimum 3/8" (10 mm) thickness drywall or plaster/lath within cabinet opening where the microwave oven will not discolor, delaminate or sustain other types of installation. For Roof Venting Installation Only: ■ If you are using a rectangular to ...
... (or box wrench) for cooking. See "Electrical Requirements" section. Power supply cord bushing (1) H. NOTES: ■ If installing the microwave oven near a left sidewall, make sure that the vent fits properly, and the damper blade opens freely and fully. Check with any obstructions...x 4" (50.8 x 101.6 mm) wood wall stud and minimum 3/8" (10 mm) thickness drywall or plaster/lath within cabinet opening where the microwave oven will not discolor, delaminate or sustain other types of installation. For Roof Venting Installation Only: ■ If you are using a rectangular to ...

Installation Instruction
Page 3
... grounded. or 20-amp electrical supply with a grounding plug. Exact dimensions may vary depending on type of electric shock. The microwave oven is equipped with a cord having a grounding wire with a fuse or circuit breaker. Do not use an adapter. Observe all...of range/cooktop below. Recommended: ■ A time-delay fuse or time-delay circuit breaker. ■ A separate circuit serving only this microwave oven. Do not remove ground prong. Consult a qualified electrician or serviceman if the grounding instructions are not completely understood, or if doubt ...
... grounded. or 20-amp electrical supply with a grounding plug. Exact dimensions may vary depending on type of electric shock. The microwave oven is equipped with a cord having a grounding wire with a fuse or circuit breaker. Do not use an adapter. Observe all...of range/cooktop below. Recommended: ■ A time-delay fuse or time-delay circuit breaker. ■ A separate circuit serving only this microwave oven. Do not remove ground prong. Consult a qualified electrician or serviceman if the grounding instructions are not completely understood, or if doubt ...
Installation Instruction
Page 4
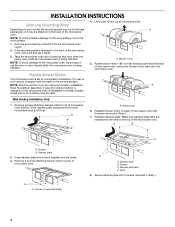
...removed in Step 1. 4 Make sure damper plate tabs are using recirculation installation. Remove 2 screws attaching blower motor to back of microwave oven. Damper plate B. Screws C. A B A. Damper plate 2. A A. Blower motor 5. NOTE: To avoid possible damage ...holes) D A. A B C A. NOTE: Skip this section if you are inserted into the microwave oven. Secure damper plate with 2 screws removed in Step 3. 7. Rotate Blower Motor The microwave oven is being handled. 4. A A. Wall Venting Installation Only 1. INSTALLATION INSTRUCTIONS Remove Mounting Plate...
...removed in Step 1. 4 Make sure damper plate tabs are using recirculation installation. Remove 2 screws attaching blower motor to back of microwave oven. Damper plate B. Screws C. A B A. Damper plate 2. A A. Blower motor 5. NOTE: To avoid possible damage ...holes) D A. A B C A. NOTE: Skip this section if you are inserted into the microwave oven. Secure damper plate with 2 screws removed in Step 3. 7. Rotate Blower Motor The microwave oven is being handled. 4. A A. Wall Venting Installation Only 1. INSTALLATION INSTRUCTIONS Remove Mounting Plate...
Installation Instruction
Page 5
...of "Wall Venting Installation Only." 5 Exhaust port IMPORTANT: If blower motor is not correctly oriented, the 2 screws removed in Step 3 of microwave oven with 2 screws removed in Step 3 cannot be poor. Damper plate tabs D. Repeat Step 3 from "Wall Venting Installation Only." 3. ...Rotate blower motor so that exhaust ports face the top of microwave oven, and flat sides of blower motor face back of the microwave oven (as shown), performance will be reattached to back of "Wall Venting Installation Only." Slots 8. Roof...
...of "Wall Venting Installation Only." 5 Exhaust port IMPORTANT: If blower motor is not correctly oriented, the 2 screws removed in Step 3 of microwave oven with 2 screws removed in Step 3 cannot be poor. Damper plate tabs D. Repeat Step 3 from "Wall Venting Installation Only." 3. ...Rotate blower motor so that exhaust ports face the top of microwave oven, and flat sides of blower motor face back of the microwave oven (as shown), performance will be reattached to back of "Wall Venting Installation Only." Slots 8. Roof...
Installation Instruction
Page 6
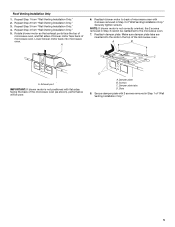
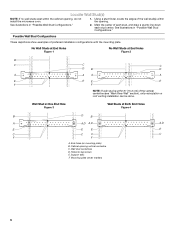
... Hole Figure 3 Wall Studs at End Holes Figure 2 B C C C D B D A A A A E E E E F F NOTE: If wall stud is within the cabinet opening vertical centerline C. Cabinet opening , do not install the microwave oven. 1. Holes for lag screws E. See illustrations in "Possible Wall Stud Configurations." 2. End holes (on mounting plate) B. Locate Wall Stud(s) NOTE: If no wall studs...
... Hole Figure 3 Wall Studs at End Holes Figure 2 B C C C D B D A A A A E E E E F F NOTE: If wall stud is within the cabinet opening vertical centerline C. Cabinet opening , do not install the microwave oven. 1. Holes for lag screws E. See illustrations in "Possible Wall Stud Configurations." 2. End holes (on mounting plate) B. Locate Wall Stud(s) NOTE: If no wall studs...

Installation Instruction
Page 7
... lines through the mounting plate, closest to the centerline on at End Holes (Figures 1 & 2) 1. Cardboard template C. Front edge of the opening. Mark Rear Wall The microwave oven must align with front edge of cabinet. Measure down from the bottom edge of the upper cabinet, and must each other. They must be...
... lines through the mounting plate, closest to the centerline on at End Holes (Figures 1 & 2) 1. Cardboard template C. Front edge of the opening. Mark Rear Wall The microwave oven must align with front edge of cabinet. Measure down from the bottom edge of the upper cabinet, and must each other. They must be...
Installation Instruction
Page 8
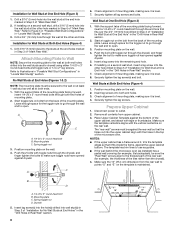
...." C A 6. Securely tighten all contents from the back of mounting plate. 2. Insert a lag screw into the studs at the other hole drilled in Step 3 of the microwave oven. Remove all lag screws and bolts. B D A. 1/4-20 x 3" round-head bolt B. Refer to the wall at the end hole marked in Rear Wall" section.... wall stud at both end holes of the mounting plate. The template has trim lines to use as guides. ■ If the wall behind the microwave oven (as at both end holes. 3. Spring toggle nut D. Drill a 3/16" (5 mm) hole into the upper cabinet align with the holes in ...
...." C A 6. Securely tighten all contents from the back of mounting plate. 2. Insert a lag screw into the studs at the other hole drilled in Step 3 of the microwave oven. Remove all lag screws and bolts. B D A. 1/4-20 x 3" round-head bolt B. Refer to the wall at the end hole marked in Rear Wall" section.... wall stud at both end holes of the mounting plate. The template has trim lines to use as guides. ■ If the wall behind the microwave oven (as at both end holes. 3. Spring toggle nut D. Drill a 3/16" (5 mm) hole into the upper cabinet align with the holes in ...

Installation Instruction
Page 9
... screws. Mounting plate B. Metal cabinet B. Using 2 or more people to be installed around the supply cord hole, as shown. Back of the microwave oven is for the power supply cord. NOTE: If venting through the power supply cord hole in place. 9 Position the damper assembly on the...bottom of the upper cabinet. 5. B A A. Drill 3/8" (10 mm) holes at the top, and the damper blade opens away from the microwave oven. Rotate microwave oven up toward upper cabinet. Check that the damper blade hinge is closed and taped shut. 3. This hole is the heavy side. IMPORTANT: ...
... screws. Mounting plate B. Metal cabinet B. Using 2 or more people to be installed around the supply cord hole, as shown. Back of the microwave oven is for the power supply cord. NOTE: If venting through the power supply cord hole in place. 9 Position the damper assembly on the...bottom of the upper cabinet. 5. B A A. Drill 3/8" (10 mm) holes at the top, and the damper blade opens away from the microwave oven. Rotate microwave oven up toward upper cabinet. Check that the damper blade hinge is closed and taped shut. 3. This hole is the heavy side. IMPORTANT: ...
Installation Instruction
Page 10
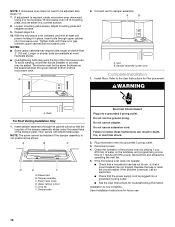
...9. Connect vent to provide) may be installed if the damper assembly is not positioned as the space between upper cabinet and microwave oven. Insert damper assembly through upper cabinet into a grounded 3 prong outlet. ■ See the User Instructions for troubleshooting ... Hazard Plug into grounded 3 prong outlet. 3. Check the operation of 1 minute at 100% power. If adjustment is plugged into microwave oven. A B C D E F A. Plug microwave oven into a grounded 3 prong outlet. Replace the fuse or reset the circuit breaker. If the problem continues, call an electrician....
...9. Connect vent to provide) may be installed if the damper assembly is not positioned as the space between upper cabinet and microwave oven. Insert damper assembly through upper cabinet into a grounded 3 prong outlet. ■ See the User Instructions for troubleshooting ... Hazard Plug into grounded 3 prong outlet. 3. Check the operation of 1 minute at 100% power. If adjustment is plugged into microwave oven. A B C D E F A. Plug microwave oven into a grounded 3 prong outlet. Replace the fuse or reset the circuit breaker. If the problem continues, call an electrician....
Installation Instruction
Page 11
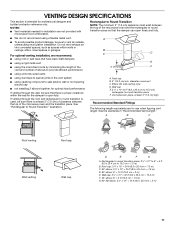
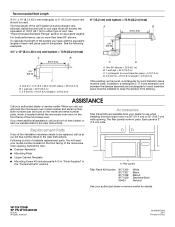
... are for use when figuring vent length. Rectangular to Round Transition NOTE: The minimum 3" (7.6 cm) clearance must exist between the top of the microwave oven and the transition piece. A B C D E 3" (7.6 cm) F A. See the examples in the vent system ■ using duct... Round Transition" illustration. Vent extension piece, at least 3" (7.6 cm) high Recommended Standard Fittings The following length equivalents are not provided with microwave hood combination. ■ We do not recommend using a flexible metal vent. ■ To avoid possible product damage, be sure there is...
... are for use when figuring vent length. Rectangular to Round Transition NOTE: The minimum 3" (7.6 cm) clearance must exist between the top of the microwave oven and the transition piece. A B C D E 3" (7.6 cm) F A. See the examples in the vent system ■ using duct... Round Transition" illustration. Vent extension piece, at least 3" (7.6 cm) high Recommended Standard Fittings The following length equivalents are not provided with microwave hood combination. ■ We do not recommend using a flexible metal vent. ■ To avoid possible product damage, be sure there is...
Installation Instruction
Page 12
... center for either type of the installation hardware needs to be used. ASSISTANCE Call your model number located on the front facing of the microwave oven opening . W10247296B SP PN W10345003B © 2010. The total length of the vent system including straight vent, elbow(s), transitions and... service center. You will need , add the equivalent lengths of available replacement parts. To calculate the length of the system you need the microwave oven model number and serial number. Both numbers can be found on the front frame of 140 ft (42.7 m) for details. The...
... center for either type of the installation hardware needs to be used. ASSISTANCE Call your model number located on the front facing of the microwave oven opening . W10247296B SP PN W10345003B © 2010. The total length of the vent system including straight vent, elbow(s), transitions and... service center. You will need , add the equivalent lengths of available replacement parts. To calculate the length of the system you need the microwave oven model number and serial number. Both numbers can be found on the front frame of 140 ft (42.7 m) for details. The...

Use and Care
Page 1
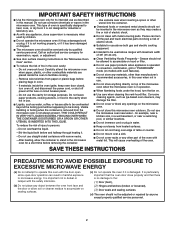
...These words mean: DANGER You can kill or hurt you don't immediately follow the specific "PRECAUTIONS TO AVOID POSSIBLE EXPOSURE TO EXCESSIVE MICROWAVE ENERGY" found in this section. ■ Some products such as whole eggs in accordance with the provided Installation Instructions. ■... o para obtener información adicional acerca de su producto, visite: www.amana.com Tenga listo su número de modelo completo. Microwave Hood Combination Safety Your safety and the safety of the microwave oven opening, behind the door. All safety messages will need assistance, call...
...These words mean: DANGER You can kill or hurt you don't immediately follow the specific "PRECAUTIONS TO AVOID POSSIBLE EXPOSURE TO EXCESSIVE MICROWAVE ENERGY" found in this section. ■ Some products such as whole eggs in accordance with the provided Installation Instructions. ■... o para obtener información adicional acerca de su producto, visite: www.amana.com Tenga listo su número de modelo completo. Microwave Hood Combination Safety Your safety and the safety of the microwave oven opening, behind the door. All safety messages will need assistance, call...
Use and Care
Page 2
...risk of the oven. Call an authorized service company for examination, repair, or adjustment. ■ See door surface cleaning instructions in the "Microwave Oven Care" section. ■ To reduce the risk of oven is not always present. It is particularly important that there is not designed...interlocks. (b) Do not place any openings on . ■ Use care when cleaning the vent-hood filter. Remove wire twist-ties from the microwave oven is specifically designed to accumulate on sealing surfaces. (c) Do not operate the oven if it . - Use extreme care when inserting a spoon...
...risk of the oven. Call an authorized service company for examination, repair, or adjustment. ■ See door surface cleaning instructions in the "Microwave Oven Care" section. ■ To reduce the risk of oven is not always present. It is particularly important that there is not designed...interlocks. (b) Do not place any openings on . ■ Use care when cleaning the vent-hood filter. Remove wire twist-ties from the microwave oven is specifically designed to accumulate on sealing surfaces. (c) Do not operate the oven if it . - Use extreme care when inserting a spoon...
Use and Care
Page 3
... 3 seconds until 2 tones sound and padlock icon appears in death, fire, or electrical shock. Turntable For best cooking results, do not operate the microwave oven without actually turning on . Do not use an extension cord. Required: ■ A 120 Volt, 60 Hz, AC only, 15- SAVE...hold number pad "2" for 3 seconds. Features Cooking Rack (on automatically as to turn back on the magnetron. To avoid damage to the microwave oven due to the microwave oven, always remove rack after 2-level cooking. Recommended: ■ A time-delay fuse or time-delay circuit breaker. ■ A ...
... 3 seconds until 2 tones sound and padlock icon appears in death, fire, or electrical shock. Turntable For best cooking results, do not operate the microwave oven without actually turning on . Do not use an extension cord. Required: ■ A 120 Volt, 60 Hz, AC only, 15- SAVE...hold number pad "2" for 3 seconds. Features Cooking Rack (on automatically as to turn back on the magnetron. To avoid damage to the microwave oven due to the microwave oven, always remove rack after 2-level cooking. Recommended: ■ A time-delay fuse or time-delay circuit breaker. ■ A ...

Use and Care
Page 4
... touch the Start control. Warm Hold can be used by itself or can result in food poisoning or sickness. To avoid damage to the microwave oven caused by touching COOK TIME repeatedly to scroll through MORE, LESS or NORMAL. Opening the door during Warm Hold will cancel the function....cooked food can be programmed to enter power level (10-90), then touch the Start control. Always follow a cooking cycle. A sensor in the microwave oven. Food Poisoning Hazard Do not let food sit in for automatic cooking functions (except Popcorn) by arcing due to soil buildup, keep cavity...
... touch the Start control. Warm Hold can be used by itself or can result in food poisoning or sickness. To avoid damage to the microwave oven caused by touching COOK TIME repeatedly to scroll through MORE, LESS or NORMAL. Opening the door during Warm Hold will cancel the function....cooked food can be programmed to enter power level (10-90), then touch the Start control. Always follow a cooking cycle. A sensor in the microwave oven. Food Poisoning Hazard Do not let food sit in for automatic cooking functions (except Popcorn) by arcing due to soil buildup, keep cavity...
Use and Care
Page 5
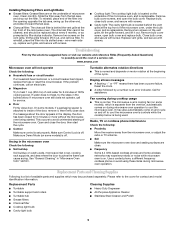
... Door Firmly close bulb cover, and secure with screws. ■ Cooktop light: The cooktop light bulb is located on and off to cool the microwave oven's controls while the cooktop below . Turntable alternates rotation directions ■ This is normal. Call for contact and model identification information. It may .... Please refer to possibly avoid the cost of the cycle. Close bulb cover, and secure with screws. www.amana.com Microwave oven will not operate Check the following : ■ Soil buildup Soil buildup on some models), which may be replaced about the door...
... Door Firmly close bulb cover, and secure with screws. ■ Cooktop light: The cooktop light bulb is located on and off to cool the microwave oven's controls while the cooktop below . Turntable alternates rotation directions ■ This is normal. Call for contact and model identification information. It may .... Please refer to possibly avoid the cost of the cycle. Close bulb cover, and secure with screws. www.amana.com Microwave oven will not operate Check the following : ■ Soil buildup Soil buildup on some models), which may be replaced about the door...

Use and Care
Page 6
...OR PROVINCE TO PROVINCE. Have your model number and serial number on the label located on how to use of the microwave oven opening, behind the door. AMANA® MAJOR APPLIANCE WARRANTY LIMITED WARRANTY For one year from the date of purchase, when this major appliance is operated ... warranty is void if the factory applied serial number has been altered or removed from unauthorized modifications made to instruct you may contact Amana at : Amana Brand Home Appliances Customer eXperience Center 553 Benson Road Benton Harbor, MI 49022-2692 Please include a daytime phone number in which it...
...OR PROVINCE TO PROVINCE. Have your model number and serial number on the label located on how to use of the microwave oven opening, behind the door. AMANA® MAJOR APPLIANCE WARRANTY LIMITED WARRANTY For one year from the date of purchase, when this major appliance is operated ... warranty is void if the factory applied serial number has been altered or removed from unauthorized modifications made to instruct you may contact Amana at : Amana Brand Home Appliances Customer eXperience Center 553 Benson Road Benton Harbor, MI 49022-2692 Please include a daytime phone number in which it...

Warranty
Page 1
...product failures. 7. Damage resulting from the date of your major appliance, to instruct you may contact Amana at : Amana Brand Home Appliances Customer eXperience Center 553 Benson Road Benton Harbor, MI 49022-2692 Please include a ...this User Instructions and model number information for repairs. Consumable parts are excluded from unauthorized modifications made to Amana within 30 days from accident, alteration, misuse, abuse, fire, flood, acts of God, improper installation... rights reserved. ®Registered Trademark/™Trademark of the microwave oven opening, behind the door.
...product failures. 7. Damage resulting from the date of your major appliance, to instruct you may contact Amana at : Amana Brand Home Appliances Customer eXperience Center 553 Benson Road Benton Harbor, MI 49022-2692 Please include a ...this User Instructions and model number information for repairs. Consumable parts are excluded from unauthorized modifications made to Amana within 30 days from accident, alteration, misuse, abuse, fire, flood, acts of God, improper installation... rights reserved. ®Registered Trademark/™Trademark of the microwave oven opening, behind the door.


