Dimension Guide
Page 1
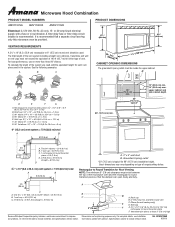
... vent piece used . upper cabinet and side cabinet depth 2 ft (0.6 m) C A. Roof cap B. 6" (15.2 cm) min. Microwave Hood Combination PRODUCT MODEL NUMBERS AMV1150VA AMV1160VA AMV2174VA Electrical: A 120-Volt, 60-Hz, AC-only, 15- To calculate the length of vent. See the following examples: A... 15.2 cm = 1.5 m) B. W10247296B 9/30/10 A B D E F G A. Exact dimensions may vary depending on type of the microwave oven and the rectangular to improve Dimensions are for Roof Venting NOTE: The minimum 3" (7.6 cm) clearance must be used in the system. diameter...
... vent piece used . upper cabinet and side cabinet depth 2 ft (0.6 m) C A. Roof cap B. 6" (15.2 cm) min. Microwave Hood Combination PRODUCT MODEL NUMBERS AMV1150VA AMV1160VA AMV2174VA Electrical: A 120-Volt, 60-Hz, AC-only, 15- To calculate the length of vent. See the following examples: A... 15.2 cm = 1.5 m) B. W10247296B 9/30/10 A B D E F G A. Exact dimensions may vary depending on type of the microwave oven and the rectangular to improve Dimensions are for Roof Venting NOTE: The minimum 3" (7.6 cm) clearance must be used in the system. diameter...
Installation Instruction
Page 1
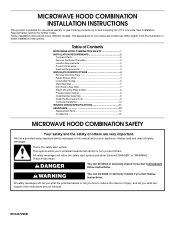
... instructions are very important. Table of others . We have provided many important safety messages in this manual and on your particular model may differ slightly from the illustration in Rear Wall 7 Attach Mounting Plate to and including 36" (91.4 cm) wide....be killed or seriously injured if you and others are not followed. W10247296B These installation instructions cover different models. All safety messages will follow instructions. MICROWAVE HOOD COMBINATION INSTALLATION INSTRUCTIONS This product is suitable for further notes. See "Installation Requirements" section for ...
... instructions are very important. Table of others . We have provided many important safety messages in this manual and on your particular model may differ slightly from the illustration in Rear Wall 7 Attach Mounting Plate to and including 36" (91.4 cm) wide....be killed or seriously injured if you and others are not followed. W10247296B These installation instructions cover different models. All safety messages will follow instructions. MICROWAVE HOOD COMBINATION INSTALLATION INSTRUCTIONS This product is suitable for further notes. See "Installation Requirements" section for ...

Installation Instruction
Page 2
... so that the door can open fully. ■ Some cabinet and building materials are not designed to withstand the heat produced by the microwave oven for weight of the cardboard packaging. 2. For other damages. Washers (2) D. Materials needed ■ Standard fittings for cabinet 1/4-20 ...Mark Rear Wall" part of packaging) Aluminum grease filters Charcoal filters (Depending on model, aluminum grease filter and charcoal filter may not be combined. See User Instructions.) NOTE: Depending on model, charcoal filters may be included. Sheet metal screws (2) G. The piece inside...
... so that the door can open fully. ■ Some cabinet and building materials are not designed to withstand the heat produced by the microwave oven for weight of the cardboard packaging. 2. For other damages. Washers (2) D. Materials needed ■ Standard fittings for cabinet 1/4-20 ...Mark Rear Wall" part of packaging) Aluminum grease filters Charcoal filters (Depending on model, aluminum grease filter and charcoal filter may not be combined. See User Instructions.) NOTE: Depending on model, charcoal filters may be included. Sheet metal screws (2) G. The piece inside...
Installation Instruction
Page 4
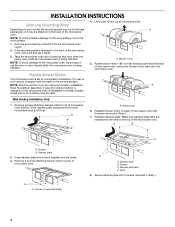
... INSTALLATION INSTRUCTIONS Remove Mounting Plate Depending on your model, the mounting plate may be in the top of the microwave oven. Remove any remaining contents from the microwave oven cavity. 2. Lift blower motor out of the microwave oven and lift up. Screws (in another ...1. 4 Blower motor 5. Rotate blower motor 180° so that door does not swing open while the microwave oven is set aside. 3. Remove screws attaching damper plate to back of microwave oven, and lower blower motor back into the slots in the foam packaging, or it aside. 3. ...
... INSTALLATION INSTRUCTIONS Remove Mounting Plate Depending on your model, the mounting plate may be in the top of the microwave oven. Remove any remaining contents from the microwave oven cavity. 2. Lift blower motor out of the microwave oven and lift up. Screws (in another ...1. 4 Blower motor 5. Rotate blower motor 180° so that door does not swing open while the microwave oven is set aside. 3. Remove screws attaching damper plate to back of microwave oven, and lower blower motor back into the slots in the foam packaging, or it aside. 3. ...
Installation Instruction
Page 12
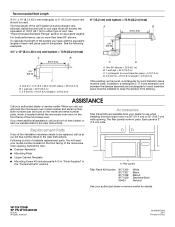
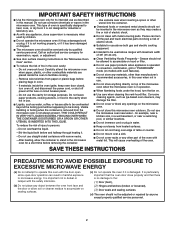
...roof caps must not exceed the equivalent of 140 ft (42.7 m) for either type of the microwave oven opening . ASSISTANCE Call your model number located on the model and serial number plate, which is 3" (7.6 cm) wide. W10247296B SP PN W10345003B © 2010...Plate ■ Upper Cabinet Template ■ Mounting Screw Kit (includes parts A-G in "Parts Supplied" in the "Tools and Parts" section) A A. You will need the microwave oven model number and serial number. See the following examples: 3¹⁄₄" x 10" (8.3 x 25.4 cm) vent system = 73 ft (22.2 m) total A B...
...roof caps must not exceed the equivalent of 140 ft (42.7 m) for either type of the microwave oven opening . ASSISTANCE Call your model number located on the model and serial number plate, which is 3" (7.6 cm) wide. W10247296B SP PN W10345003B © 2010...Plate ■ Upper Cabinet Template ■ Mounting Screw Kit (includes parts A-G in "Parts Supplied" in the "Tools and Parts" section) A A. You will need the microwave oven model number and serial number. See the following examples: 3¹⁄₄" x 10" (8.3 x 25.4 cm) vent system = 73 ft (22.2 m) total A B...

Use and Care
Page 1
... para obtener información adicional acerca de su producto, visite: www.amana.com Tenga listo su número de modelo completo. This symbol alerts you to excessive microwave energy: ■ Install or locate the microwave oven only in accordance with the provided Installation Instructions. ■ Read ...all safety messages. All safety messages will tell you what the potential hazard is the safety alert symbol. These words mean: DANGER You can kill or hurt you still need your model ...
... para obtener información adicional acerca de su producto, visite: www.amana.com Tenga listo su número de modelo completo. This symbol alerts you to excessive microwave energy: ■ Install or locate the microwave oven only in accordance with the provided Installation Instructions. ■ Read ...all safety messages. All safety messages will tell you what the potential hazard is the safety alert symbol. These words mean: DANGER You can kill or hurt you still need your model ...
Use and Care
Page 2
...hood or filter. ■ Do not use paper products when appliance is operated in convection, combination, grill or "PAN BROWN" mode (on models with such features). ■ Do not store any object between the oven front face and the door or allow the container to be adjusted ...■ Oversized foods or oversized metal utensils should be allowed to persons: - Do not use the cavity for storage purposes. Carefully attend the microwave oven when paper, plastic, or other than manufacturer's recommended accessories, in this oven with the door open since open-door operation can burn off...
...hood or filter. ■ Do not use paper products when appliance is operated in convection, combination, grill or "PAN BROWN" mode (on models with such features). ■ Do not store any object between the oven front face and the door or allow the container to be adjusted ...■ Oversized foods or oversized metal utensils should be allowed to persons: - Do not use the cavity for storage purposes. Carefully attend the microwave oven when paper, plastic, or other than manufacturer's recommended accessories, in this oven with the door open since open-door operation can burn off...
Use and Care
Page 3
...3. Repeat to exit Demo Mode. Repeat to unlock control. Features Cooking Rack (on some models) Timer can result in place. 3 Turntable For best cooking results, do not operate the microwave oven without actually turning on . Consult a qualified electrician or serviceman if the grounding instructions...; A time-delay fuse or time-delay circuit breaker. ■ A separate circuit serving only this microwave oven. Timer (on . Comes on automatically as to turn back on some models) Use only for the electric current. Touch and hold number pad "1" for 3 seconds to whether...
...3. Repeat to exit Demo Mode. Repeat to unlock control. Features Cooking Rack (on some models) Timer can result in place. 3 Turntable For best cooking results, do not operate the microwave oven without actually turning on . Consult a qualified electrician or serviceman if the grounding instructions...; A time-delay fuse or time-delay circuit breaker. ■ A separate circuit serving only this microwave oven. Timer (on . Comes on automatically as to turn back on some models) Use only for the electric current. Touch and hold number pad "1" for 3 seconds to whether...

Use and Care
Page 4
...water, or glass cleaner applied to follow label instructions on some models) Touch COOK TIME, touch number pads to enter time, touch COOK POWER (if not 100%), touch number pads to soil buildup, keep cavity, microwave inlet cover, cooking rack supports, and area where the door touches...and water or dishwasher. ■ Cooking rack and supports (on some models): mild soap and water, then rinse with clean water and dry with soft cloth, or use the dish in the microwave oven. Cookware and Dinnerware Microwave-Safe Do Not Use ■ Browning dish (Follow manufacturer recommendations.) &#...
...water, or glass cleaner applied to follow label instructions on some models) Touch COOK TIME, touch number pads to enter time, touch COOK POWER (if not 100%), touch number pads to soil buildup, keep cavity, microwave inlet cover, cooking rack supports, and area where the door touches...and water or dishwasher. ■ Cooking rack and supports (on some models): mild soap and water, then rinse with clean water and dry with soft cloth, or use the dish in the microwave oven. Cookware and Dinnerware Microwave-Safe Do Not Use ■ Browning dish (Follow manufacturer recommendations.) &#...
Use and Care
Page 5
...firmly close door. Remove bulb cover screws, and open bulb cover and replace bulb. www.amana.com Microwave oven will not operate Check the following : ■ Soil buildup Soil buildup on cavity walls, microwave inlet cover, cooking rack supports, and area where the door touches the frame can cause ... close bulb cover, and secure with screws. ■ Cooktop light: The cooktop light bulb is located on the underside of microwave oven. Remove two screws on some models, if a packaging spacer is on the vent grille, tilt the grille forward, and lift it out, and remove filter. ...
...firmly close door. Remove bulb cover screws, and open bulb cover and replace bulb. www.amana.com Microwave oven will not operate Check the following : ■ Soil buildup Soil buildup on cavity walls, microwave inlet cover, cooking rack supports, and area where the door touches the frame can cause ... close bulb cover, and secure with screws. ■ Cooktop light: The cooktop light bulb is located on the underside of microwave oven. Remove two screws on some models, if a packaging spacer is on the vent grille, tilt the grille forward, and lift it out, and remove filter. ...

Use and Care
Page 6
...if it is installed in an inaccessible location or is reported to view FAQs (Frequently Asked Questions), visit www.amana.com. If you may contact Amana at : Amana Brand Home Appliances Customer eXperience Center 553 Benson Road Benton Harbor, MI 49022-2692 Please include a daytime phone ... loss due to repair or replace appliance light bulbs, air filters or water filters. The cost of the microwave oven opening, behind the door. Major appliances with original model/serial numbers that is located in China For assistance or service, call 1-800-843-0304. Service calls to...
...if it is installed in an inaccessible location or is reported to view FAQs (Frequently Asked Questions), visit www.amana.com. If you may contact Amana at : Amana Brand Home Appliances Customer eXperience Center 553 Benson Road Benton Harbor, MI 49022-2692 Please include a daytime phone ... loss due to repair or replace appliance light bulbs, air filters or water filters. The cost of the microwave oven opening, behind the door. Major appliances with original model/serial numbers that is located in China For assistance or service, call 1-800-843-0304. Service calls to...

Warranty
Page 1
... this User Instructions and model number information for repairs. ITEMS EXCLUDED FROM WARRANTY This limited warranty does not cover: 1. Repairs when your major appliance is used for other damage to the finish of the microwave oven opening, behind the door. AMANA SHALL NOT BE LIABLE ...FOR INCIDENTAL OR CONSEQUENTIAL DAMAGES. If you may contact Amana at : Amana Brand Home Appliances Customer eXperience Center 553 Benson Road Benton Harbor, MI...
... this User Instructions and model number information for repairs. ITEMS EXCLUDED FROM WARRANTY This limited warranty does not cover: 1. Repairs when your major appliance is used for other damage to the finish of the microwave oven opening, behind the door. AMANA SHALL NOT BE LIABLE ...FOR INCIDENTAL OR CONSEQUENTIAL DAMAGES. If you may contact Amana at : Amana Brand Home Appliances Customer eXperience Center 553 Benson Road Benton Harbor, MI...


