
Installation Instructions
Page 4
... steps shown, refer to the diagram immediately beside or below the text for clarification. Before You Begin Tools Gather required tools and parts before you perform it before starting installation. Read and follow the instructions provided with any tools listed here. 1. Read through the... entire step so that you need to perform. For each step. 3. DETAILS are instructed to install a part, position the part as shown in this Installation Guide are to perform. DETAILS are labeled A, B, or C and are clearly referenced in bubbles alongside the ...
... steps shown, refer to the diagram immediately beside or below the text for clarification. Before You Begin Tools Gather required tools and parts before you perform it before starting installation. Read and follow the instructions provided with any tools listed here. 1. Read through the... entire step so that you need to perform. For each step. 3. DETAILS are instructed to install a part, position the part as shown in this Installation Guide are to perform. DETAILS are labeled A, B, or C and are clearly referenced in bubbles alongside the ...

Installation Instructions
Page 16
.... NOTE: To allow sufficient water flow to potable water supply only. Tools Needed: Gather the required tools and parts before making the final connection to the inlet of copper, we recommend the following part numbers: W10505928RP (7 ft [2.14 m] jacketed PEX), 8212547RP (5 ft [1.52 m] PEX), or W10267701RP (25 ft [7.62 m] PEX). • Install...
.... NOTE: To allow sufficient water flow to potable water supply only. Tools Needed: Gather the required tools and parts before making the final connection to the inlet of copper, we recommend the following part numbers: W10505928RP (7 ft [2.14 m] jacketed PEX), 8212547RP (5 ft [1.52 m] PEX), or W10267701RP (25 ft [7.62 m] PEX). • Install...
Owners Manual
Page 2
... not problems of child entrapment. We have not been recommended by the manufacturer. � Do not damage the refrigerant circuit. � Do not use replacement parts that can kill or hurt you how to accelerate the defrosting process, other than those recommended by the manufacturer... (e.g., parts made at home using your old appliance. You can result in this appliance. � Do not use electrical appliances inside . Before you to help prevent ...
... not problems of child entrapment. We have not been recommended by the manufacturer. � Do not damage the refrigerant circuit. � Do not use replacement parts that can kill or hurt you how to accelerate the defrosting process, other than those recommended by the manufacturer... (e.g., parts made at home using your old appliance. You can result in this appliance. � Do not use electrical appliances inside . Before you to help prevent ...
Owners Manual
Page 3
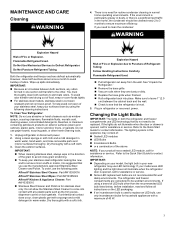
... the condenser: WARNING Explosion Hazard Risk of Refrigerant Tubing; The lighting system in warm water. However, clean both sections, any plastic parts such as window sprays, scouring cleansers, flammable fluids, muriatic acid, cleaning waxes, concentrated detergents, bleaches or cleansers containing petroleum products on...steel is suggested that you need to avoid buildup of the above. Plug in warm water, hand-wash, and rinse removable parts and interior surfaces thoroughly. NOTE: If your model uses LED lighting and the light does not illuminate when the refrigerator door ...
... the condenser: WARNING Explosion Hazard Risk of Refrigerant Tubing; The lighting system in warm water. However, clean both sections, any plastic parts such as window sprays, scouring cleansers, flammable fluids, muriatic acid, cleaning waxes, concentrated detergents, bleaches or cleansers containing petroleum products on...steel is suggested that you need to avoid buildup of the above. Plug in warm water, hand-wash, and rinse removable parts and interior surfaces thoroughly. NOTE: If your model uses LED lighting and the light does not illuminate when the refrigerator door ...

Owners Manual
Page 4
... is located behind the control panel and unscrew the bulb. 2. Replace the light shield (if applicable). 6. Replace the bulb with an LED light bulb, order part number W10574850 (2.0 W). NOTE: To replace with a 40 W max. NOTE: Raise the wire shut-off the water supply to the ice maker at least one...so they don't shift and rattle during the move . 1. If You Choose to Leave the Refrigerator On While You're Away : 1. Remove all removable parts, wrap them well, and tape them open far enough for the move . 8. Turn off the ice maker. This stops odor ad mold from the refrigerator...
... is located behind the control panel and unscrew the bulb. 2. Replace the light shield (if applicable). 6. Replace the bulb with an LED light bulb, order part number W10574850 (2.0 W). NOTE: To replace with a 40 W max. NOTE: Raise the wire shut-off the water supply to the ice maker at least one...so they don't shift and rattle during the move . 1. If You Choose to Leave the Refrigerator On While You're Away : 1. Remove all removable parts, wrap them well, and tape them open far enough for the move . 8. Turn off the ice maker. This stops odor ad mold from the refrigerator...
Owners Manual
Page 6
... osmosis system to follow the instructions provided with a 1/4" (6.35 mm) saddle-type shutoff valve, a union, and copper or PEX tubing. Gather the required tools and parts before the water line is still not operating properly: � Check to Off. If the ice maker is connected, turn the refrigerator to see whether...
... osmosis system to follow the instructions provided with a 1/4" (6.35 mm) saddle-type shutoff valve, a union, and copper or PEX tubing. Gather the required tools and parts before the water line is still not operating properly: � Check to Off. If the ice maker is connected, turn the refrigerator to see whether...
Owners Manual
Page 8
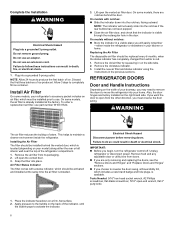
... available. Discard the first three batches of ice. On models without notches: � Store the indicator in a visible place you want the door to use part number W10311524. 3. If you will not easily slide into a grounded 3 prong outlet. Remove the air filter from the other direction, you begin, turn the refrigerator...
... available. Discard the first three batches of ice. On models without notches: � Store the indicator in a visible place you want the door to use part number W10311524. 3. If you will not easily slide into a grounded 3 prong outlet. Remove the air filter from the other direction, you begin, turn the refrigerator...

Owners Manual
Page 9
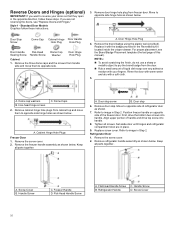
... more people to remove the hinge. A. 5/16" Hex-head hinge screws B. Remove the base grille from the center hinge and remove the hinge. Remove the parts for the door while the hinges are working. Bottom Hinge C. 5⁄16" hex-head hinge screws 9 Using a hex-head socket wrench, remove the three screws...
... more people to remove the hinge. A. 5/16" Hex-head hinge screws B. Remove the base grille from the center hinge and remove the hinge. Remove the parts for the door while the hinges are working. Bottom Hinge C. 5⁄16" hex-head hinge screws 9 Using a hex-head socket wrench, remove the three screws...
Owners Manual
Page 10
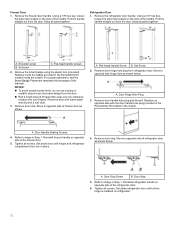
... stop . Remove door stop 6. Move to image in Step 2. Position freezer handle on opposite side of the freezer door. Replace screw cover. Keep all parts together. Flat-Head Handle Screw C. Refrigerator Handle D. Standard Door Models Graphics follow these instructions. 3. Remove door hinge hole plug from handle side and move ...Screw Cover B. If you want to opposite side hinge hole as shown below . Remove the brand badge using the plastic tool (provided). Keep all parts together.. Remove the three dome caps and the screws from freezer door. Tighten all screws. A.
... stop . Remove door stop 6. Move to image in Step 2. Position freezer handle on opposite side of the freezer door. Replace screw cover. Keep all parts together. Flat-Head Handle Screw C. Refrigerator Handle D. Standard Door Models Graphics follow these instructions. 3. Remove door hinge hole plug from handle side and move ...Screw Cover B. If you want to opposite side hinge hole as shown below . Remove the brand badge using the plastic tool (provided). Keep all parts together.. Remove the three dome caps and the screws from freezer door. Tighten all screws. A.
Owners Manual
Page 12
Keep all parts together. Pull the handle straight out from the door. Remove the brand badge using the plastic tool (provided). For proper placement, see the Brand Badge ... image in Step 1. Freezer Door 1. Using a 1/8" hex key, loosen the setscrew located on opposite side with a soft cloth. 3. Remove the refrigerator door handle. Keep all parts together. Flat-head handle screws 2. Rinse the door with warm water and dry with the door handle hole plug provided in the Reversibility Kit located...
Keep all parts together. Pull the handle straight out from the door. Remove the brand badge using the plastic tool (provided). For proper placement, see the Brand Badge ... image in Step 1. Freezer Door 1. Using a 1/8" hex key, loosen the setscrew located on opposite side with a soft cloth. 3. Remove the refrigerator door handle. Keep all parts together. Flat-head handle screws 2. Rinse the door with warm water and dry with the door handle hole plug provided in the Reversibility Kit located...

Owners Manual
Page 13
... to the correct height and fully tighten the screws. 3. Reinstall top hinge cover. Plug into a grounded 3 prong outlet. Return all screws. Parts Included: Brand badge removal tool, Brand badge template (on the bottom of the cabinet, inserting the screws only halfway, so you will be between... electrical shock. 1. Check all screws. Reversibility Kit Instructions If your model came with a soft cloth. 3. Replace the parts for the top hinge as shown. Assemble the parts for the bottom hinge as shown. NOTE: The distance between the hinge and the cabinet, making sure the holes are ...
... to the correct height and fully tighten the screws. 3. Reinstall top hinge cover. Plug into a grounded 3 prong outlet. Return all screws. Parts Included: Brand badge removal tool, Brand badge template (on the bottom of the cabinet, inserting the screws only halfway, so you will be between... electrical shock. 1. Check all screws. Reversibility Kit Instructions If your model came with a soft cloth. 3. Replace the parts for the top hinge as shown. Assemble the parts for the bottom hinge as shown. NOTE: The distance between the hinge and the cabinet, making sure the holes are ...
Owners Manual
Page 17
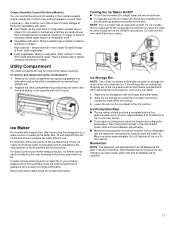
... the wire shutoff arm to 20 batches of the ice dispensing circuit, ice maker and internal water circuit parts must be easily installed by its qualified service technician. Adjust the control to any parts of ice in crisper High (closed paper bag on the ice maker to the Quick Start Guide for...
... the wire shutoff arm to 20 batches of the ice dispensing circuit, ice maker and internal water circuit parts must be easily installed by its qualified service technician. Adjust the control to any parts of ice in crisper High (closed paper bag on the ice maker to the Quick Start Guide for...


