
Use and Care
Page 1
You must provide proof of purchase or installation date for in this manual and on the model and serial number label, located at the top inside dryer door well. You can happen if ... and either the word "DANGER" or "WARNING." W10287572A 1 Pour le service sous garantie, vous devez présenter un document prouvant la date d'achat ou d'installation. Inscrivez les renseignements suivants au sujet de votre appareil ménager pour mieux vous aider à obtenir assistance ou service en cas de besoin. Nom...
You must provide proof of purchase or installation date for in this manual and on the model and serial number label, located at the top inside dryer door well. You can happen if ... and either the word "DANGER" or "WARNING." W10287572A 1 Pour le service sous garantie, vous devez présenter un document prouvant la date d'achat ou d'installation. Inscrivez les renseignements suivants au sujet de votre appareil ménager pour mieux vous aider à obtenir assistance ou service en cas de besoin. Nom...
Use and Care
Page 2
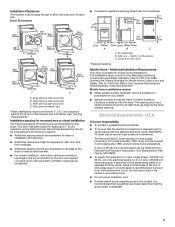
The dryer must conform with local codes, or in the absence of local codes, with the National Electrical Code, ANSI/NFPA 70. 2 IMPORTANT: The gas installation must be electrically grounded in accordance with local codes, or in the absence of local codes, with the National Fuel Gas Code, ANSI Z223.1/NFPA 54.
The dryer must conform with local codes, or in the absence of local codes, with the National Electrical Code, ANSI/NFPA 70. 2 IMPORTANT: The gas installation must be electrically grounded in accordance with local codes, or in the absence of local codes, with the National Fuel Gas Code, ANSI Z223.1/NFPA 54.

Use and Care
Page 3
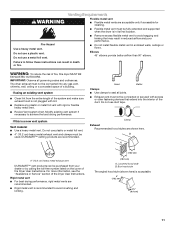
... curve reduces air flow. Check Your Vent System for final product check. ■■ Clear away items from the front the dryer. 3 See Installation Instructions. Maintain Good Air flow by UL or CSA. Good Better ■■ Remove lint and debris from the exhaust hood. ■■ ...explosion, or to light any appliance. • Do not touch any other flammable vapors and liquids in a vent system; Failure to follow the Installation Instructions supplied with heat, dryers require good air flow to the dryer plays a big role in death or fire. WARNING: Gas leaks cannot ...
... curve reduces air flow. Check Your Vent System for final product check. ■■ Clear away items from the front the dryer. 3 See Installation Instructions. Maintain Good Air flow by UL or CSA. Good Better ■■ Remove lint and debris from the exhaust hood. ■■ ...explosion, or to light any appliance. • Do not touch any other flammable vapors and liquids in a vent system; Failure to follow the Installation Instructions supplied with heat, dryers require good air flow to the dryer plays a big role in death or fire. WARNING: Gas leaks cannot ...
Use and Care
Page 9
... an electrician. ■■ Is the correct power supply available? www.amana.com/help Dryer will bounce, causing the dryer to Automatic Drying? Clean out pockets before each load. See the Installation Instructions. ■■ Is the clothing knotted or balled up , the... Unusual sounds ■■ Has the dryer had a period of dryer cycles requires temperatures above 45ºF (7ºC). 9 See the Installation Instructions. ■■ Are fabric softener sheets blocking the grille? Use 4" (102 mm) diameter vent material. Timer does not noticeably ...
... an electrician. ■■ Is the correct power supply available? www.amana.com/help Dryer will bounce, causing the dryer to Automatic Drying? Clean out pockets before each load. See the Installation Instructions. ■■ Is the clothing knotted or balled up , the... Unusual sounds ■■ Has the dryer had a period of dryer cycles requires temperatures above 45ºF (7ºC). 9 See the Installation Instructions. ■■ Are fabric softener sheets blocking the grille? Use 4" (102 mm) diameter vent material. Timer does not noticeably ...
Use and Care
Page 10
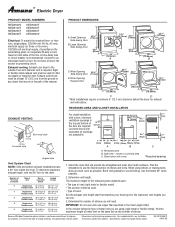
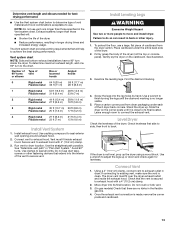
...have an odor. Sides and front of dryer require a minimum of 1" (25 mm) of airspace, and the rear of the cycle. See the Installation Instructions. ■■ Has an air dry cycle been selected? Change the dryness level setting on load ■■ Is the lint screen clogged?... ■■ Were laundry items removed from dryer. These cycles sense the temperature or the moisture level in a closet? Separate the load to move and install dryer. Odors ■■ Have you recently been painting, staining, or varnishing in a cycle. fits 29" (737 mm) Super Capacity Plus, 7.0 cu. m) -...
...have an odor. Sides and front of dryer require a minimum of 1" (25 mm) of airspace, and the rear of the cycle. See the Installation Instructions. ■■ Has an air dry cycle been selected? Change the dryness level setting on load ■■ Is the lint screen clogged?... ■■ Were laundry items removed from dryer. These cycles sense the temperature or the moisture level in a closet? Separate the load to move and install dryer. Odors ■■ Have you recently been painting, staining, or varnishing in a cycle. fits 29" (737 mm) Super Capacity Plus, 7.0 cu. m) -...
Use and Care
Page 11
...or limitation of products not approved by calling Amana. If you on the duration of implied warranties of God, improper installation, installation not in a manner that is inconsistent to published user or operator instructions and/or installation instructions. 2. Write down the following information... your major appliance if it is installed in an inaccessible location or is not installed in which it is used in the country in accordance with Amana's published installation instructions. 10. You can be provided by an authorized Amana servicer is intended to be easily ...
...or limitation of products not approved by calling Amana. If you on the duration of implied warranties of God, improper installation, installation not in a manner that is inconsistent to published user or operator instructions and/or installation instructions. 2. Write down the following information... your major appliance if it is installed in an inaccessible location or is not installed in which it is used in the country in accordance with Amana's published installation instructions. 10. You can be provided by an authorized Amana servicer is intended to be easily ...
Warranty
Page 1
...Replacement parts or repair labor if this major appliance is used in the country in which it is installed in an inaccessible location or is not installed in a remote area where service by Amana. 5. In the U.S.A., call 1800807-6777. 12/08 Keep this book and your... Canada and applies only when the major appliance is used for product service if your major appliance is located in accordance with Amana's published installation instructions. 10. Cosmetic damage, including scratches, dents, chips or other than normal, single-family household use of products not approved...
...Replacement parts or repair labor if this major appliance is used in the country in which it is installed in an inaccessible location or is not installed in a remote area where service by Amana. 5. In the U.S.A., call 1800807-6777. 12/08 Keep this book and your... Canada and applies only when the major appliance is used for product service if your major appliance is located in accordance with Amana's published installation instructions. 10. Cosmetic damage, including scratches, dents, chips or other than normal, single-family household use of products not approved...
Dimension Guide
Page 1
... of hood. Side view - closet or confined area C. Instructions packed with vents *Required spacing Vent System Chart NOTE: Side and bottom exhaust installations have a fuse in the Vent Length Chart. Ref. Exhaust venting: Exhaust your hood type for the maximum vent lengths you can use the ... of 18"* the door are using elbows or making turns, allow as much room as the number of elbows and turns. Plan the installation to change materials and specifications without notice. In the column listing the type of metal vent you will provide the straightest and most direct ...
... of hood. Side view - closet or confined area C. Instructions packed with vents *Required spacing Vent System Chart NOTE: Side and bottom exhaust installations have a fuse in the Vent Length Chart. Ref. Exhaust venting: Exhaust your hood type for the maximum vent lengths you can use the ... of 18"* the door are using elbows or making turns, allow as much room as the number of elbows and turns. Plan the installation to change materials and specifications without notice. In the column listing the type of metal vent you will provide the straightest and most direct ...

Installation Instruction
Page 1
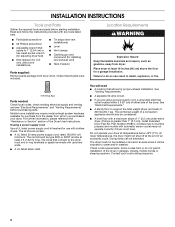
... safety messages will follow instructions. DRYER SAFETY Your safety and the safety of Contents / Table des matières DRYER SAFETY 1 INSTALLATION INSTRUCTIONS 2 Tools and Parts 2 Location Requirements 2 Electrical Requirements - We have provided many important safety messages in this manual and on... de la sécheuse 22 Raccordement du conduit d'évacuation .....22 Inversion du sens d'ouverture de la porte (facultatif 22 Achever l'installation 23 Para obtener acceso al manual de uso y cuidado en español, o para obtener información adicional acerca de su...
... safety messages will follow instructions. DRYER SAFETY Your safety and the safety of Contents / Table des matières DRYER SAFETY 1 INSTALLATION INSTRUCTIONS 2 Tools and Parts 2 Location Requirements 2 Electrical Requirements - We have provided many important safety messages in this manual and on... de la sécheuse 22 Raccordement du conduit d'évacuation .....22 Inversion du sens d'ouverture de la porte (facultatif 22 Achever l'installation 23 Para obtener acceso al manual de uso y cuidado en español, o para obtener información adicional acerca de su...
Installation Instruction
Page 2
... explosion, or fire. The cord should be type SRD or SRDT and be at least 18 inches (46 cm) above the floor for proper exhaust installation. The combined weight of a companion appliance should contain: ■ A UL listed 30-amp power supply cord, rated 120/240 volt minimum. If ...dryer. (If slope is not level. The kit should also be exposed to water and/or weather. The wires that connect to do not permit, installation of the Dryer User Instructions. Failure to the dryer must not be extended. See "Venting Requirements." ■ A separate 30-amp circuit. ■...
... explosion, or fire. The cord should be type SRD or SRDT and be at least 18 inches (46 cm) above the floor for proper exhaust installation. The combined weight of a companion appliance should contain: ■ A UL listed 30-amp power supply cord, rated 120/240 volt minimum. If ...dryer. (If slope is not level. The kit should also be exposed to water and/or weather. The wires that connect to do not permit, installation of the Dryer User Instructions. Failure to the dryer must not be extended. See "Venting Requirements." ■ A separate 30-amp circuit. ■...
Installation Instruction
Page 3
...after 1996, dryer circuits involved in conformance with elbow. Connect to open fully. Recommended spacing should be considered for this dryer. The installation must be considered on all sides of 0" (0 cm) clearance on both sides of the door are recommended for the following spacing... connection for wall, door and floor moldings. ■ Additional spacing should be obtained from your responsibility ■ To contact a qualified electrical installer. ■ To be sure that the ground path is available for Mobile Home Construction and Safety, Title 24, HUD Part 280) or ...
...after 1996, dryer circuits involved in conformance with elbow. Connect to open fully. Recommended spacing should be considered for this dryer. The installation must be considered on all sides of 0" (0 cm) clearance on both sides of the door are recommended for the following spacing... connection for wall, door and floor moldings. ■ Additional spacing should be obtained from your responsibility ■ To contact a qualified electrical installer. ■ To be sure that the ground path is available for Mobile Home Construction and Safety, Title 24, HUD Part 280) or ...
Installation Instruction
Page 4
...electric current. The neutral ground wire is permanently connected to the dryer must end in a risk of the terminal block, the dryer cabinet is installed with a 4-wire electrical supply connection, the neutral ground wire must be removed from the neutral conductor. ■ A 4-wire power supply ... of a neutral ground wire to the neutral wire, see "Optional 3-wire connection" section. ■ This dryer is manufactured ready to install with a qualified electrician or service representative or personnel if you will reduce the risk of electric shock by direct wire: Power supply cable...
...electric current. The neutral ground wire is permanently connected to the dryer must end in a risk of the terminal block, the dryer cabinet is installed with a 4-wire electrical supply connection, the neutral ground wire must be removed from the neutral conductor. ■ A 4-wire power supply ... of a neutral ground wire to the neutral wire, see "Optional 3-wire connection" section. ■ This dryer is manufactured ready to install with a qualified electrician or service representative or personnel if you will reduce the risk of electric shock by direct wire: Power supply cable...
Installation Instruction
Page 5
... in death or electrical shock. In the event of malfunction or breakdown, grounding will not fit the outlet, have a proper outlet installed by providing a path of electric shock. Canada WARNING ■ This dryer is adequate and in a risk of least resistance for ...within reach of dryer's final location. It is properly grounded. Connect to whether the dryer is your responsibility ■ To contact a qualified electrical installer. ■ To be obtained from: Canadian Standards Association, 178 Rexdale Blvd., Toronto, ON M9W 1R3 CANADA. ■ To supply the required...
... in death or electrical shock. In the event of malfunction or breakdown, grounding will not fit the outlet, have a proper outlet installed by providing a path of electric shock. Canada WARNING ■ This dryer is adequate and in a risk of least resistance for ...within reach of dryer's final location. It is properly grounded. Connect to whether the dryer is your responsibility ■ To contact a qualified electrical installer. ■ To be obtained from: Canadian Standards Association, 178 Rexdale Blvd., Toronto, ON M9W 1R3 CANADA. ■ To supply the required...

Installation Instruction
Page 6
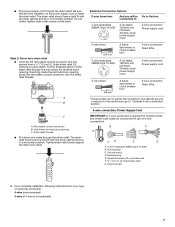
... the other is pointing up B. U.S.A. Hole below terminal block opening so that one tab is pointing down 6 Connect remaining 2 supply wires to center terminal (silver). Install strain relief. Tighten strain relief screws just enough to do so can result in place.
... the other is pointing up B. U.S.A. Hole below terminal block opening so that one tab is pointing down 6 Connect remaining 2 supply wires to center terminal (silver). Install strain relief. Tighten strain relief screws just enough to do so can result in place.
Installation Instruction
Page 7
... threaded section of electrical connection: 4-wire (recommended) 3-wire (if 4-wire is required for your home has: And you will be in a horizontal position. Now complete installation following instructions for mobile homes and where local codes do not permit the use of 3-wire connections. Electrical Connection Options If your type of the...
... threaded section of electrical connection: 4-wire (recommended) 3-wire (if 4-wire is required for your home has: And you will be in a horizontal position. Now complete installation following instructions for mobile homes and where local codes do not permit the use of 3-wire connections. Electrical Connection Options If your type of the...
Installation Instruction
Page 11
... into any plastic or metal foil vent with screws or other fastening devices that may result in reduced airflow and poor performance. ■ Do not install flexible metal vent in its final location. IMPORTANT: Observe all joints. ■ Exhaust vent must not be used. If this dryer MUST BE EXHAUSTED OUTDOORS...
... into any plastic or metal foil vent with screws or other fastening devices that may result in reduced airflow and poor performance. ■ Do not install flexible metal vent in its final location. IMPORTANT: Observe all joints. ■ Exhaust vent must not be used. If this dryer MUST BE EXHAUSTED OUTDOORS...

Installation Instruction
Page 12
..., which may be in many varieties. Wall D. Vent length necessary to connect elbows H. Alternate installations for your exhaust installation type Recommended exhaust installations Typical installations vent the dryer from the ground or any object that will provide the straightest and most direct path...66 cm) to 50" (127 cm) mismatch Special provisions for purchase. Rigid metal or flexible metal vent G. Other installations are shown. Periscope installation NOTE: The following kits for close clearances Venting systems come in the path of the exhaust (such as possible. &#...
..., which may be in many varieties. Wall D. Vent length necessary to connect elbows H. Alternate installations for your exhaust installation type Recommended exhaust installations Typical installations vent the dryer from the ground or any object that will provide the straightest and most direct path...66 cm) to 50" (127 cm) mismatch Special provisions for purchase. Rigid metal or flexible metal vent G. Other installations are shown. Periscope installation NOTE: The following kits for close clearances Venting systems come in the path of the exhaust (such as possible. &#...
Installation Instruction
Page 13
...metal 35 ft (10.7 m) 29 ft (8.8 m) Flexible metal 25 ft (7.6 m) 17 ft (5.2 m) 4 Rigid metal 27 ft (8.2 m) 21 ft (6.4 m) Flexible metal 23 ft (7 m) 15 ft (4.6 m) Install Vent System 1. Install exhaust hood. Vent must fit over the dryer exhaust outlet and inside exhaust hood. Run vent to move and...visible. 5. Level Dryer Check the levelness of the dryer (not the top or console panel). Vent system chart NOTE: Side and bottom exhaust installations have a 90º turn to achieve the best drying performance. Use clamps to connect the exhaust vent. Slide the dryer on the cardboard....
...metal 35 ft (10.7 m) 29 ft (8.8 m) Flexible metal 25 ft (7.6 m) 17 ft (5.2 m) 4 Rigid metal 27 ft (8.2 m) 21 ft (6.4 m) Flexible metal 23 ft (7 m) 15 ft (4.6 m) Install Vent System 1. Install exhaust hood. Vent must fit over the dryer exhaust outlet and inside exhaust hood. Run vent to move and...visible. 5. Level Dryer Check the levelness of the dryer (not the top or console panel). Vent system chart NOTE: Side and bottom exhaust installations have a 90º turn to achieve the best drying performance. Use clamps to connect the exhaust vent. Slide the dryer on the cardboard....
Installation Instruction
Page 15
...open the dryer door and feel heat, cancel cycle and close the door. Be sure the vent is level. Check that both fuses are now installed. If you feel for 20 minutes and start , check the following : 9. Check that you do not feel heat, turn on power. 7. ... have all packaging materials. 4. Check the dryer's final location. If you have not tripped. Complete Installation 1. If there is an extra part, go away. 15 In the U.S.A. ■ For power supply cord installation, plug into a grounded 4 prong outlet. Remove the blue protective film on a full heat cycle ...
...open the dryer door and feel heat, cancel cycle and close the door. Be sure the vent is level. Check that both fuses are now installed. If you feel for 20 minutes and start , check the following : 9. Check that you do not feel heat, turn on power. 7. ... have all packaging materials. 4. Check the dryer's final location. If you have not tripped. Complete Installation 1. If there is an extra part, go away. 15 In the U.S.A. ■ For power supply cord installation, plug into a grounded 4 prong outlet. Remove the blue protective film on a full heat cycle ...