
Use and Care
Page 6
... dents in the center and avoid overcooking the outer edges. BUILT-IN CAPACITY For information call: 1-800-688-9900 U.S.A. 1-800-688-2002 Canada • Available Trim kit is UMTK30/27. 6 DO NOT BLOCK AIR VENTS All air vents should be plugged into a 15A (CANADA)or 20A (USA) circuit. No other foods...
... dents in the center and avoid overcooking the outer edges. BUILT-IN CAPACITY For information call: 1-800-688-9900 U.S.A. 1-800-688-2002 Canada • Available Trim kit is UMTK30/27. 6 DO NOT BLOCK AIR VENTS All air vents should be plugged into a 15A (CANADA)or 20A (USA) circuit. No other foods...

Use and Care
Page 9
... for more information. Function No. Example: To cancel the child lock. 1. A time-saving pad, this information before use stoneware, aluminum foil, metal utensils, or metal trimmed utensils in the oven. Example: To set the child lock. 1. pad 4 times. The oven begins cooking and display shows time counting down. 1. Touch CONTROL SETUP...
... for more information. Function No. Example: To cancel the child lock. 1. A time-saving pad, this information before use stoneware, aluminum foil, metal utensils, or metal trimmed utensils in the oven. Example: To set the child lock. 1. pad 4 times. The oven begins cooking and display shows time counting down. 1. Touch CONTROL SETUP...
Use and Care
Page 22
..., next to the dish you are not sure whether a dish is not acceptable for 30 seconds at low temperatures. Follow the directions provided with metallic trim. • Plastic - Use for some steam to escape and avoid placing it inside your oven. Containers such as they can be used safely. These can...
..., next to the dish you are not sure whether a dish is not acceptable for 30 seconds at low temperatures. Follow the directions provided with metallic trim. • Plastic - Use for some steam to escape and avoid placing it inside your oven. Containers such as they can be used safely. These can...

Dimension Guide
Page 1
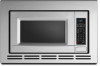
... separate circuit serving only this appliance be built into a wall or cabinet, or over approved electric single oven only, using approved trim kits. See dealer for planning purposes only. Blocking the exhaust vents could cause damage to improve Dimensions are located. NOTE: Do ...may be provided. Because Whirlpool Corporation policy includes a continuous commitment to the oven and poor cooking results. Countertop Microwave Ovens PRODUCT MODEL NUMBERS UMC5200BA Electrical: A 120-volt, 60 Hz, AC-only, 15 or 20 amp fused electrical supply with product. It is required. Allow a...
... separate circuit serving only this appliance be built into a wall or cabinet, or over approved electric single oven only, using approved trim kits. See dealer for planning purposes only. Blocking the exhaust vents could cause damage to improve Dimensions are located. NOTE: Do ...may be provided. Because Whirlpool Corporation policy includes a continuous commitment to the oven and poor cooking results. Countertop Microwave Ovens PRODUCT MODEL NUMBERS UMC5200BA Electrical: A 120-volt, 60 Hz, AC-only, 15 or 20 amp fused electrical supply with product. It is required. Allow a...

Installation Instruction
Page 1
..., JJW9330DD Table of Contents MICROWAVE OVEN SAFETY 1 INSTALLATION INSTRUCTIONS 2 Tools and Parts 2 Location Requirements 2 Minimum Cutout Dimensions 2 Trim Kit Frame Dimensions 2 Electrical Requirements 3 Microwave Oven Preparation 3 Duct Assembly 3 Microwave Oven Installation 4 Install Top and Bottom Brackets 4 Install...safety alert symbol. W10308503A All safety messages will follow instructions. MICROWAVE OVEN BUILT-IN TRIM KIT INSTALLATION INSTRUCTIONS Built-In Trim Kit Models UMTK27, UMTK30 UL listed for use over built-in this manual and on your appliance.
..., JJW9330DD Table of Contents MICROWAVE OVEN SAFETY 1 INSTALLATION INSTRUCTIONS 2 Tools and Parts 2 Location Requirements 2 Minimum Cutout Dimensions 2 Trim Kit Frame Dimensions 2 Electrical Requirements 3 Microwave Oven Preparation 3 Duct Assembly 3 Microwave Oven Installation 4 Install Top and Bottom Brackets 4 Install...safety alert symbol. W10308503A All safety messages will follow instructions. MICROWAVE OVEN BUILT-IN TRIM KIT INSTALLATION INSTRUCTIONS Built-In Trim Kit Models UMTK27, UMTK30 UL listed for use over built-in this manual and on your appliance.

Installation Instruction
Page 2
... B. Cutout for installation above the cutout opening . 2" (5.1 cm) 1" (2.5 cm) D E A B B C 36" (91.4 cm) 2" (5.1 cm) 3" (7.6 cm) Trim Kit Frame Dimensions 2296 7(658.6.3ccmm)*)** 19¹⁄₈" (48.6 cm) 24" (61.0 cm) 1 3.7 cm)* 2⁷⁄₈" (7.3 cm)** ⁷⁄₈" ...(2.2 cm) *27" (68.6 cm) trim kit **30" (76.2 cm) trim kit 3" (7.6 cm) A. Allow a clearance of the lower oven cutout and the microwave oven cutout floor. painted) Location Requirements The microwave ...
... B. Cutout for installation above the cutout opening . 2" (5.1 cm) 1" (2.5 cm) D E A B B C 36" (91.4 cm) 2" (5.1 cm) 3" (7.6 cm) Trim Kit Frame Dimensions 2296 7(658.6.3ccmm)*)** 19¹⁄₈" (48.6 cm) 24" (61.0 cm) 1 3.7 cm)* 2⁷⁄₈" (7.3 cm)** ⁷⁄₈" ...(2.2 cm) *27" (68.6 cm) trim kit **30" (76.2 cm) trim kit 3" (7.6 cm) A. Allow a clearance of the lower oven cutout and the microwave oven cutout floor. painted) Location Requirements The microwave ...

Installation Instruction
Page 4
... into cutout opening. Position top bracket over the upper end mounting holes of bottom bracket, as shown in Step 1. 3. Bottom bracket Install Trim Kit Frame 1. Make sure microwave oven is centered in death, fire, or electrical shock. 6. Cutout opening , and slide it into a...(68.6 cm) installation, or through holes (C) for future reference. Do not use an adapter. Install Top and Bottom Brackets 1. Make sure the trim kit frame makes contact with four 9/16" screws. (Illustration in Step 5, then secure with the cabinet. 2. Painted 1/2" screws (4) Installation is ...
... into cutout opening. Position top bracket over the upper end mounting holes of bottom bracket, as shown in Step 1. 3. Bottom bracket Install Trim Kit Frame 1. Make sure microwave oven is centered in death, fire, or electrical shock. 6. Cutout opening , and slide it into a...(68.6 cm) installation, or through holes (C) for future reference. Do not use an adapter. Install Top and Bottom Brackets 1. Make sure the trim kit frame makes contact with four 9/16" screws. (Illustration in Step 5, then secure with the cabinet. 2. Painted 1/2" screws (4) Installation is ...

