
Installation Instructions
Page 1
... code does approve a directional "Y" style fitting with proper venting to local codes. ! Close toilet supply valve and flush tank completely. Towel or sponge remaining water from the other toilet. Remove closet bolts from base area. Product names listed... a , I n c . 2 011 730529-100 Rev. NOTE: If replacing valve, first shut off main water supply! c. Recommended fitting type for selecting American Standard - b. INSTALLATION INSTRUCTIONS CARE AND MAINTENANCE Champion® 4 2-piece Toilets Models - 2002, 2018, 2023, 2414, 2585, 2792, 2586, 2793, 3186, 3404 Doral Classic™...
... code does approve a directional "Y" style fitting with proper venting to local codes. ! Close toilet supply valve and flush tank completely. Towel or sponge remaining water from the other toilet. Remove closet bolts from base area. Product names listed... a , I n c . 2 011 730529-100 Rev. NOTE: If replacing valve, first shut off main water supply! c. Recommended fitting type for selecting American Standard - b. INSTALLATION INSTRUCTIONS CARE AND MAINTENANCE Champion® 4 2-piece Toilets Models - 2002, 2018, 2023, 2414, 2585, 2792, 2586, 2793, 3186, 3404 Doral Classic™...
Installation Instructions
Page 4
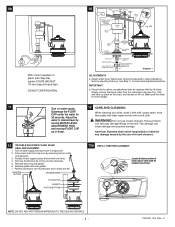
...REPLACEMENT: Locate bottom portion of in-tank cleaners. 13 TROUBLE SHOOTING FLUSH VALVE SEAL REPLACEMENT: 1. water to vent tube at location as shown. These products can cause leakage and property damage. American Standard shall not be adjusted to level indicated in tank by removing ...lift and support piston bottom with new gasket. 7. Remove piston top and gasket. 6. VALVE BODY SHANK WASHER WATER LEVEL ADJUSTMENT ROD ADJUSTABLE HEIGHT LOCK NUT CONE WASHER COUPLING NUT (HAND TIGHT ONLY) THREADED SHANK PARTS FOR WATER CONNECTION (SEE STEP 9) Diagram 1 ADJUSTMENTS a. This damage...
...REPLACEMENT: Locate bottom portion of in-tank cleaners. 13 TROUBLE SHOOTING FLUSH VALVE SEAL REPLACEMENT: 1. water to vent tube at location as shown. These products can cause leakage and property damage. American Standard shall not be adjusted to level indicated in tank by removing ...lift and support piston bottom with new gasket. 7. Remove piston top and gasket. 6. VALVE BODY SHANK WASHER WATER LEVEL ADJUSTMENT ROD ADJUSTABLE HEIGHT LOCK NUT CONE WASHER COUPLING NUT (HAND TIGHT ONLY) THREADED SHANK PARTS FOR WATER CONNECTION (SEE STEP 9) Diagram 1 ADJUSTMENTS a. This damage...
Installation Instructions
Page 5
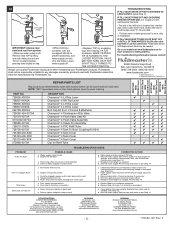
... Covers & Washers) Champion® 4 Fluidmaster 400a Valve Champion® 4 Flush Valve Seal Kit Champion® 4 Flush Valve Assembly Champion® 4 Clevis Pin Assembly Champion® 4 PVC Refill Tube Champion® 4 Tank To Bowl Coupling Kit #241 Champion® 4 Tank Cover Champion® 4 Tank Cover Champion® 4 Tank ... Readjust chain length as needed . b. In the United States: American Standard Brands P.O. Mississauga, Ontario Canada L5R 3M3 Toll Free: (800) 387-0369 www.americanstandard.ca In Mexico: American Standard B&K Mexico S. IF FILL VALVE WON'T TURN ON OR SHUT ...
... Covers & Washers) Champion® 4 Fluidmaster 400a Valve Champion® 4 Flush Valve Seal Kit Champion® 4 Flush Valve Assembly Champion® 4 Clevis Pin Assembly Champion® 4 PVC Refill Tube Champion® 4 Tank To Bowl Coupling Kit #241 Champion® 4 Tank Cover Champion® 4 Tank Cover Champion® 4 Tank ... Readjust chain length as needed . b. In the United States: American Standard Brands P.O. Mississauga, Ontario Canada L5R 3M3 Toll Free: (800) 387-0369 www.americanstandard.ca In Mexico: American Standard B&K Mexico S. IF FILL VALVE WON'T TURN ON OR SHUT ...

Valve Replacement
Page 1
... tighten the tank mounting fasteners in a alternating manner. AMERICAN STANDARD COMPANIES Champion4 Valve Replacement Instructions r Turn off and disconnect the supply line. Place the tank on it's side, remove the coupling gasket (not shown) and lock nut. Ob I • •, • Install a New Champion4 Flush valve with the vent tube positioned as shown...
... tighten the tank mounting fasteners in a alternating manner. AMERICAN STANDARD COMPANIES Champion4 Valve Replacement Instructions r Turn off and disconnect the supply line. Place the tank on it's side, remove the coupling gasket (not shown) and lock nut. Ob I • •, • Install a New Champion4 Flush valve with the vent tube positioned as shown...


