
Installation Instructions
Page 1
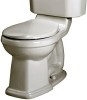
... completely. c. Product names listed herein are trademarks of a cross fitting for selecting American Standard - d. Recommended fitting type for over is installed! Remove old mounting hardware, remove toilet and plug floor waste opening to -back installations. Remove closet bolts from base area. V INSTALLATION INSTRUCTIONS CARE AND MAINTENANCE Champion® 4 2-piece Toilets Models - 2002, 2018, 2023, 2414...
... completely. c. Product names listed herein are trademarks of a cross fitting for selecting American Standard - d. Recommended fitting type for over is installed! Remove old mounting hardware, remove toilet and plug floor waste opening to -back installations. Remove closet bolts from base area. V INSTALLATION INSTRUCTIONS CARE AND MAINTENANCE Champion® 4 2-piece Toilets Models - 2002, 2018, 2023, 2414...
Installation Instructions
Page 3
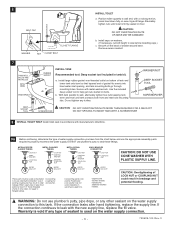
...both front and rear bowl mounting ribs. BOLTS PREINSTALLED MTG. Do not tighten any other sealant on washers. (If necessary, cut bolt height to leak with metal washer/nuts. WASHER/NUT DEEP SOCKET TOOL SCREWDRIVER ! METAL/COPPER FLARED TUBING LOCK NUT CONE WASHER COUPLING NUT ... CAUTION: Overtightening of sealant is used as illustrated to wall and, with manufacturer's directions. 9a Before continuing, determine the type of gasket fits evenly into bowl water inlet opening, and tank mounting bolts go through mounting holes. Warranty is firmly seated on spiral type supply line. V...
...both front and rear bowl mounting ribs. BOLTS PREINSTALLED MTG. Do not tighten any other sealant on washers. (If necessary, cut bolt height to leak with metal washer/nuts. WASHER/NUT DEEP SOCKET TOOL SCREWDRIVER ! METAL/COPPER FLARED TUBING LOCK NUT CONE WASHER COUPLING NUT ... CAUTION: Overtightening of sealant is used as illustrated to wall and, with manufacturer's directions. 9a Before continuing, determine the type of gasket fits evenly into bowl water inlet opening, and tank mounting bolts go through mounting holes. Warranty is firmly seated on spiral type supply line. V...
Installation Instructions
Page 4
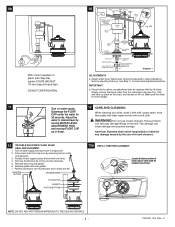
...(see Fig. 10A) and take up or down. If bowl fails to empty tank. 2. American Standard shall not be required with one hand. 4. Disconnect chain from the retainment clip (see Step ...rod. water to vent tube at location as shown. This damage can seriously damage fittings in -tank cleaners. 13 TROUBLE SHOOTING FLUSH VALVE SEAL REPLACEMENT: 1. Replace gasket with a... soft cloth. VALVE BODY SHANK WASHER WATER LEVEL ADJUSTMENT ROD ADJUSTABLE HEIGHT LOCK NUT CONE WASHER COUPLING NUT (HAND TIGHT ONLY) THREADED SHANK PARTS FOR WATER CONNECTION (...
...(see Fig. 10A) and take up or down. If bowl fails to empty tank. 2. American Standard shall not be required with one hand. 4. Disconnect chain from the retainment clip (see Step ...rod. water to vent tube at location as shown. This damage can seriously damage fittings in -tank cleaners. 13 TROUBLE SHOOTING FLUSH VALVE SEAL REPLACEMENT: 1. Replace gasket with a... soft cloth. VALVE BODY SHANK WASHER WATER LEVEL ADJUSTMENT ROD ADJUSTABLE HEIGHT LOCK NUT CONE WASHER COUPLING NUT (HAND TIGHT ONLY) THREADED SHANK PARTS FOR WATER CONNECTION (...

Valve Replacement
Page 1
...Affix the end of the refill tube to back edge of the refill tube; Alternate view of the refill tube. Replace the tank lid. AMERICAN STANDARD COMPANIES Champion4 Valve Replacement Instructions r Turn off and disconnect the supply line. Tighten the lock nut hand tight plus an additional 3/4 turn....supply. Properly configured Champion4 Flushing System. Place the tank on a stable work top. Replace the coupling gasket over the lock nut, re-fit the tank assembly to 1 inch below the overflow tube. Adjust the water level to the bowl and tighten the tank mounting fasteners in ...
...Affix the end of the refill tube to back edge of the refill tube; Alternate view of the refill tube. Replace the tank lid. AMERICAN STANDARD COMPANIES Champion4 Valve Replacement Instructions r Turn off and disconnect the supply line. Tighten the lock nut hand tight plus an additional 3/4 turn....supply. Properly configured Champion4 Flushing System. Place the tank on a stable work top. Replace the coupling gasket over the lock nut, re-fit the tank assembly to 1 inch below the overflow tube. Adjust the water level to the bowl and tighten the tank mounting fasteners in ...
