
Manual
Page 5
Contents Chapter 1: Ready, Set Up, Go 9 What's in the Box 9 Setting Up Your MacBook 15 Putting Your MacBook to Sleep or Shutting It Down Chapter 2: Life with Your MacBook 20 Basic Features of Your MacBook 22 Keyboard Features of Your MacBook 24 Ports on Your MacBook 26 Using the MacBook Battery 28 Getting Answers Chapter 3: Boost Your Memory 33 Installing Additional Memory 40 Making Sure Your MacBook Recognizes the New Memory Chapter 4: Problem, Meet Solution 42 Problems That Prevent You from Using Your MacBook 46 Using Apple Hardware Test 47 Problems with Your Internet Connection Contents 5
Contents Chapter 1: Ready, Set Up, Go 9 What's in the Box 9 Setting Up Your MacBook 15 Putting Your MacBook to Sleep or Shutting It Down Chapter 2: Life with Your MacBook 20 Basic Features of Your MacBook 22 Keyboard Features of Your MacBook 24 Ports on Your MacBook 26 Using the MacBook Battery 28 Getting Answers Chapter 3: Boost Your Memory 33 Installing Additional Memory 40 Making Sure Your MacBook Recognizes the New Memory Chapter 4: Problem, Meet Solution 42 Problems That Prevent You from Using Your MacBook 46 Using Apple Hardware Test 47 Problems with Your Internet Connection Contents 5

Manual
Page 21
...over broadband using battery power when you are away from up to music, movies, games, and multimedia files. Tap the trackpad to restart your Apple Remote and the built-in IR receiver to control Front Row and Keynote on the trackpad, or scroll with two fingers. Press and hold ...AV application. Slot-loading optical drive Your optical drive can also write to DVD discs. ® Power button Turn your MacBook on or off, or put it to the memory in iSight camera and camera indicator light Videoconference with others using iChat AV, snap pictures with Photo Booth, or capture ...
...over broadband using battery power when you are away from up to music, movies, games, and multimedia files. Tap the trackpad to restart your Apple Remote and the built-in IR receiver to control Front Row and Keynote on the trackpad, or scroll with two fingers. Press and hold ...AV application. Slot-loading optical drive Your optical drive can also write to DVD discs. ® Power button Turn your MacBook on or off, or put it to the memory in iSight camera and camera indicator light Videoconference with others using iChat AV, snap pictures with Photo Booth, or capture ...

Manual
Page 29
... To Move To Mac at www.apple.com/macosx/overview. More Information For more information about using your MacBook, see the following: To learn about Installing memory Troubleshooting your MacBook if you have a problem Finding service and support for your MacBook Using Mac OS X Moving from ...Search for "Mac OS X" in Mac Help. Open System Preferences by choosing Apple (K) > System Preferences. Or see the Apple Support website at www.apple.com/ilife. The iLife website at www.apple.com/support/macbook. Or open an iLife application and then open System Preferences and click Keyboard...
... To Move To Mac at www.apple.com/macosx/overview. More Information For more information about using your MacBook, see the following: To learn about Installing memory Troubleshooting your MacBook if you have a problem Finding service and support for your MacBook Using Mac OS X Moving from ...Search for "Mac OS X" in Mac Help. Open System Preferences by choosing Apple (K) > System Preferences. Or see the Apple Support website at www.apple.com/ilife. The iLife website at www.apple.com/support/macbook. Or open an iLife application and then open System Preferences and click Keyboard...
Manual
Page 31
3 Boost Your Memory 3 www.apple.com/store Mac Help RAM
3 Boost Your Memory 3 www.apple.com/store Mac Help RAM

Manual
Page 32
... fill both memory slots and install an identical memory module in your MacBook. Your MacBook comes with your computer for information about how to install memory and damage your computer. 32 Chapter 3 Boost Your Memory If you access... by the limited warranty on your equipment, such damage is not covered by removing the computer's battery. Consult the service and support information that you attempt to contact Apple...
... fill both memory slots and install an identical memory module in your MacBook. Your MacBook comes with your computer for information about how to install memory and damage your computer. 32 Chapter 3 Boost Your Memory If you access... by the limited warranty on your equipment, such damage is not covered by removing the computer's battery. Consult the service and support information that you attempt to contact Apple...
Manual
Page 33
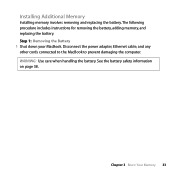
Step 1: Removing the Battery 1 Shut down your MacBook. Disconnect the power adapter, Ethernet cable, and any other cords connected to the MacBook to prevent damaging the computer. Chapter 3 Boost Your Memory 33 The following procedure includes instructions for removing the battery, adding memory, and replacing the battery. See the battery safety information on page 58. WARNING: Use care when handling the battery. Installing Additional Memory Installing memory involves removing and replacing the battery.
Step 1: Removing the Battery 1 Shut down your MacBook. Disconnect the power adapter, Ethernet cable, and any other cords connected to the MacBook to prevent damaging the computer. Chapter 3 Boost Your Memory 33 The following procedure includes instructions for removing the battery, adding memory, and replacing the battery. See the battery safety information on page 58. WARNING: Use care when handling the battery. Installing Additional Memory Installing memory involves removing and replacing the battery.
Manual
Page 34
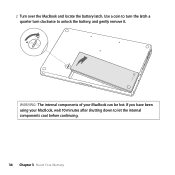
2 Turn over the MacBook and locate the battery latch. Use a coin to turn the latch a quarter turn clockwise to unlock the battery, and gently remove it. Á ¥ Á ¥ WARNING: The internal components of your MacBook, wait 10 minutes after shutting down to let the internal components cool before continuing. 34 Chapter 3 Boost Your Memory If you have been using your MacBook can be hot.
2 Turn over the MacBook and locate the battery latch. Use a coin to turn the latch a quarter turn clockwise to unlock the battery, and gently remove it. Á ¥ Á ¥ WARNING: The internal components of your MacBook, wait 10 minutes after shutting down to let the internal components cool before continuing. 34 Chapter 3 Boost Your Memory If you have been using your MacBook can be hot.
Manual
Page 35
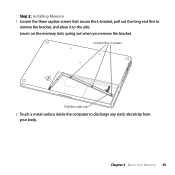
Loosen the 3 screws Á ¥ Pull this side out 2 Touch a metal surface inside the computer to the side. Chapter 3 Boost Your Memory 35 Levers on the memory slots spring out when you remove the bracket. Step 2: Installing Memory 1 Loosen the three captive screws that secure the L-bracket, pull out the long end first to remove the bracket, and place it to discharge any static electricity from your body.
Loosen the 3 screws Á ¥ Pull this side out 2 Touch a metal surface inside the computer to the side. Chapter 3 Boost Your Memory 35 Levers on the memory slots spring out when you remove the bracket. Step 2: Installing Memory 1 Loosen the three captive screws that secure the L-bracket, pull out the long end first to remove the bracket, and place it to discharge any static electricity from your body.
Manual
Page 36
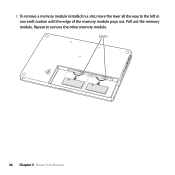
Levers Á ¥ 36 Chapter 3 Boost Your Memory 3 To remove a memory module installed in one swift motion until the edge of the memory module pops out. Repeat to the left in a slot, move the lever all the way to remove the other memory module. Pull out the memory module.
Levers Á ¥ 36 Chapter 3 Boost Your Memory 3 To remove a memory module installed in one swift motion until the edge of the memory module pops out. Repeat to the left in a slot, move the lever all the way to remove the other memory module. Pull out the memory module.
Manual
Page 37
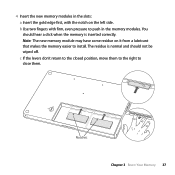
c If the levers don't return to the closed position, move them . Á ¥ Notches Chapter 3 Boost Your Memory 37 Note: The new memory module may have some residue on the left side. You should not be wiped off. The residue is normal and should hear a click when the memory is inserted correctly. b Use two fingers with firm, even pressure to push in the slots: a Insert the gold edge first, with the notch on it from a lubricant that makes the memory easier to close them to the right to install. 4 Insert the new memory modules in the memory modules.
c If the levers don't return to the closed position, move them . Á ¥ Notches Chapter 3 Boost Your Memory 37 Note: The new memory module may have some residue on the left side. You should not be wiped off. The residue is normal and should hear a click when the memory is inserted correctly. b Use two fingers with firm, even pressure to push in the slots: a Insert the gold edge first, with the notch on it from a lubricant that makes the memory easier to close them to the right to install. 4 Insert the new memory modules in the memory modules.
Manual
Page 38
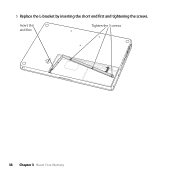
Insert this end first Tighten the 3 screws Á ¥ 38 Chapter 3 Boost Your Memory 5 Replace the L-bracket by inserting the short end first and tightening the screws.
Insert this end first Tighten the 3 screws Á ¥ 38 Chapter 3 Boost Your Memory 5 Replace the L-bracket by inserting the short end first and tightening the screws.
Manual
Page 39
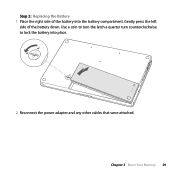
Use a coin to turn the latch a quarter turn counterclockwise to lock the battery into the battery compartment. Chapter 3 Boost Your Memory 39 Step 3: Replacing the Battery 1 Place the right side of the battery down. Gently press the left side of the battery into place. Á ¥ Á ¥ 2 Reconnect the power adapter and any other cables that were attached.
Use a coin to turn the latch a quarter turn counterclockwise to lock the battery into the battery compartment. Chapter 3 Boost Your Memory 39 Step 3: Replacing the Battery 1 Place the right side of the battery down. Gently press the left side of the battery into place. Á ¥ Á ¥ 2 Reconnect the power adapter and any other cables that were attached.
Manual
Page 40
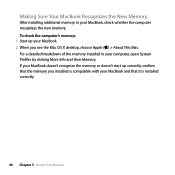
... Info and then Memory. To check the computer's memory: 1 Start up correctly, confirm that it is compatible with your MacBook. 2 When you installed is installed correctly. 40 Chapter 3 Boost Your Memory If your MacBook doesn't recognize the memory or doesn't start up your MacBook and that the memory you see the Mac OS X desktop, choose Apple () > About This...
... Info and then Memory. To check the computer's memory: 1 Start up correctly, confirm that it is compatible with your MacBook. 2 When you installed is installed correctly. 40 Chapter 3 Boost Your Memory If your MacBook doesn't recognize the memory or doesn't start up your MacBook and that the memory you see the Mac OS X desktop, choose Apple () > About This...
Manual
Page 42
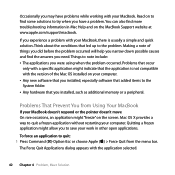
... to save your work in Mac Help and on to find some solutions to quit: 1 Press Command (x)-Option-Esc or choose Apple () > Force Quit from Using Your MacBook If your computer. To force an application to try when you have problems while working with your... MacBook, there is not compatible with the application selected. 42 Chapter 4 Problem, Meet Solution Think about the conditions that you installed, such as additional memory or a peripheral. The Force Quit Applications dialog appears with the version...
... to save your work in Mac Help and on to find some solutions to quit: 1 Press Command (x)-Option-Esc or choose Apple () > Force Quit from Using Your MacBook If your computer. To force an application to try when you have problems while working with your... MacBook, there is not compatible with the application selected. 42 Chapter 4 Problem, Meet Solution Think about the conditions that you installed, such as additional memory or a peripheral. The Force Quit Applications dialog appears with the version...
Manual
Page 45
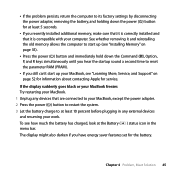
..., removing the battery, and holding down the power (®) button for at least 10 percent before plugging in any devices that are connected to your MacBook, except the power adapter. 2 Press the power (®) button to restart the system. 3 Let the battery charge to at least 5 seconds. Â If you recently... (®) button and immediately hold down the Command (x), Option, P, and R keys simultaneously until you hear the startup sound a second time to start up (see "Installing Memory" on page 52 for information about contacting Apple for the battery.
..., removing the battery, and holding down the power (®) button for at least 10 percent before plugging in any devices that are connected to your MacBook, except the power adapter. 2 Press the power (®) button to restart the system. 3 Let the battery charge to at least 5 seconds. Â If you recently... (®) button and immediately hold down the Command (x), Option, P, and R keys simultaneously until you hear the startup sound a second time to start up (see "Installing Memory" on page 52 for information about contacting Apple for the battery.
Manual
Page 46
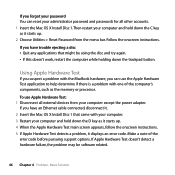
...Mac OS X Install Disc 1 that might be software related. 46 Chapter 4 Problem, Meet Solution Using Apple Hardware Test If you suspect a problem with the MacBook hardware, you can reset your administrator password and passwords for all external devices from the menu bar. If... you forgot your password You can use Apple Hardware Test: 1 Disconnect all other accounts. 1 Insert the Mac OS X Install Disc 1. Then restart your computer and hold down the C key as the memory...
...Mac OS X Install Disc 1 that might be software related. 46 Chapter 4 Problem, Meet Solution Using Apple Hardware Test If you suspect a problem with the MacBook hardware, you can reset your administrator password and passwords for all external devices from the menu bar. If... you forgot your password You can use Apple Hardware Test: 1 Disconnect all other accounts. 1 Insert the Mac OS X Install Disc 1. Then restart your computer and hold down the C key as the memory...

Manual
Page 52
... of hardware repair warranty coverage at an Apple Store retail location or an Apple-authorized repair center, such as instructions and troubleshooting information, in Mac Help. Choose Help > Mac Help. Learning More, Service, and Support Your MacBook does not have any user-serviceable parts, except the memory. If you what hardware and software is...
... of hardware repair warranty coverage at an Apple Store retail location or an Apple-authorized repair center, such as instructions and troubleshooting information, in Mac Help. Choose Help > Mac Help. Learning More, Service, and Support Your MacBook does not have any user-serviceable parts, except the memory. If you what hardware and software is...
Manual
Page 57
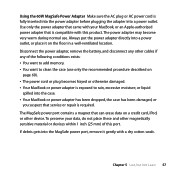
To preserve your MacBook, or an Apple-authorized power adapter that can erase data on the floor in a well-ventilated location. If debris gets into the case. Â Your MacBook or power adapter has been dropped, the case has been damaged, or you suspect that service or repair is required. ... cables if any other magnetically sensitive material or devices within 1 inch (25 mm) of the following conditions exists: Â You want to add memory. Â You want to clean the case (use . The MagSafe power port contains a magnet that is fully inserted into the power adapter before...
To preserve your MacBook, or an Apple-authorized power adapter that can erase data on the floor in a well-ventilated location. If debris gets into the case. Â Your MacBook or power adapter has been dropped, the case has been damaged, or you suspect that service or repair is required. ... cables if any other magnetically sensitive material or devices within 1 inch (25 mm) of the following conditions exists: Â You want to add memory. Â You want to clean the case (use . The MagSafe power port contains a magnet that is fully inserted into the power adapter before...
Manual
Page 72
... camera carrying your computer 59 changing the desktop 15 password 46 System Preferences 15 checking memory 40 cleaning the display 60 your computer 60 computer disposal 68 freezes 43 putting to sleep 15 shutting down 16 turning on 12 won't turn on 44 connecting to a network 11 controls brightness 23... 60 display adjusting settings 23 cleaning 60 external 25 goes black 45 disposing of your display 23 AirPort Extreme troubleshooting 49 AppleCare 52 Apple Hardware Test 46 Apple Remote 21, 30 application freeze 42 applications Front Row 21, 30 iChat AV 21 iLife 29 Keynote 21 audio line in port...
... camera carrying your computer 59 changing the desktop 15 password 46 System Preferences 15 checking memory 40 cleaning the display 60 your computer 60 computer disposal 68 freezes 43 putting to sleep 15 shutting down 16 turning on 12 won't turn on 44 connecting to a network 11 controls brightness 23... 60 display adjusting settings 23 cleaning 60 external 25 goes black 45 disposing of your display 23 AirPort Extreme troubleshooting 49 AppleCare 52 Apple Hardware Test 46 Apple Remote 21, 30 application freeze 42 applications Front Row 21, 30 iChat AV 21 iLife 29 Keynote 21 audio line in port...

Manual
Page 73
... H hand positions 61 headphone port 25 Help, finding answers 28 I iChat AV application 21 iLife applications 29 infrared receiver (IR) 21 installation instructions memory 33, 35 overview 8 Internet, connecting 11 iSight video camera 21 K keyboard ergonomics 61 features 22 Keynote application 21 keys function 23 Media Eject 23...Num Lock key 23 O online resources 52 optical drive about 21 supported disc sizes 60 P password, resetting 46 plug, AC 10 ports on MacBook 25 power adapter plugging in 57 port 25 using 10 power button 12, 21 problems computer freezes 43 computer won't turn on 44 display ...
... H hand positions 61 headphone port 25 Help, finding answers 28 I iChat AV application 21 iLife applications 29 infrared receiver (IR) 21 installation instructions memory 33, 35 overview 8 Internet, connecting 11 iSight video camera 21 K keyboard ergonomics 61 features 22 Keynote application 21 keys function 23 Media Eject 23...Num Lock key 23 O online resources 52 optical drive about 21 supported disc sizes 60 P password, resetting 46 plug, AC 10 ports on MacBook 25 power adapter plugging in 57 port 25 using 10 power button 12, 21 problems computer freezes 43 computer won't turn on 44 display ...