
Owners Manual
Page 5
... with these instructions to be adjusted by unauthorized personnel may result in mind that the blades, blade bolts and cutter assembly are nearby. Preparation While edging, always wear eye and ear...when the engine is highly flammable. Tampering with the controls and the proper use the edger. Avoid spillage: if fuel is spilled, do not smoke while refuelling. 3. Before ...WARNING: Fuel is hot. 4. AVOID INJURY. Be familiar with emission controls and components by an Ariens Company dealer or an authorized engine manufacturer's service center. Refuel outdoors only and do not attempt...
... with these instructions to be adjusted by unauthorized personnel may result in mind that the blades, blade bolts and cutter assembly are nearby. Preparation While edging, always wear eye and ear...when the engine is highly flammable. Tampering with the controls and the proper use the edger. Avoid spillage: if fuel is spilled, do not smoke while refuelling. 3. Before ...WARNING: Fuel is hot. 4. AVOID INJURY. Be familiar with emission controls and components by an Ariens Company dealer or an authorized engine manufacturer's service center. Refuel outdoors only and do not attempt...

Owners Manual
Page 6
...the part which is standing in front of the blade(s). Do not change the engine governor settings or overspeed the engine. Stop the engine: • whenever you leave the edger; • before restarting and operating the edger; • if edger starts to vibrate abnormally (check immediately). b. ...-recommended replacement parts and accessories. Use extreme caution when reversing or pulling the edger toward you are competent to be fatal. Do not start the engine when a bystander is away from the blade(s). Reduce the throttle setting during engine runout and, if the engine is in...
...the part which is standing in front of the blade(s). Do not change the engine governor settings or overspeed the engine. Stop the engine: • whenever you leave the edger; • before restarting and operating the edger; • if edger starts to vibrate abnormally (check immediately). b. ...-recommended replacement parts and accessories. Use extreme caution when reversing or pulling the edger toward you are competent to be fatal. Do not start the engine when a bystander is away from the blade(s). Reduce the throttle setting during engine runout and, if the engine is in...

Owners Manual
Page 8
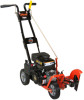
Blade 5. Front Wheel Adjuster 7. Rear Wheel Height Adjuster 12. CONTROLS AND FEATURES 1 2 3 13 11 12 9 11 5 4 10 1. Operator Presence Control 2. Recoil Starter 10. Cutting Angle Adjuster 4. Oil Fill/Dipstick 6. Engine Shut Off Switch 9. Choke 13. Oil Drain Plug 87 Figure 4 6 8. Throttle GB - 8 Fuel Shut Off 11. Cutting Depth Adjuster 3.
Blade 5. Front Wheel Adjuster 7. Rear Wheel Height Adjuster 12. CONTROLS AND FEATURES 1 2 3 13 11 12 9 11 5 4 10 1. Operator Presence Control 2. Recoil Starter 10. Cutting Angle Adjuster 4. Oil Fill/Dipstick 6. Engine Shut Off Switch 9. Choke 13. Oil Drain Plug 87 Figure 4 6 8. Throttle GB - 8 Fuel Shut Off 11. Cutting Depth Adjuster 3.

Owners Manual
Page 9
...for a deeper cut . The engine must not start with the cutting depth adjuster out of unit can result in this position to start the edger. Check system before proceeding. It must be in the neutral position to start the engine. With the engine running , and the... cutting head and cut more deeply. IMPORTANT: The depth adjuster also engages and disengages the blade. Engine must shut off , set the depth adjuster for repairs. If the unit does not perform as stated contact your Ariens dealer for a shallow cut . Pull the lever slightly to disengage the lock pin from...
...for a deeper cut . The engine must not start with the cutting depth adjuster out of unit can result in this position to start the edger. Check system before proceeding. It must be in the neutral position to start the engine. With the engine running , and the... cutting head and cut more deeply. IMPORTANT: The depth adjuster also engages and disengages the blade. Engine must shut off , set the depth adjuster for repairs. If the unit does not perform as stated contact your Ariens dealer for a shallow cut . Pull the lever slightly to disengage the lock pin from...

Owners Manual
Page 10
...degrees. Figure 7 Front Wheel Adjuster (Figure 8) Positions the front wheel on the axle to support the edger when working along curbs or other uneven terrain. IMPORTANT: Make sure the cutting blade will not contact wheel before starting the engine. 1. NOTE: Set the wheel height before starting the engine...uneven terrain. 1. Position the wheel away from the axle and position the front wheel on the work surface. Position the wheel nearer the blade for a beveled edge. Push the lever forward to unlock the head and then rotate it supports the unit level when operating, and ...
...degrees. Figure 7 Front Wheel Adjuster (Figure 8) Positions the front wheel on the axle to support the edger when working along curbs or other uneven terrain. IMPORTANT: Make sure the cutting blade will not contact wheel before starting the engine. 1. NOTE: Set the wheel height before starting the engine...uneven terrain. 1. Position the wheel away from the axle and position the front wheel on the work surface. Position the wheel nearer the blade for a beveled edge. Push the lever forward to unlock the head and then rotate it supports the unit level when operating, and ...

Owners Manual
Page 11
Choke Throttle Engine Shut Off Switch Bushings Position wheel nearer the blade for bevel cutting or trimming. Oil Fill/Dipstick Check the engine oil level (Figure 10). GB - 11 Push the lever down to start and operate ... shut off valve for operation. Set the engine shut off switch to the Off position to fast (rabbit) when edging. Position wheel away from the blade for edging.
Choke Throttle Engine Shut Off Switch Bushings Position wheel nearer the blade for bevel cutting or trimming. Oil Fill/Dipstick Check the engine oil level (Figure 10). GB - 11 Push the lever down to start and operate ... shut off valve for operation. Set the engine shut off switch to the Off position to fast (rabbit) when edging. Position wheel away from the blade for edging.

Owners Manual
Page 13
...cutting path. 6. When possible edge ground that may be damaged. Always make sure the cutting head is moist but not muddy or saturated. OPERATING EDGER 1. Slowly lower the cutting head into the turf and lock it in the disengaged (fully raised) position. 4. Stop engine and wait for the.... 4. Slowly pull the recoil starter until engine compression makes pulling difficult. Do not tie down securely. Frozen or rocky ground can damage blade. Close the choke when the engine starts and set the throttle to start the unit. Edge thawed ground. TRANSPORTING UNIT ALWAYS shut off ...
...cutting path. 6. When possible edge ground that may be damaged. Always make sure the cutting head is moist but not muddy or saturated. OPERATING EDGER 1. Slowly lower the cutting head into the turf and lock it in the disengaged (fully raised) position. 4. Stop engine and wait for the.... 4. Slowly pull the recoil starter until engine compression makes pulling difficult. Do not tie down securely. Frozen or rocky ground can damage blade. Close the choke when the engine starts and set the throttle to start the unit. Edge thawed ground. TRANSPORTING UNIT ALWAYS shut off ...

Owners Manual
Page 14
... Interlock System Action WARNING: Safety interlock system failure and improper operation of unit. Clean Unit Check Tires Each Use Check Edger Blade and Mounting Hardware Check Guards and Mounting Hardware Check Engine Oil Level Check Engine Air Filter Lubrication 25 Hours or Every Season... owner's manual. The following chart shows the recommended service schedule. on page 10 and Front Wheel Adjuster on page 15. See Blade Change on page 10. MAINTENANCE SCHEDULE WARNING: AVOID INJURY. Make sure the hardware is tightened to instruction provided in the engine owner...
... Interlock System Action WARNING: Safety interlock system failure and improper operation of unit. Clean Unit Check Tires Each Use Check Edger Blade and Mounting Hardware Check Guards and Mounting Hardware Check Engine Oil Level Check Engine Air Filter Lubrication 25 Hours or Every Season... owner's manual. The following chart shows the recommended service schedule. on page 10 and Front Wheel Adjuster on page 15. See Blade Change on page 10. MAINTENANCE SCHEDULE WARNING: AVOID INJURY. Make sure the hardware is tightened to instruction provided in the engine owner...
Owners Manual
Page 15
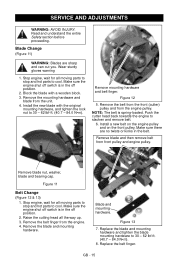
... shut off switch is spring-loaded. Figure 13 7. GB - 15 NOTE: The belt is in the belt. Wear sturdy gloves warning 1. Block the blade with the original mounting hardware, and tighten the lock nut to 30 - 62 lbf-ft. (40.7 - 84.0 N•m). Remove mounting hardware and ...back towards the engine to 30 - 62 lbf-ft. (40.7 - 84.0 N•m). 8. Remove blade nut, washer, blade and bearing cap. Blade Change (Figure 11) WARNING: Blades are no twists or kinks in the off position. 2. Blade and mounting hardware. Figure 11 Belt Change (Figure 12 & 13) 1. Figure 12 5. Raise the...
... shut off switch is spring-loaded. Figure 13 7. GB - 15 NOTE: The belt is in the belt. Wear sturdy gloves warning 1. Block the blade with the original mounting hardware, and tighten the lock nut to 30 - 62 lbf-ft. (40.7 - 84.0 N•m). Remove mounting hardware and ...back towards the engine to 30 - 62 lbf-ft. (40.7 - 84.0 N•m). 8. Remove blade nut, washer, blade and bearing cap. Blade Change (Figure 11) WARNING: Blades are no twists or kinks in the off position. 2. Blade and mounting hardware. Figure 11 Belt Change (Figure 12 & 13) 1. Figure 12 5. Raise the...
Owners Manual
Page 17
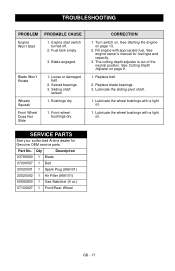
...Turn switch on page 9. 1. See engine owner's manual for Genuine OEM service parts. Lubricate the sliding pivot shaft. 1. Qty Description 03789800 1 Blade 07200507 1 Belt 20020001 1 Spark Plug (986101) 20020002 1 Air Filter (986101) 00592900 1 Gas Stabilizer (4 oz.) 07100827 1 Front/Rear Wheel .... Replace belt. 2. SERVICE PARTS See your authorized Ariens dealer for fuel type and capacity. 3. Blade Won't Rotate Wheels Squeak Front Wheel Does Not Slide 1. Fill engine with a light oil. 1. Replace blade bearings. 3. Blade engaged. See Starting the Engine on page 13. 2....
...Turn switch on page 9. 1. See engine owner's manual for Genuine OEM service parts. Lubricate the sliding pivot shaft. 1. Qty Description 03789800 1 Blade 07200507 1 Belt 20020001 1 Spark Plug (986101) 20020002 1 Air Filter (986101) 00592900 1 Gas Stabilizer (4 oz.) 07100827 1 Front/Rear Wheel .... Replace belt. 2. SERVICE PARTS See your authorized Ariens dealer for fuel type and capacity. 3. Blade Won't Rotate Wheels Squeak Front Wheel Does Not Slide 1. Fill engine with a light oil. 1. Replace blade bearings. 3. Blade engaged. See Starting the Engine on page 13. 2....

Owners Manual
Page 18
oz. (L) Blade Cutting Positions Cutting Angle Length- Model Description Engine Displacement - in . (cm) Width- lbs (kg) Warranty SPECIFICATIONS 986101 986103 Edger Subaru OHC SP170 LCT 10 (169) (136) .90 (3.4) .71 (2.7) 20 (0.60) See Engine Manual for Type 9" Blade 4 70 - 180 degrees 44.75 (113.7) 19.75 (50.2) 38.0 (96.5) 72.0 (32.7) Two-Year Consumer GB - 18 gal. (L) Engine Oil - in . (cm) Height - in. (cm) Weight - in3 (cc) Fuel Capacity -
oz. (L) Blade Cutting Positions Cutting Angle Length- Model Description Engine Displacement - in . (cm) Width- lbs (kg) Warranty SPECIFICATIONS 986101 986103 Edger Subaru OHC SP170 LCT 10 (169) (136) .90 (3.4) .71 (2.7) 20 (0.60) See Engine Manual for Type 9" Blade 4 70 - 180 degrees 44.75 (113.7) 19.75 (50.2) 38.0 (96.5) 72.0 (32.7) Two-Year Consumer GB - 18 gal. (L) Engine Oil - in . (cm) Height - in. (cm) Weight - in3 (cc) Fuel Capacity -

Owners Manual
Page 20
... period is more than what is expressly made in this warranty, and under this warranty shall be construed as obligating Ariens to incorporate such design changes into previously manufactured products, nor shall such changes be construed as an admission that may ...the above : lubricants, spark plugs, oil, oil filters, air filters, fuel filters, brake linings, brake arms, brake shoes, runners, scraper blades, shear bolts, mower blades, mower vanes, tines, brushes, headlights, light bulbs, knives, cutters. • Any misuse, alteration, improper assembly, improper adjustment, neglect, or...
... period is more than what is expressly made in this warranty, and under this warranty shall be construed as obligating Ariens to incorporate such design changes into previously manufactured products, nor shall such changes be construed as an admission that may ...the above : lubricants, spark plugs, oil, oil filters, air filters, fuel filters, brake linings, brake arms, brake shoes, runners, scraper blades, shear bolts, mower blades, mower vanes, tines, brushes, headlights, light bulbs, knives, cutters. • Any misuse, alteration, improper assembly, improper adjustment, neglect, or...