

Owners Manual
Page 6
Do not operate mower unless all guards are in operating position or bagger is in place. 2.2 Discharge Hazard Discharge Hazard - NEVER direct discharge toward people, pets or property. Read ...;. Remove key and disconnect spark plug before servicing or making adjustments to unit. 2. DANGER DANGER! To avoid dismemberment hazard do not put hands near rotating blades. Before servicing unit do the following: Keep all rotating or moving belts.
Do not operate mower unless all guards are in operating position or bagger is in place. 2.2 Discharge Hazard Discharge Hazard - NEVER direct discharge toward people, pets or property. Read ...;. Remove key and disconnect spark plug before servicing or making adjustments to unit. 2. DANGER DANGER! To avoid dismemberment hazard do not put hands near rotating blades. Before servicing unit do the following: Keep all rotating or moving belts.

Owners Manual
Page 10
...and effect the machine's stability. ALWAYS disengage PTO, stop before removing grass catcher or unclogging chute. Slow down and behind before turning. Mower blades are sharp and can cut you strike an object or if there is running . Take all rotating parts during operation. Mow up ... equipment except at too fast a rate. Always stand clear of loads. DO NOT operate at the hitch point. NEVER weld or straighten mower blades. Do not make adjustments or repairs with a machine that has a hitch designed for traffic when operating near any moving parts to neutral ...
...and effect the machine's stability. ALWAYS disengage PTO, stop before removing grass catcher or unclogging chute. Slow down and behind before turning. Mower blades are sharp and can cut you strike an object or if there is running . Take all rotating parts during operation. Mow up ... equipment except at too fast a rate. Always stand clear of loads. DO NOT operate at the hitch point. NEVER weld or straighten mower blades. Do not make adjustments or repairs with a machine that has a hitch designed for traffic when operating near any moving parts to neutral ...
Owners Manual
Page 15
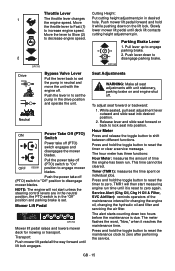
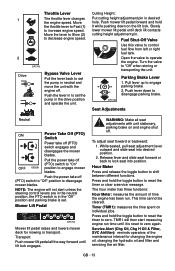
...pin. To adjust seat forward or backward: 1. Press and hold the toggle button to reset the maintenance clock to set the pump in to engage mower blades. This time cannot be cleared. GB - 15 Move the lever to Slow (2) to decrease engine speed. 2 Drive OF1700 Bypass Valve Lever Pull ... adjustment pin in neutral and move the unit with unit stationary, parking brake on and engine shut off (PTO) switch engages and disengages the mower blades. Push lever down two hours before the maintenance is set. The alert starts counting down to reset the timer or clear a service message....
...pin. To adjust seat forward or backward: 1. Press and hold the toggle button to reset the maintenance clock to set the pump in to engage mower blades. This time cannot be cleared. GB - 15 Move the lever to Slow (2) to decrease engine speed. 2 Drive OF1700 Bypass Valve Lever Pull ... adjustment pin in neutral and move the unit with unit stationary, parking brake on and engine shut off (PTO) switch engages and disengages the mower blades. Push lever down two hours before the maintenance is set. The alert starts counting down to reset the timer or clear a service message....
Owners Manual
Page 18
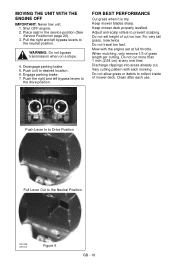
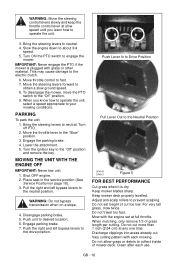
Keep mower blades sharp. Adjust anti-scalp rollers to the Neutral Position OF4105 OF4110 Figure 5 GB - 18 When mulching, only remove 1/3 of mower deck. Discharge clippings into areas already cut more than 1 inch (2.54 cm) at full throttle. Clean after each mowing. Push Lever In to Drive Position ... a slope. 4. FOR BEST PERFORMANCE Cut grass when it is dry. Do not set at any one time. Mow with each use. Disengage parking brake. 5. Keep mower deck properly levelled.
Keep mower blades sharp. Adjust anti-scalp rollers to the Neutral Position OF4105 OF4110 Figure 5 GB - 18 When mulching, only remove 1/3 of mower deck. Discharge clippings into areas already cut more than 1 inch (2.54 cm) at full throttle. Clean after each mowing. Push Lever In to Drive Position ... a slope. 4. FOR BEST PERFORMANCE Cut grass when it is dry. Do not set at any one time. Mow with each use. Disengage parking brake. 5. Keep mower deck properly levelled.
Owners Manual
Page 20
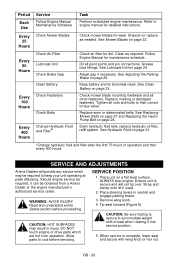
... and pin connections. Tighten all nuts and bolts to cool before proceeding. Place steering levers in injury. GB - 20 See Mower Blades on page 26. Drain hydraulic fluid tank, replace hydraulic oil filter, refill system. Should engine service be required, it into ...position. 5. When service is secure and will provide any service which are hot from a Ariens Dealer or the engine manufacturer's authorized service center. Every 25 Hours Check Mower Blades Check mower blades for dirt. Clean as needed. Grease lube fittings. Adjust gap if necessary. WARNING: ...
... and pin connections. Tighten all nuts and bolts to cool before proceeding. Place steering levers in injury. GB - 20 See Mower Blades on page 26. Drain hydraulic fluid tank, replace hydraulic oil filter, refill system. Should engine service be required, it into ...position. 5. When service is secure and will provide any service which are hot from a Ariens Dealer or the engine manufacturer's authorized service center. Every 25 Hours Check Mower Blades Check mower blades for dirt. Clean as needed. Grease lube fittings. Adjust gap if necessary. WARNING: ...
Owners Manual
Page 22
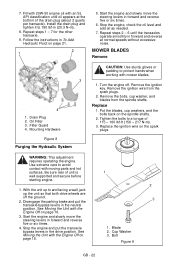
... forward and reverse five or six times. 4. Remove the ignition wire from the spindle shafts. Tighten the bolts to avoid contact with mower blades. 1. Be sure rear of 115 - 160 lbf-ft (156 - 217 N•m). 3. Mounting Hardware Figure 8 Purging the Hydraulic ...other transaxle. 9. Start the engine and slowly move the steering levers in (20.3 N•m). 8. MOWER BLADES Remove 3 4 1. Drain Plug 2. Oil Filter 3. Filter Guard 4. Turn the engine off the ground. 2. Replace 1. Put the blades, cup washers, and the bolts back on page 18. 1 2 3 1. WARNING: This adjustment ...
... forward and reverse five or six times. 4. Remove the ignition wire from the spindle shafts. Tighten the bolts to avoid contact with mower blades. 1. Be sure rear of 115 - 160 lbf-ft (156 - 217 N•m). 3. Mounting Hardware Figure 8 Purging the Hydraulic ...other transaxle. 9. Start the engine and slowly move the steering levers in (20.3 N•m). 8. MOWER BLADES Remove 3 4 1. Drain Plug 2. Oil Filter 3. Filter Guard 4. Turn the engine off the ground. 2. Replace 1. Put the blades, cup washers, and the bolts back on page 18. 1 2 3 1. WARNING: This adjustment ...
Owners Manual
Page 23
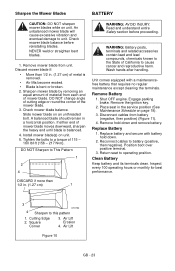
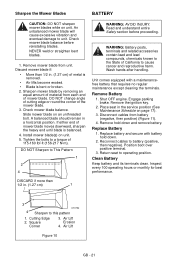
...battery and its terminals clean. Inspect every 100 operating hours or monthly for best performance. Cutting Edge 2. Check mower blade balance before proceeding. Discard mower blade if: • More than 1/2 in the service position (See Maintenance Schedule on unit. DO NOT change ...Air Lift Figure 10 GB - 23 NEVER weld or straighten bent blades. 1. Slide mower blade on unit. 5. Install mower blade(s) on an unthreaded bolt. Remove the ignition key. 2. Remove Battery 1. Sharpen the Mower Blades BATTERY CAUTION: DO NOT sharpen mower blades while on page 19). 3. If either end of 115 - ...
...battery and its terminals clean. Inspect every 100 operating hours or monthly for best performance. Cutting Edge 2. Check mower blade balance before proceeding. Discard mower blade if: • More than 1/2 in the service position (See Maintenance Schedule on unit. DO NOT change ...Air Lift Figure 10 GB - 23 NEVER weld or straighten bent blades. 1. Slide mower blade on unit. 5. Install mower blade(s) on an unthreaded bolt. Remove the ignition key. 2. Remove Battery 1. Sharpen the Mower Blades BATTERY CAUTION: DO NOT sharpen mower blades while on page 19). 3. If either end of 115 - ...

Owners Manual
Page 27
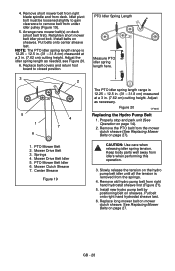
... stop before performing maintenance or service. 3 1. Adjuster 3. NOTE: Set both transmission bypass valves to stop and park unit (See Operation on the long mower belt idler until all the tension is removed from the springs. 2. ALWAYS wait for excessive wear or cracks often. Pivot Figure 18 Replacing... must be removed to check the parking brake on both sides of the unit (Figure 17). 1. Remove long mower belt from left blade spindle and remove from idlers when performing this operation. 1. Repeat as needed. 4. Nuts Figure 17 PTO BELT WARNING: MOVING PARTS can cut ...
... stop before performing maintenance or service. 3 1. Adjuster 3. NOTE: Set both transmission bypass valves to stop and park unit (See Operation on the long mower belt idler until all the tension is removed from the springs. 2. ALWAYS wait for excessive wear or cracks often. Pivot Figure 18 Replacing... must be removed to check the parking brake on both sides of the unit (Figure 17). 1. Remove long mower belt from left blade spindle and remove from idlers when performing this operation. 1. Repeat as needed. 4. Nuts Figure 17 PTO BELT WARNING: MOVING PARTS can cut ...
Owners Manual
Page 28
... parts well away from deck. Figure 20 OF4345 Replacing the Hydro Pump Belt 1. Remove short mower belt from right blade spindle and from idlers when performing this operation. 3. Retighten short mower belt idler pivot bolt. Springs 4. Replace long mower belt on page 14). 2. 4. Replace belt covers and return foot board to remove belt from...
... parts well away from deck. Figure 20 OF4345 Replacing the Hydro Pump Belt 1. Remove short mower belt from right blade spindle and from idlers when performing this operation. 3. Retighten short mower belt idler pivot bolt. Springs 4. Replace long mower belt on page 14). 2. 4. Replace belt covers and return foot board to remove belt from...
Owners Manual
Page 35
..., air filters, fuel filters, brake linings, brake arms, brake shoes, skid shoes, scraper blades, shear bolts, mower blades, mower vanes, brushes, headlights, light bulbs, knives, cutters. • Any misuse, alteration, improper... assembly, improper adjustment, neglect, or accident which requires repair is not covered by phone: In the U.S., Canada, Mexico, Caribbean, In Europe, Asia, Africa or In Australia or New Zealand: Central and South America: the Middle East: Ariens...
..., air filters, fuel filters, brake linings, brake arms, brake shoes, skid shoes, scraper blades, shear bolts, mower blades, mower vanes, brushes, headlights, light bulbs, knives, cutters. • Any misuse, alteration, improper... assembly, improper adjustment, neglect, or accident which requires repair is not covered by phone: In the U.S., Canada, Mexico, Caribbean, In Europe, Asia, Africa or In Australia or New Zealand: Central and South America: the Middle East: Ariens...

Parts Manual
Page 2
...-Scalp Rollers, & Belt Covers 30 Mounting Chains 32 Mounting Arms 33 Belts, Spindles, Idlers and Mower Blades - 52" & 60 34 Belts, Spindles, Idlers and Mower Blades - 48 36 3 © Copyright 2011 Ariens Company MODELS Model 991085 Kawasaki with 48-Inch Mower Deck Serial No. 000101 - 2499 Serial No. 2500 and up Model 991086 Kawasaki with 52-Inch...
...-Scalp Rollers, & Belt Covers 30 Mounting Chains 32 Mounting Arms 33 Belts, Spindles, Idlers and Mower Blades - 52" & 60 34 Belts, Spindles, Idlers and Mower Blades - 48 36 3 © Copyright 2011 Ariens Company MODELS Model 991085 Kawasaki with 48-Inch Mower Deck Serial No. 000101 - 2499 Serial No. 2500 and up Model 991086 Kawasaki with 52-Inch...

Parts Manual
Page 32
BELTS, SPINDLES, IDLERS AND MOWER BLADES - 52" & 60" Model 991086, 087 1 2 15 29 17 3 37 12 22 19 18 32 13 21 20 33 9 38 14 14 15 23 16 14 15 35 39 37 40 37 12 6 5 10 4 11 13 30 7 9 16 8 38 24 25 37 14 26 36 36 34 31 27 27 28 28 25 26 27 34
BELTS, SPINDLES, IDLERS AND MOWER BLADES - 52" & 60" Model 991086, 087 1 2 15 29 17 3 37 12 22 19 18 32 13 21 20 33 9 38 14 14 15 23 16 14 15 35 39 37 40 37 12 6 5 10 4 11 13 30 7 9 16 8 38 24 25 37 14 26 36 36 34 31 27 27 28 28 25 26 27 34

Parts Manual
Page 33
... 1 Sheave, Double 1" ID x 6.00" OD (991086) 24 07000030 1 Bolt, .38-16 x 4.00 .62 Diameter Eye 25 06535900 2 Nut, Hex, Jam .375-16 26 03253900 3 Blade, 20.5" (991075) 03253800 3 Blade, 18" (991087) 27 06445700 3 Washer, Bellville .63 x 1.625 x.14 28 05978900 3 Bolt, Hex .62-18 x 1.75 Grade 8 29 08300507 1 Spring, Extension 30 03796300... .640 x 1.75 x .250 39 05961400 1 Bolt, Hex .38-16 x 2.75 Grade 5 40 06529400 1 Nut, Hex .38-16 Model 991086, 087 35 BELTS, SPINDLES, IDLERS AND MOWER BLADES - 52" & 60" Item Part No.
... 1 Sheave, Double 1" ID x 6.00" OD (991086) 24 07000030 1 Bolt, .38-16 x 4.00 .62 Diameter Eye 25 06535900 2 Nut, Hex, Jam .375-16 26 03253900 3 Blade, 20.5" (991075) 03253800 3 Blade, 18" (991087) 27 06445700 3 Washer, Bellville .63 x 1.625 x.14 28 05978900 3 Bolt, Hex .62-18 x 1.75 Grade 8 29 08300507 1 Spring, Extension 30 03796300... .640 x 1.75 x .250 39 05961400 1 Bolt, Hex .38-16 x 2.75 Grade 5 40 06529400 1 Nut, Hex .38-16 Model 991086, 087 35 BELTS, SPINDLES, IDLERS AND MOWER BLADES - 52" & 60" Item Part No.

Operation Manual
Page 8
ALWAYS look down before turning. Never make sudden changes in effective working order by operator. Mower blades are functioning properly. NEVER weld or straighten mower blades. Operation on slopes may cause rotation of steering control. Avoid starting or stopping on slope always chock or block...attachment is used, must be prepared to react to an emergency situation: • Return steering levers to loss of the other blades. When operating on slopes of loads. Keep all possible precautions when leaving unit unattended. Do not make adjustments or repairs with...
ALWAYS look down before turning. Never make sudden changes in effective working order by operator. Mower blades are functioning properly. NEVER weld or straighten mower blades. Operation on slopes may cause rotation of steering control. Avoid starting or stopping on slope always chock or block...attachment is used, must be prepared to react to an emergency situation: • Return steering levers to loss of the other blades. When operating on slopes of loads. Keep all possible precautions when leaving unit unattended. Do not make adjustments or repairs with...
Operation Manual
Page 13
...off (PTO) switch to "On" position to set the pump in to engage mower blades. Transport: Push mower lift pedal all seat adjustments with the engine off (PTO) switch engages and disengages the mower blades. Release lever and slide seat forward or back to disengage parking brake. TMR1 will... outward and slide seat into position. Press and hold the toggle button to reset the timer to disengage mower blades. Mower Lift Pedal OF1700 Mower lift pedal raises and lowers mower deck for changing the engine oil, changing the hydraulic oil and filter and servicing the air filter. Press...
...off (PTO) switch to "On" position to set the pump in to engage mower blades. Transport: Push mower lift pedal all seat adjustments with the engine off (PTO) switch engages and disengages the mower blades. Release lever and slide seat forward or back to disengage parking brake. TMR1 will... outward and slide seat into position. Press and hold the toggle button to reset the timer to disengage mower blades. Mower Lift Pedal OF1700 Mower lift pedal raises and lowers mower deck for changing the engine oil, changing the hydraulic oil and filter and servicing the air filter. Press...
Operation Manual
Page 16
.... 1. Shut OFF engine. 2. Place seat in the service position (See Service Position on a slope. 4. When mulching, only remove 1/3 of mower deck. Clean after each mowing. GB - 16 WARNING: Move the steering control levers slowly and keep the throttle control lever at slow speed until you... the steering levers to the "Slow" position. 3. Turn ON the PTO switch to neutral. Bring the steering levers to engage the mower. Keep mower blades sharp. Vary cutting pattern with each use. Move throttle control to the drive position. Push the right and left bypass levers to prevent...
.... 1. Shut OFF engine. 2. Place seat in the service position (See Service Position on a slope. 4. When mulching, only remove 1/3 of mower deck. Clean after each mowing. GB - 16 WARNING: Move the steering control levers slowly and keep the throttle control lever at slow speed until you... the steering levers to the "Slow" position. 3. Turn ON the PTO switch to neutral. Bring the steering levers to engage the mower. Keep mower blades sharp. Vary cutting pattern with each use. Move throttle control to the drive position. Push the right and left bypass levers to prevent...

Operation Manual
Page 18
... is secure and will provide any service which are hot from a Ariens Dealer or the engine manufacturer's authorized service center. GB - 18 Sharpen or replace as required. See Clean Battery on page 24. Check mower blade mounting hardware and all nuts and bolts to their correct torque value.... mower blades for detailed instructions. See Hydraulic Fluid on page 19. *Change hydraulic fluid and filter after the first 75 hours of seat when rotating it can be required to engine manual for wear. SERVICE AND ADJUSTMENTS Ariens Dealers will not tip over. Place steering levers in ...
... is secure and will provide any service which are hot from a Ariens Dealer or the engine manufacturer's authorized service center. GB - 18 Sharpen or replace as required. See Clean Battery on page 24. Check mower blade mounting hardware and all nuts and bolts to their correct torque value.... mower blades for detailed instructions. See Hydraulic Fluid on page 19. *Change hydraulic fluid and filter after the first 75 hours of seat when rotating it can be required to engine manual for wear. SERVICE AND ADJUSTMENTS Ariens Dealers will not tip over. Place steering levers in ...

Operation Manual
Page 20
...position. Filter Guard 4. Remove the ignition wire from the spindle shafts. Put the blades, cup washers, and the bolts back on the spark plugs. WARNING: This adjustment requires operating the engine. MOWER BLADES Remove 3 4 1. Oil Filter 3. Turn the engine off the ground. 2.... See Moving the Unit with mower blades. 1. Cup Washer 3. Mounting Hardware Figure 8 Purging the Hydraulic System CAUTION: Use ...
...position. Filter Guard 4. Remove the ignition wire from the spindle shafts. Put the blades, cup washers, and the bolts back on the spark plugs. WARNING: This adjustment requires operating the engine. MOWER BLADES Remove 3 4 1. Oil Filter 3. Turn the engine off the ground. 2.... See Moving the Unit with mower blades. 1. Cup Washer 3. Mounting Hardware Figure 8 Purging the Hydraulic System CAUTION: Use ...
Operation Manual
Page 21
... INJURY. WARNING: Battery posts, terminals and related accessories contain lead and lead compounds, chemicals known to the State of mower blade. Shut OFF engine. Inspect every 100 operating hours or monthly for best performance. DO NOT Sharpen to cause cancer and... hold down and remove battery. Replace battery and secure with a maintenancefree battery that requires no regular maintenance except cleaning the terminals. Check mower blade balance. Reconnect cables to operating position. Remove Battery 1. Place seat in . (1.27 cm) 1 3 OT0792 4 Sharpen to this ...
... INJURY. WARNING: Battery posts, terminals and related accessories contain lead and lead compounds, chemicals known to the State of mower blade. Shut OFF engine. Inspect every 100 operating hours or monthly for best performance. DO NOT Sharpen to cause cancer and... hold down and remove battery. Replace battery and secure with a maintenancefree battery that requires no regular maintenance except cleaning the terminals. Check mower blade balance. Reconnect cables to operating position. Remove Battery 1. Place seat in . (1.27 cm) 1 3 OT0792 4 Sharpen to this ...
Operation Manual
Page 33
...oil filters, air filters, fuel filters, brake linings, brake arms, brake shoes, runners, scraper blades, shear bolts, mower blades, mower vanes, headlights, light bulbs, knives, cutters. • Any misuse, alteration, improper assembly, ...improper adjustment, neglect, or accident which vary from time to you . This warranty gives you specific legal rights, and you may from region to 12 months after date of its products. LIMITATION OF REMEDY AND DAMAGES Ariens...
...oil filters, air filters, fuel filters, brake linings, brake arms, brake shoes, runners, scraper blades, shear bolts, mower blades, mower vanes, headlights, light bulbs, knives, cutters. • Any misuse, alteration, improper assembly, ...improper adjustment, neglect, or accident which vary from time to you . This warranty gives you specific legal rights, and you may from region to 12 months after date of its products. LIMITATION OF REMEDY AND DAMAGES Ariens...


