

Owners Manual
Page 11
...NO flames. Do not use unit on a truck or trailer bed with a portable container, rather than from your unit. Objects contacting both battery terminals at regular intervals, especially blade attachment bolts. Always connect positive (+) lead of charger to positive (+) terminal, and negative (-) lead to... applicable local, state or federal laws. NEVER fill or drain fuel tank indoors. ALWAYS wear safety glasses and protective gear near battery. Never fill containers inside a building where any unimproved, forest-covered or brush covered land unless exhaust system is running or hot...
...NO flames. Do not use unit on a truck or trailer bed with a portable container, rather than from your unit. Objects contacting both battery terminals at regular intervals, especially blade attachment bolts. Always connect positive (+) lead of charger to positive (+) terminal, and negative (-) lead to... applicable local, state or federal laws. NEVER fill or drain fuel tank indoors. ALWAYS wear safety glasses and protective gear near battery. Never fill containers inside a building where any unimproved, forest-covered or brush covered land unless exhaust system is running or hot...

Owners Manual
Page 12
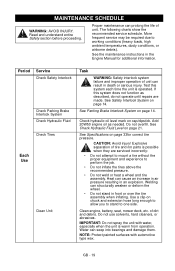
... the bypass valves. 3. See Specifications on page 25. 1. Seat - See Aligning the Steering Levers (Figure 14) on page 33. Battery - Check Engine Crankcase - Fill Engine Fuel Tank - Check Safety Interlock System - Ensure unit runs and performs properly. Lubricate all Controls ... WARNING: FAILURE OF CONTROLS could result in the operating position. 13. Steering Levers 2. Reinstall spacers. Check for specifications. 8. On 60-inch Decks: Remove the discharge chute from the transport position and place the discharge chute in death or serious injury. WARNING: FAILURE...
... the bypass valves. 3. See Specifications on page 25. 1. Seat - See Aligning the Steering Levers (Figure 14) on page 33. Battery - Check Engine Crankcase - Fill Engine Fuel Tank - Check Safety Interlock System - Ensure unit runs and performs properly. Lubricate all Controls ... WARNING: FAILURE OF CONTROLS could result in the operating position. 13. Steering Levers 2. Reinstall spacers. Check for specifications. 8. On 60-inch Decks: Remove the discharge chute from the transport position and place the discharge chute in death or serious injury. WARNING: FAILURE...
Owners Manual
Page 13
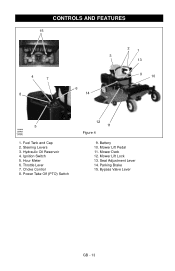
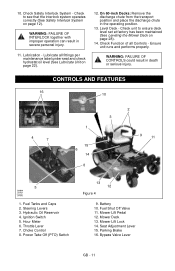
Throttle Lever 7. Power Take Off (PTO) Switch 12 11 Figure 4 9. Bypass Valve Lever GB - 13 Ignition Switch 5. Mower Deck 12. Mower Lift Pedal 11. Seat Adjustment Lever 14. Hydraulic Oil Reservoir 4. Mower Lift Lock 13. CONTROLS AND FEATURES 15 4 7 8 6 14 21 3 13 9 10 5 OM4090 OM4085 OF4410 OF4040 1. Choke Control 8. Battery 10. Steering Levers 3. Fuel Tank and Cap 2. Hour Meter 6. Parking Brake 15.
Throttle Lever 7. Power Take Off (PTO) Switch 12 11 Figure 4 9. Bypass Valve Lever GB - 13 Ignition Switch 5. Mower Deck 12. Mower Lift Pedal 11. Seat Adjustment Lever 14. Hydraulic Oil Reservoir 4. Mower Lift Lock 13. CONTROLS AND FEATURES 15 4 7 8 6 14 21 3 13 9 10 5 OM4090 OM4085 OF4410 OF4040 1. Choke Control 8. Battery 10. Steering Levers 3. Fuel Tank and Cap 2. Hour Meter 6. Parking Brake 15.
Owners Manual
Page 19
See the maintenance instructions in death or serious injury. Clean engine, battery, seat, mower deck, etc. of unit. NOTE: Protect painted surfaces with water, especially when the unit is possible when they are made. GB - 19 Proper ...
See the maintenance instructions in death or serious injury. Clean engine, battery, seat, mower deck, etc. of unit. NOTE: Protect painted surfaces with water, especially when the unit is possible when they are made. GB - 19 Proper ...
Owners Manual
Page 20
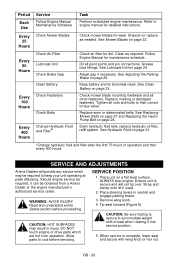
...Hours Change Hydraulic Fluid and Filter* Check air filter for maintenance schedule. Follow Engine Manual for dirt. Oil all other fasteners. Keep battery and its terminals clean. Read and understand entire Safety section before servicing. Remove wing knob. 4. Tip seat forward (Figure 6). ...page 22. Replace missing or damaged fasteners. When service is secure and will provide any service which are hot from a Ariens Dealer or the engine manufacturer's authorized service center. See Mower Blades on page 26. Should engine service be obtained from operation...
...Hours Change Hydraulic Fluid and Filter* Check air filter for maintenance schedule. Follow Engine Manual for dirt. Oil all other fasteners. Keep battery and its terminals clean. Read and understand entire Safety section before servicing. Remove wing knob. 4. Tip seat forward (Figure 6). ...page 22. Replace missing or damaged fasteners. When service is secure and will provide any service which are hot from a Ariens Dealer or the engine manufacturer's authorized service center. See Mower Blades on page 26. Should engine service be obtained from operation...
Owners Manual
Page 21
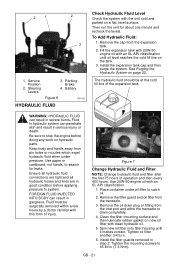
... the cold fill line on a flat, level surface. 2 1 2 3 4 1. Parking Brake 4. Fluid must be at the cold fill line of operation and then every 400 hours. Battery Figure 6 OF4110 HYDRAULIC FLUID Check Hydraulic Fluid Level Check the system with clean hydraulic oil. 5. Install the expansion tank cap and then purge the system...
... the cold fill line on a flat, level surface. 2 1 2 3 4 1. Parking Brake 4. Fluid must be at the cold fill line of operation and then every 400 hours. Battery Figure 6 OF4110 HYDRAULIC FLUID Check Hydraulic Fluid Level Check the system with clean hydraulic oil. 5. Install the expansion tank cap and then purge the system...
Owners Manual
Page 23
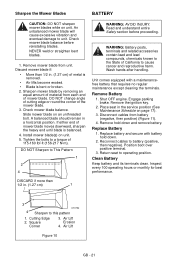
... metal is removed. • Air lifts become eroded. • Blade is balanced. 4. Shut OFF engine. Replace battery and secure with a maintenancefree battery that requires no regular maintenance except cleaning the terminals. An unbalanced mower blade will cause excessive vibration and eventual damage to... mower blade on unit. Inspect every 100 operating hours or monthly for best performance. Wash hands after handling. Square Corner 3. DO NOT Sharpen to battery (positive, then negative). DISCARD if more than 1/2 in . (1.27 cm) 1 3 OT0792 4 Sharpen to the State of 115 - 160 ...
... metal is removed. • Air lifts become eroded. • Blade is balanced. 4. Shut OFF engine. Replace battery and secure with a maintenancefree battery that requires no regular maintenance except cleaning the terminals. An unbalanced mower blade will cause excessive vibration and eventual damage to... mower blade on unit. Inspect every 100 operating hours or monthly for best performance. Wash hands after handling. Square Corner 3. DO NOT Sharpen to battery (positive, then negative). DISCARD if more than 1/2 in . (1.27 cm) 1 3 OT0792 4 Sharpen to the State of 115 - 160 ...
Owners Manual
Page 24
... page 23. 2. Get medical attention immediately! ONLY use with your battery. See Remove Battery on page 23. 2. Replace battery. Jump-Starting Ariens does not recommend jump-starting your engine manual for more detailed information. Be sure rear of five minutes, then shut OFF engine. 2. Remove the drive ...
... page 23. 2. Get medical attention immediately! ONLY use with your battery. See Remove Battery on page 23. 2. Replace battery. Jump-Starting Ariens does not recommend jump-starting your engine manual for more detailed information. Be sure rear of five minutes, then shut OFF engine. 2. Remove the drive ...
Owners Manual
Page 32
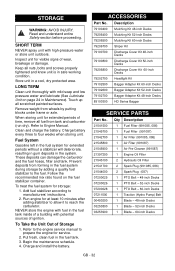
...with high-pressure water or store unit outdoors. Put fresh, clean fuel in a cool, dry protected area. Charge and install the battery. SHORT TERM NEVER spray unit with potential sources of Storage 1. Add fuel stabilizer according to four weeks when storing unit. Description 79100400... Decks 79202700 Headlight Kit 79102500 Bagger Adapter Kit 60-inch Decks 79102600 Bagger Adapter Kit 52-inch Decks 79102700 Bagger Adapter Kit 48-inch Decks 89100300 HD Series Bagger SERVICE PARTS Part No. Charge battery every three to manufacturers' instructions. 2. LONG TERM Clean ...
...with high-pressure water or store unit outdoors. Put fresh, clean fuel in a cool, dry protected area. Charge and install the battery. SHORT TERM NEVER spray unit with potential sources of Storage 1. Add fuel stabilizer according to four weeks when storing unit. Description 79100400... Decks 79202700 Headlight Kit 79102500 Bagger Adapter Kit 60-inch Decks 79102600 Bagger Adapter Kit 52-inch Decks 79102700 Bagger Adapter Kit 48-inch Decks 89100300 HD Series Bagger SERVICE PARTS Part No. Charge battery every three to manufacturers' instructions. 2. LONG TERM Clean ...

Owners Manual
Page 33
...be different from maximum RPM) Liquid or Air Cooled Speed Forward Maximum - in . (cm) SPECIFICATIONS 991085 991086 Max Zoom 48 Max Zoom 52 Kohler Courage 44.2 (725) 3,600 ± 75 Air 991087 Max Zoom 60 Courage Pro 8.0 (12.9) 4.0 (6.4) Zero Hydro - Front Tire Pressure - mph (km/h) Reverse Maximum - ... 20 x 10-10 20 - 25 (138 -172) 15 - 18 (103 - 124) 48 (121.9) Mechanical 52 (132.1) 1 - 5 (2.5 - 12.7) 0.5 (1.25) 60 (152.4) GB - 33 in . (cm) Cutting Height - in . (cm) Width (With Chute Up) - Model Number Model Engine Engine Model Number Engine Displacement - in . ...
...be different from maximum RPM) Liquid or Air Cooled Speed Forward Maximum - in . (cm) SPECIFICATIONS 991085 991086 Max Zoom 48 Max Zoom 52 Kohler Courage 44.2 (725) 3,600 ± 75 Air 991087 Max Zoom 60 Courage Pro 8.0 (12.9) 4.0 (6.4) Zero Hydro - Front Tire Pressure - mph (km/h) Reverse Maximum - ... 20 x 10-10 20 - 25 (138 -172) 15 - 18 (103 - 124) 48 (121.9) Mechanical 52 (132.1) 1 - 5 (2.5 - 12.7) 0.5 (1.25) 60 (152.4) GB - 33 in . (cm) Cutting Height - in . (cm) Width (With Chute Up) - Model Number Model Engine Engine Model Number Engine Displacement - in . ...
Owners Manual
Page 34
...and parts) to any defect in the chart below . If any defective part, subject to this warranty: Warranty Code Warranty Exception All Batteries All Belts, Muffler, Tires Cloth, Plastic, and All Rubber Components (Including Belts and Cables) All Engines Warranty Period Use Detail 1 ... wear. Warranty Code HA HB HC HD N/A Product Group Zoom & ZT Zero-Turn Riders; Except as noted below . Consumer Mowing Equipment Limited Warranty Ariens Company (Ariens) warrants to 2 years for All consumer use. AMP™ Rider Max Zoom & ZT HD Zero-Turn Riders Tractors, "961" Series Walk...
...and parts) to any defect in the chart below . If any defective part, subject to this warranty: Warranty Code Warranty Exception All Batteries All Belts, Muffler, Tires Cloth, Plastic, and All Rubber Components (Including Belts and Cables) All Engines Warranty Period Use Detail 1 ... wear. Warranty Code HA HB HC HD N/A Product Group Zoom & ZT Zero-Turn Riders; Except as noted below . Consumer Mowing Equipment Limited Warranty Ariens Company (Ariens) warrants to 2 years for All consumer use. AMP™ Rider Max Zoom & ZT HD Zero-Turn Riders Tractors, "961" Series Walk...

Parts Manual
Page 27
... Eyelet Terminal 5 03288500 1 Harness, CZ Remote SOL. 6 03966800 1 Hour Meter, with Maintenance 7 00432100 AR Relay, Sealed with Diode 8 00696900 1 Solenoid 9 01554800 1 Battery 10 03494051 1 Hold Down 11 06226400 2 Bolt, Round Head Square Neck .25-20 x 7.50 12 06437300 2 Washer, Flat Steel .281 x .620 x .065 13 ... Nut, Hex .25-20 14 05946800 2 Bolt, Hex .25-20 x .75 Grade 5 15 07505700 1 Insulator 16 03286000 1 Cable, Positive Battery 9.00" 17 03288100 1 Cable, Negative Battery 18 07500125 2 Rivet, .25 Nylon Panel 19 07527800 1 Plug, Hole .50 Diameter 20 03252300 1 Switch, Single Pole (N.O.) -
... Eyelet Terminal 5 03288500 1 Harness, CZ Remote SOL. 6 03966800 1 Hour Meter, with Maintenance 7 00432100 AR Relay, Sealed with Diode 8 00696900 1 Solenoid 9 01554800 1 Battery 10 03494051 1 Hold Down 11 06226400 2 Bolt, Round Head Square Neck .25-20 x 7.50 12 06437300 2 Washer, Flat Steel .281 x .620 x .065 13 ... Nut, Hex .25-20 14 05946800 2 Bolt, Hex .25-20 x .75 Grade 5 15 07505700 1 Insulator 16 03286000 1 Cable, Positive Battery 9.00" 17 03288100 1 Cable, Negative Battery 18 07500125 2 Rivet, .25 Nylon Panel 19 07527800 1 Plug, Hole .50 Diameter 20 03252300 1 Switch, Single Pole (N.O.) -
Operation Manual
Page 9
...contact with the rim of California to cause cancer and reproductive harm. ALWAYS connect positive (+) cable FIRST, and negative (-) cable SECOND. Battery posts, terminals and related accessories contain lead and lead compounds, chemicals known to the State of the fuel tank or container opening at...to positive (+) terminal, and negative (-) lead to cool completely before servicing or cleaning. Wash hands after handling. Release pressure slowly from battery can cause serious injury. Stop engine, remove key or spark plug wire and wait for all times until fueling is running (except where...
...contact with the rim of California to cause cancer and reproductive harm. ALWAYS connect positive (+) cable FIRST, and negative (-) cable SECOND. Battery posts, terminals and related accessories contain lead and lead compounds, chemicals known to the State of the fuel tank or container opening at...to positive (+) terminal, and negative (-) lead to cool completely before servicing or cleaning. Wash hands after handling. Release pressure slowly from battery can cause serious injury. Stop engine, remove key or spark plug wire and wait for all times until fueling is running (except where...

Operation Manual
Page 10
... Mounting Hardware Figure 3 OF4110 6. Check and add oil if needed. DO NOT OVERFILL! Push unit from unit and charge (See Battery on page 16). See Aligning the Steering Levers (Figure 14) on chuck and extension hose long enough to allow you to stand ...to the Owner/Operator manual as required. 1. Remove battery from container onto a level surface. Position Steering Levers - Tighten hardware securely. Battery - NOTE: See engine manual for specifications. 8. Remove shrink wrap and packaging materials. 2. Open ...
... Mounting Hardware Figure 3 OF4110 6. Check and add oil if needed. DO NOT OVERFILL! Push unit from unit and charge (See Battery on page 16). See Aligning the Steering Levers (Figure 14) on chuck and extension hose long enough to allow you to stand ...to the Owner/Operator manual as required. 1. Remove battery from container onto a level surface. Position Steering Levers - Tighten hardware securely. Battery - NOTE: See engine manual for specifications. 8. Remove shrink wrap and packaging materials. 2. Open ...
Operation Manual
Page 11
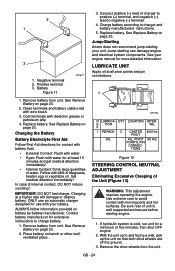
... 5 OM4090 OM4085 OF4410 OF4040 1. Throttle Lever 7. Power Take Off (PTO) Switch 13 12 Figure 4 9. Mower Lift Lock 14. Parking Brake 16. Lubricate all Controls - On 60-inch Decks: Remove the discharge chute from the transport position and place the discharge chute in severe personal injury. 11. Fuel Tanks and Caps 2. Steering... - Check to ensure deck level set at factory has been maintained (See Leveling the Mower Deck on page 22). 12. Lubrication - Level Deck - Ignition Switch 5. Battery 10. Bypass Valve Lever GB - 11
... 5 OM4090 OM4085 OF4410 OF4040 1. Throttle Lever 7. Power Take Off (PTO) Switch 13 12 Figure 4 9. Mower Lift Lock 14. Parking Brake 16. Lubricate all Controls - On 60-inch Decks: Remove the discharge chute from the transport position and place the discharge chute in severe personal injury. 11. Fuel Tanks and Caps 2. Steering... - Check to ensure deck level set at factory has been maintained (See Leveling the Mower Deck on page 22). 12. Lubrication - Level Deck - Ignition Switch 5. Battery 10. Bypass Valve Lever GB - 11

Operation Manual
Page 17
... not inflate the tires above the recommended pressure. • Do not weld or heat a wheel and tire assembly. See Specifications on page 19. Clean engine, battery, seat, mower deck, etc. of tire and rim parts is warm from operation. IMPORTANT: Do not spray the unit with automotive type wax. Water can...
... not inflate the tires above the recommended pressure. • Do not weld or heat a wheel and tire assembly. See Specifications on page 19. Clean engine, battery, seat, mower deck, etc. of tire and rim parts is warm from operation. IMPORTANT: Do not spray the unit with automotive type wax. Water can...

Operation Manual
Page 18
...When service is secure and will provide any service which are hot from a Ariens Dealer or the engine manufacturer's authorized service center. See Mower Blades on page 24. Grease lube fittings. Keep battery and its terminals clean. Replace missing or damaged fasteners. Should engine service be...2. Check mower blade mounting hardware and all other fasteners. Every 50 Hours Check Air FIlter Lubricate Unit Check Brake Gap Clean Battery Every 100 Hours Check Fasteners Check Belts Every 400 Hours Change Hydraulic Fluid and Filter* Check air filter for detailed instructions....
...When service is secure and will provide any service which are hot from a Ariens Dealer or the engine manufacturer's authorized service center. See Mower Blades on page 24. Grease lube fittings. Keep battery and its terminals clean. Replace missing or damaged fasteners. Should engine service be...2. Check mower blade mounting hardware and all other fasteners. Every 50 Hours Check Air FIlter Lubricate Unit Check Brake Gap Clean Battery Every 100 Hours Check Fasteners Check Belts Every 400 Hours Change Hydraulic Fluid and Filter* Check air filter for detailed instructions....

Operation Manual
Page 19
Service Position 2. Steering Levers 3. Then run the unit for leaks. To Add Hydraulic Fluid: 1. Fluid in hydraulic system can penetrate skin and result in gangrene. Battery Figure 6 OF4110 HYDRAULIC FLUID Check Hydraulic Fluid Level Check the system with the unit cold and parked on new oil filter with an SL API ...
Service Position 2. Steering Levers 3. Then run the unit for leaks. To Add Hydraulic Fluid: 1. Fluid in hydraulic system can penetrate skin and result in gangrene. Battery Figure 6 OF4110 HYDRAULIC FLUID Check Hydraulic Fluid Level Check the system with the unit cold and parked on new oil filter with an SL API ...
Operation Manual
Page 21
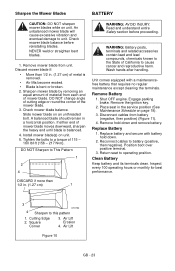
...bent or broken. 2. DO NOT Sharpen to operating position. Unit comes equipped with battery hold down . 2. Remove Battery 1. Remove the ignition key. 2. Replace battery and secure with a maintenancefree battery that requires no regular maintenance except cleaning the terminals. Return seat to This Pattern ...Air lifts become eroded. • Blade is balanced. 4. Read and understand entire Safety section before reinstalling blades. WARNING: Battery posts, terminals and related accessories contain lead and lead compounds, chemicals known to a torque of mower blade. Wash hands after...
...bent or broken. 2. DO NOT Sharpen to operating position. Unit comes equipped with battery hold down . 2. Remove Battery 1. Remove the ignition key. 2. Replace battery and secure with a maintenancefree battery that requires no regular maintenance except cleaning the terminals. Return seat to This Pattern ...Air lifts become eroded. • Blade is balanced. 4. Read and understand entire Safety section before reinstalling blades. WARNING: Battery posts, terminals and related accessories contain lead and lead compounds, chemicals known to a torque of mower blade. Wash hands after...

Operation Manual
Page 22
...petroleum jelly. 4. Charging the Battery Battery Electrolyte First Aid Follow First Aid directions for at least 15 minutes and get medical attention immediately! • Internal Contact: Drink large quantities of Magnesia, beaten egg or vegetable oil. Jump-Starting Ariens does not recommend jump-starting ...your engine manual for use with Milk of water. LUBRICATE UNIT Apply oil at a higher rate will damage or destroy battery. 2 1 3 1. In case of the Unit (Figure 13...
...petroleum jelly. 4. Charging the Battery Battery Electrolyte First Aid Follow First Aid directions for at least 15 minutes and get medical attention immediately! • Internal Contact: Drink large quantities of Magnesia, beaten egg or vegetable oil. Jump-Starting Ariens does not recommend jump-starting ...your engine manual for use with Milk of water. LUBRICATE UNIT Apply oil at a higher rate will damage or destroy battery. 2 1 3 1. In case of the Unit (Figure 13...
