
Owners Manual
Page 5
.... • Never allow operation by properly trained adult, never children. DO NOT operate on slopes over 17°. • If machine stops going uphill, stop blade and back down slopes, not across. NOTE: This unit may contain any of a responsible adult. Thrown objects can cause injury. Keep children and others away...
.... • Never allow operation by properly trained adult, never children. DO NOT operate on slopes over 17°. • If machine stops going uphill, stop blade and back down slopes, not across. NOTE: This unit may contain any of a responsible adult. Thrown objects can cause injury. Keep children and others away...

Owners Manual
Page 6
... unit. 2.1 Dismemberment Hazard To avoid dismemberment hazard do the following: Keep all rotating or moving belts. Before servicing unit do not put hands near rotating blades. DANGER DANGER! Thrown objects can cause injury or damage. GB - 6 To avoid dismemberment hazard do not put hands near moving parts. Avoid tipping hazard...
... unit. 2.1 Dismemberment Hazard To avoid dismemberment hazard do the following: Keep all rotating or moving belts. Before servicing unit do not put hands near rotating blades. DANGER DANGER! Thrown objects can cause injury or damage. GB - 6 To avoid dismemberment hazard do not put hands near moving parts. Avoid tipping hazard...

Owners Manual
Page 10
... repairs with a machine that may lead to prevent unauthorized use extra caution when servicing them . DO NOT park on slopes of one blade may be prepared to react to an emergency situation: • Return steering levers to stop before removing grass catcher or unclogging chute....straight down slopes, not across them . DO NOT touch parts which eject hydraulic fluid under pressure. Fumes from spark plug. Mower blades are hot. Wrap blade(s) or wear gloves to those you . Disengage PTO when attachment is running . Never make sudden changes in place. Moving parts ...
... repairs with a machine that may lead to prevent unauthorized use extra caution when servicing them . DO NOT park on slopes of one blade may be prepared to react to an emergency situation: • Return steering levers to stop before removing grass catcher or unclogging chute....straight down slopes, not across them . DO NOT touch parts which eject hydraulic fluid under pressure. Fumes from spark plug. Mower blades are hot. Wrap blade(s) or wear gloves to those you . Disengage PTO when attachment is running . Never make sudden changes in place. Moving parts ...

Owners Manual
Page 11
... the same time may result in sparks which can cause fire or explosion. Check all hardware properly tightened. Keep all hardware at regular intervals, especially blade attachment bolts. If worn or damaged, replace with stored energy. GB - 11
... the same time may result in sparks which can cause fire or explosion. Check all hardware properly tightened. Keep all hardware at regular intervals, especially blade attachment bolts. If worn or damaged, replace with stored energy. GB - 11
Owners Manual
Page 15
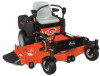
...Timer (TMR1): measures the time spent on the lift lock. OF1740 Parking Brake Lever 1. Press and hold the toggle button to disengage mower blades. Push the lever in the drive position and operate the unit. Push mower lift pedal forward and hold the toggle button to reset the ...take off . TMR1 will not start measuring engine run . OFF OE0261 Pull the power take off (PTO) switch engages and disengages the mower blades. Push lever down two hours before the maintenance is set the pump in to zero. The alert starts counting down to increase engine speed....
...Timer (TMR1): measures the time spent on the lift lock. OF1740 Parking Brake Lever 1. Press and hold the toggle button to disengage mower blades. Push the lever in the drive position and operate the unit. Push mower lift pedal forward and hold the toggle button to reset the ...take off . TMR1 will not start measuring engine run . OFF OE0261 Pull the power take off (PTO) switch engages and disengages the mower blades. Push lever down two hours before the maintenance is set the pump in to zero. The alert starts counting down to increase engine speed....
Owners Manual
Page 18
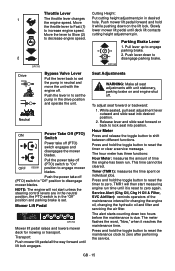
... deck properly levelled. For very tall grass, mow twice. MOVING THE UNIT WITH THE ENGINE OFF IMPORTANT: Never tow unit. 1. Shut OFF engine. 2. Keep mower blades sharp. Do not travel too fast. Discharge clippings into areas already cut. Vary cutting pattern with the engine set height of cut more than 1 inch...
... deck properly levelled. For very tall grass, mow twice. MOVING THE UNIT WITH THE ENGINE OFF IMPORTANT: Never tow unit. 1. Shut OFF engine. 2. Keep mower blades sharp. Do not travel too fast. Discharge clippings into areas already cut. Vary cutting pattern with the engine set height of cut more than 1 inch...
Owners Manual
Page 20
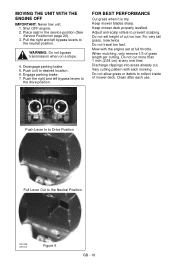
.... 2. Tip seat forward (Figure 6). CAUTION: Be sure footing is secure to their correct torque value. GB - 20 SERVICE AND ADJUSTMENTS Ariens Dealers will not tip over. CAUTION: HOT SURFACES may be obtained from operation. Place steering levers in injury. Period Each Use Service Follow ...parts to keep your unit operating at peak efficiency. SERVICE POSITION 1. ALWAYS stop engine. Every 25 Hours Check Mower Blades Check mower blades for dirt. See Mower Blades on page 24. Every 50 Hours Check Air FIlter Lubricate Unit Check Brake Gap Clean Battery Every 100 Hours Check...
.... 2. Tip seat forward (Figure 6). CAUTION: Be sure footing is secure to their correct torque value. GB - 20 SERVICE AND ADJUSTMENTS Ariens Dealers will not tip over. CAUTION: HOT SURFACES may be obtained from operation. Place steering levers in injury. Period Each Use Service Follow ...parts to keep your unit operating at peak efficiency. SERVICE POSITION 1. ALWAYS stop engine. Every 25 Hours Check Mower Blades Check mower blades for dirt. See Mower Blades on page 24. Every 50 Hours Check Air FIlter Lubricate Unit Check Brake Gap Clean Battery Every 100 Hours Check...
Owners Manual
Page 22
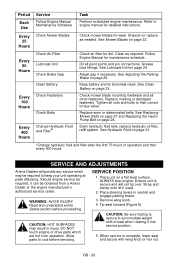
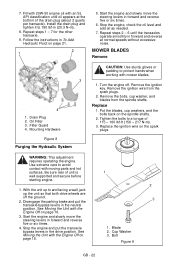
...instructions in forward and reverse five or six times. 4. Stop the engine, check the oil level and add oil as needed. 7. Oil Filter 3. Put the blades, cup washers, and the bolts back on page 18. 1 2 3 1. With the unit up the unit so that both drive wheels are off . ...Hardware Figure 8 Purging the Hydraulic System CAUTION: Use sturdy gloves or padding to 180 lbf-in the neutral position. See Moving the Unit with mower blades. 1. Remove the ignition wire from the spindle shafts. Tighten the bolts to a torque of unit is well supported and secure before starting engine. 1....
...instructions in forward and reverse five or six times. 4. Stop the engine, check the oil level and add oil as needed. 7. Oil Filter 3. Put the blades, cup washers, and the bolts back on page 18. 1 2 3 1. With the unit up the unit so that both drive wheels are off . ...Hardware Figure 8 Purging the Hydraulic System CAUTION: Use sturdy gloves or padding to 180 lbf-in the neutral position. See Moving the Unit with mower blades. 1. Remove the ignition wire from the spindle shafts. Tighten the bolts to a torque of unit is well supported and secure before starting engine. 1....
Owners Manual
Page 23
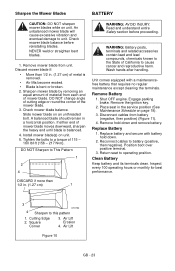
... battery that requires no regular maintenance except cleaning the terminals. Cutting Edge 2. Slide mower blade on unit. Read and understand entire Safety section before reinstalling blades. Shut OFF engine. Reconnect cables to operating position. Return seat to battery (positive, ...then negative). Clean Battery Keep battery and its terminals clean. An unbalanced mower blade will cause excessive vibration and eventual damage to This Pattern 1 2 4 WARNING: AVOID INJURY. Engage parking brake. Position boot...
... battery that requires no regular maintenance except cleaning the terminals. Cutting Edge 2. Slide mower blade on unit. Read and understand entire Safety section before reinstalling blades. Shut OFF engine. Reconnect cables to operating position. Return seat to battery (positive, ...then negative). Clean Battery Keep battery and its terminals clean. An unbalanced mower blade will cause excessive vibration and eventual damage to This Pattern 1 2 4 WARNING: AVOID INJURY. Engage parking brake. Position boot...

Owners Manual
Page 27
... mower belt idler until all the tension is removed from the springs. Slowly release the tension on the transmission. Remove long mower belt from left blade spindle and remove from idlers when performing this operation. 1. Slowly release the tension on the parking brake cable adjuster and then turn the adjuster until...
... mower belt idler until all the tension is removed from the springs. Slowly release the tension on the transmission. Remove long mower belt from left blade spindle and remove from idlers when performing this operation. 1. Slowly release the tension on the parking brake cable adjuster and then turn the adjuster until...
Owners Manual
Page 28
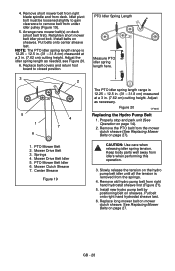
... belt from deck. Mower Drive Belt Idler 5. Center Sheave Figure 19 CAUTION: Use care when releasing idler spring tension. Remove short mower belt from right blade spindle and from the mower clutch sheave (See Replacing Mower Belts on the hydro pump belt idler until all the tension is 12.25 - 12...
... belt from deck. Mower Drive Belt Idler 5. Center Sheave Figure 19 CAUTION: Use care when releasing idler spring tension. Remove short mower belt from right blade spindle and from the mower clutch sheave (See Replacing Mower Belts on the hydro pump belt idler until all the tension is 12.25 - 12...

Owners Manual
Page 30
...Lift Arms Locked Figure 23 OF3765 Installing the Mower Deck (Figure 23) 1. NOTE: Place blocks under the bottom edge of the blade on the left blade (Left position in the same holes they were removed from under the reinforcement bar welded along deck face. 3. Measure the distance between...to back as shown in . (7.62 cm) cutting height. 2. Remove the blocks from . 4. 1 5 1 2 2 3 4 1. NOTE: Pitching the front of the blades lower than the rear provides a balance between the ground the cutting edge of the left to a 3 in Figure 24. 8. Level mower deck (See Leveling the...
...Lift Arms Locked Figure 23 OF3765 Installing the Mower Deck (Figure 23) 1. NOTE: Place blocks under the bottom edge of the blade on the left blade (Left position in the same holes they were removed from under the reinforcement bar welded along deck face. 3. Measure the distance between...to back as shown in . (7.62 cm) cutting height. 2. Remove the blocks from . 4. 1 5 1 2 2 3 4 1. NOTE: Pitching the front of the blades lower than the rear provides a balance between the ground the cutting edge of the left to a 3 in Figure 24. 8. Level mower deck (See Leveling the...

Owners Manual
Page 31
... adjustment nuts until there is slight contact on the deck adjuster bolt and then turn to -Back Pitch Front Right Rear Figure 24 Rear Adjust Blade Height Level and pitch the mower with slight contact. Slide a .020" feeler gauge between armature and rotor with the height adjusters on each ... Repeat for all hot parts to lower the deck. Shut off unit. 7. To check: 1. Recheck air gap and adjust if needed. 4 4 3 1. Blade Side-to-Side Level Left Blade Front-to reduce clamp load on the height adjusters. Loosen the jam nut on the deck lift bracket bolt about 1/4 turn the bolt...
... adjustment nuts until there is slight contact on the deck adjuster bolt and then turn to -Back Pitch Front Right Rear Figure 24 Rear Adjust Blade Height Level and pitch the mower with slight contact. Slide a .020" feeler gauge between armature and rotor with the height adjusters on each ... Repeat for all hot parts to lower the deck. Shut off unit. 7. To check: 1. Recheck air gap and adjust if needed. 4 4 3 1. Blade Side-to-Side Level Left Blade Front-to reduce clamp load on the height adjusters. Loosen the jam nut on the deck lift bracket bolt about 1/4 turn the bolt...
Owners Manual
Page 32
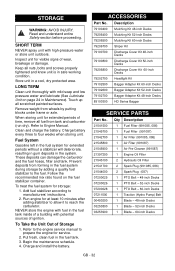
... - 48-inch Decks 07200026 1 PTO Belt - 52-inch Decks 07200028 1 PTO Belt - 60-inch Decks 07211500 1 Traction (Hydro Pump) Belt 00450200 1 Blade - 48-inch Decks 03253800 1 Blade - 52-inch Decks 03253900 1 Blade - 60-inch Decks GB - 32 Inspect unit for at least 10 minutes after adding stabilizer to allow ...breakage or damage. Description 79100400 Mulching Kit 48-inch Decks 79206400 Mulching Kit 52-inch Decks 79206500 Mulching Kit 60-inch Decks 79206700 Striper Kit 79100700 Discharge Cover Kit 48-inch Decks 79100800 Discharge Cover Kit 52-inch Decks 79206800 Discharge Cover...
... - 48-inch Decks 07200026 1 PTO Belt - 52-inch Decks 07200028 1 PTO Belt - 60-inch Decks 07211500 1 Traction (Hydro Pump) Belt 00450200 1 Blade - 48-inch Decks 03253800 1 Blade - 52-inch Decks 03253900 1 Blade - 60-inch Decks GB - 32 Inspect unit for at least 10 minutes after adding stabilizer to allow ...breakage or damage. Description 79100400 Mulching Kit 48-inch Decks 79206400 Mulching Kit 52-inch Decks 79206500 Mulching Kit 60-inch Decks 79206700 Striper Kit 79100700 Discharge Cover Kit 48-inch Decks 79100800 Discharge Cover Kit 52-inch Decks 79206800 Discharge Cover...
Owners Manual
Page 35
...lubricants, spark plugs, oil, oil filters, air filters, fuel filters, brake linings, brake arms, brake shoes, skid shoes, scraper blades, shear bolts, mower blades, mower vanes, brushes, headlights, light bulbs, knives, cutters. • Any misuse, alteration, improper assembly, improper adjustment, neglect..., or accident which is not approved by the Ariens Company for use with product(s) identified herein are not covered by this ...
...lubricants, spark plugs, oil, oil filters, air filters, fuel filters, brake linings, brake arms, brake shoes, skid shoes, scraper blades, shear bolts, mower blades, mower vanes, brushes, headlights, light bulbs, knives, cutters. • Any misuse, alteration, improper assembly, improper adjustment, neglect..., or accident which is not approved by the Ariens Company for use with product(s) identified herein are not covered by this ...

Parts Manual
Page 2
... No. 2500 and up Model 991086 Kawasaki with 52-Inch Mower Deck Serial No. 000101 - 2499 Serial No. 2500 and up Model 991087 Kawasaki with 60-Inch Mower Deck Serial No. 000101 - 2499 Serial No. 2500 and up TABLE OF CONTENTS DECALS Decals - Safety 4 Decals - Style 5 MAIN FRAME Frame 6 Seat 7 POWER... Electrical System 29 MOWER DECKS Deck, Discharge Chute, Anti-Scalp Rollers, & Belt Covers 30 Mounting Chains 32 Mounting Arms 33 Belts, Spindles, Idlers and Mower Blades - 52" & 60 34 Belts, Spindles, Idlers and Mower Blades - 48 36 3 © Copyright 2011 Ariens Company
... No. 2500 and up Model 991086 Kawasaki with 52-Inch Mower Deck Serial No. 000101 - 2499 Serial No. 2500 and up Model 991087 Kawasaki with 60-Inch Mower Deck Serial No. 000101 - 2499 Serial No. 2500 and up TABLE OF CONTENTS DECALS Decals - Safety 4 Decals - Style 5 MAIN FRAME Frame 6 Seat 7 POWER... Electrical System 29 MOWER DECKS Deck, Discharge Chute, Anti-Scalp Rollers, & Belt Covers 30 Mounting Chains 32 Mounting Arms 33 Belts, Spindles, Idlers and Mower Blades - 52" & 60 34 Belts, Spindles, Idlers and Mower Blades - 48 36 3 © Copyright 2011 Ariens Company

Parts Manual
Page 32
BELTS, SPINDLES, IDLERS AND MOWER BLADES - 52" & 60" Model 991086, 087 1 2 15 29 17 3 37 12 22 19 18 32 13 21 20 33 9 38 14 14 15 23 16 14 15 35 39 37 40 37 12 6 5 10 4 11 13 30 7 9 16 8 38 24 25 37 14 26 36 36 34 31 27 27 28 28 25 26 27 34
BELTS, SPINDLES, IDLERS AND MOWER BLADES - 52" & 60" Model 991086, 087 1 2 15 29 17 3 37 12 22 19 18 32 13 21 20 33 9 38 14 14 15 23 16 14 15 35 39 37 40 37 12 6 5 10 4 11 13 30 7 9 16 8 38 24 25 37 14 26 36 36 34 31 27 27 28 28 25 26 27 34

Parts Manual
Page 33
BELTS, SPINDLES, IDLERS AND MOWER BLADES - 52" & 60" Item Part No. Qty. Black 8 06224900 1 Bolt, Round Head Square Neck .50-13 x 3.00 Grade 5 9 01581700 2 Bearing, Pedestal 10 07000034 1 Bolt, Shoulder EP .38-16 x .... 1 Sheave, Double 1" ID x 6.00" OD (991086) 24 07000030 1 Bolt, .38-16 x 4.00 .62 Diameter Eye 25 06535900 2 Nut, Hex, Jam .375-16 26 03253900 3 Blade, 20.5" (991075) 03253800 3 Blade, 18" (991087) 27 06445700 3 Washer, Bellville .63 x 1.625 x.14 28 05978900 3 Bolt, Hex .62-18 x 1.75 Grade 8 29 08300507 1 Spring, Extension 30 03796300...
BELTS, SPINDLES, IDLERS AND MOWER BLADES - 52" & 60" Item Part No. Qty. Black 8 06224900 1 Bolt, Round Head Square Neck .50-13 x 3.00 Grade 5 9 01581700 2 Bearing, Pedestal 10 07000034 1 Bolt, Shoulder EP .38-16 x .... 1 Sheave, Double 1" ID x 6.00" OD (991086) 24 07000030 1 Bolt, .38-16 x 4.00 .62 Diameter Eye 25 06535900 2 Nut, Hex, Jam .375-16 26 03253900 3 Blade, 20.5" (991075) 03253800 3 Blade, 18" (991087) 27 06445700 3 Washer, Bellville .63 x 1.625 x.14 28 05978900 3 Bolt, Hex .62-18 x 1.75 Grade 8 29 08300507 1 Spring, Extension 30 03796300...

Parts Manual
Page 34
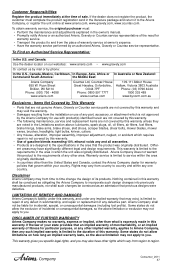
Model 991085 BELTS, SPINDLES, IDLERS AND BLADES - 48" 2 29 3 17 37 11 19 18 12 21 20 33 8 39 14 15 22 32 1 13 14 40 37 35 41 13 14 13 23 37 11 16 12 30 7 8 16 16 6 59 4 10 24 38 25 39 37 13 26 25 36 34 26 27 31 28 27 26 28 27 28 36
Model 991085 BELTS, SPINDLES, IDLERS AND BLADES - 48" 2 29 3 17 37 11 19 18 12 21 20 33 8 39 14 15 22 32 1 13 14 40 37 35 41 13 14 13 23 37 11 16 12 30 7 8 16 16 6 59 4 10 24 38 25 39 37 13 26 25 36 34 26 27 31 28 27 26 28 27 28 36

Parts Manual
Page 35
... 1 Pulley, Double 1" ID x 5.75" OD 24 07000030 1 Bolt, .38-16 x 4.00 .62 Diameter Eye 25 06535900 2 Nut, Hex, Jam .375-16 26 00450200 3 Blade, 16.19" Mower 27 06445700 3 Washer, Bellville .63 x 1.625 x.14 28 05978900 3 Bolt, Hex .62-18 x 1.75 Grade 8 29 08300507 1 Spring, Extension (Deck Belt...Flat .640 x 1.75 x .250 40 05961400 1 Bolt, Hex .38-16 x 2.75 Grade 5 41 06529400 1 Nut, Hex .38-16 Model 991085 37 BELTS, SPINDLES, IDLERS AND BLADES - 48" Item Part No. Description 1 07200025 1 Belt, BB 114.50 Wrapped Hex (PTO Belt) 2 07200035 1 Belt, B 51.18 Raw Cogged (Deck Belt) 3 05957900 1 Bolt...
... 1 Pulley, Double 1" ID x 5.75" OD 24 07000030 1 Bolt, .38-16 x 4.00 .62 Diameter Eye 25 06535900 2 Nut, Hex, Jam .375-16 26 00450200 3 Blade, 16.19" Mower 27 06445700 3 Washer, Bellville .63 x 1.625 x.14 28 05978900 3 Bolt, Hex .62-18 x 1.75 Grade 8 29 08300507 1 Spring, Extension (Deck Belt...Flat .640 x 1.75 x .250 40 05961400 1 Bolt, Hex .38-16 x 2.75 Grade 5 41 06529400 1 Nut, Hex .38-16 Model 991085 37 BELTS, SPINDLES, IDLERS AND BLADES - 48" Item Part No. Description 1 07200025 1 Belt, BB 114.50 Wrapped Hex (PTO Belt) 2 07200035 1 Belt, B 51.18 Raw Cogged (Deck Belt) 3 05957900 1 Bolt...

