
Owners Manual
Page 10
...on slopes even though the brakes are sharp and can cut off power to those you feel uneasy on the slope slow and gradual. Tires may lose traction on slopes unless necessary. Wrap blade(s) or wear gloves to cool. Rotating parts can cut or amputate fingers or a...extreme caution on a slope. Remove wire from all possible precautions when leaving unit unattended. DO NOT operate on slopes may obscure vision. If tires lose traction, disengage the blades and proceed slowly straight down and behind before restarting. DO NOT run engine in daylight or good artificial light...
...on slopes even though the brakes are sharp and can cut off power to those you feel uneasy on the slope slow and gradual. Tires may lose traction on slopes unless necessary. Wrap blade(s) or wear gloves to cool. Rotating parts can cut or amputate fingers or a...extreme caution on a slope. Remove wire from all possible precautions when leaving unit unattended. DO NOT operate on slopes may obscure vision. If tires lose traction, disengage the blades and proceed slowly straight down and behind before restarting. DO NOT run engine in daylight or good artificial light...

Owners Manual
Page 12
... Hardware Figure 3 OF4110 6. See Filling Fuel Tank on page 30). 14. WARNING: FAILURE OF CONTROLS could result in front or over the tire assembly when inflating. Remove shrink wrap and packaging materials. 2. CAUTION: Avoid injury! Check and add oil if needed. Fill Engine Fuel Tank ... Pack Preparation Checklist Refer to the operating position. Steering Levers 2. DO NOT OVERFILL! On 60-inch Decks: Remove the discharge chute from container onto a level surface. Check Function of tire and rim parts is possible when they are serviced incorrectly: • Do not attempt to...
... Hardware Figure 3 OF4110 6. See Filling Fuel Tank on page 30). 14. WARNING: FAILURE OF CONTROLS could result in front or over the tire assembly when inflating. Remove shrink wrap and packaging materials. 2. CAUTION: Avoid injury! Check and add oil if needed. Fill Engine Fuel Tank ... Pack Preparation Checklist Refer to the operating position. Steering Levers 2. DO NOT OVERFILL! On 60-inch Decks: Remove the discharge chute from container onto a level surface. Check Function of tire and rim parts is possible when they are serviced incorrectly: • Do not attempt to...

Owners Manual
Page 17
Check Tire Pressure See Specifications on slopes be reached safely from the "Choke" position. Bring the steering levers to about 3/4 speed. 5. Release parking brake. Engage parking brake. 4. ... in the "Off" position. 3. STARTING AND SHUT OFF CAUTION: Read entire Owner/Operator Manual, Clutch Manual, and Engine Manual first. See Engine Manual for correct tire pressure. 5. Turn ON the PTO switch to 3/4 "Fast" position. GB - 17 Check that engine crankcase oil is warm or hot, do not use choke. 5. Return...
Check Tire Pressure See Specifications on slopes be reached safely from the "Choke" position. Bring the steering levers to about 3/4 speed. 5. Release parking brake. Engage parking brake. 4. ... in the "Off" position. 3. STARTING AND SHUT OFF CAUTION: Read entire Owner/Operator Manual, Clutch Manual, and Engine Manual first. See Engine Manual for correct tire pressure. 5. Turn ON the PTO switch to 3/4 "Fast" position. GB - 17 Check that engine crankcase oil is warm or hot, do not use choke. 5. Return...
Owners Manual
Page 19
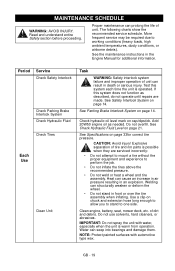
...Use a clip-on page 14. Welding can result in an explosion. GB - 19 See the maintenance instructions in front or over the tire assembly when inflating. More frequent service may be required due to one side. See Check Hydraulic Fluid Level on page 14. NOTE: Protect... dusty conditions, or airborne debris). Do not overfill. Period Service Check Safety Interlock Check Parking Brake Interlock System Check Hydraulic Fluid Check Tires Each Use Clean Unit Task WARNING: Safety interlock system failure and improper operation of unit. IMPORTANT: Do not spray the unit with...
...Use a clip-on page 14. Welding can result in an explosion. GB - 19 See the maintenance instructions in front or over the tire assembly when inflating. More frequent service may be required due to one side. See Check Hydraulic Fluid Level on page 14. NOTE: Protect... dusty conditions, or airborne debris). Do not overfill. Period Service Check Safety Interlock Check Parking Brake Interlock System Check Hydraulic Fluid Check Tires Each Use Clean Unit Task WARNING: Safety interlock system failure and improper operation of unit. IMPORTANT: Do not spray the unit with...

Owners Manual
Page 26
...brake may need adjustment. ADJUSTING THE UNIT TO TRACK STRAIGHT WARNING: Prior to lever) on the stop bracket (Figure 15). Check and adjust tire pressure. Increase pressure on page 33). Handle 3. NOTE: Position the right and left handles are the same height. Steering Lever Figure 16 OF0004... until the right and left handles at the same height position. 3. Remove the spacer, handle, and eccentric spacer from the steering lever. If tire pressure adjustment does not solve tracking problem, adjust the limiter bolts on side which is too fast. 3 2 1 2 1 ADJUSTING THE HEIGHT ...
...brake may need adjustment. ADJUSTING THE UNIT TO TRACK STRAIGHT WARNING: Prior to lever) on the stop bracket (Figure 15). Check and adjust tire pressure. Increase pressure on page 33). Handle 3. NOTE: Position the right and left handles are the same height. Steering Lever Figure 16 OF0004... until the right and left handles at the same height position. 3. Remove the spacer, handle, and eccentric spacer from the steering lever. If tire pressure adjustment does not solve tracking problem, adjust the limiter bolts on side which is too fast. 3 2 1 2 1 ADJUSTING THE HEIGHT ...

Owners Manual
Page 30
... deck evenly to keep the deck level side to right across the width of the deck using the height adjusters on a level surface with the tires inflated to deck with the rear of the deck (Rear position in . (3.18 mm) lower than the rear provides a balance between the ground and the...
... deck evenly to keep the deck level side to right across the width of the deck using the height adjusters on a level surface with the tires inflated to deck with the rear of the deck (Rear position in . (3.18 mm) lower than the rear provides a balance between the ground and the...

Owners Manual
Page 33
... (cm) Height - gal. (L) Transmission Type Transmission Oil Hydraulic Oil Filter Size and Weight Length - lbs (kg) Tires Front Tire Size - Parking Electric 12-Volt Maintenance Free U1-250 Electric PTO Clutch/Brake Refer to Engine Manual 6.5 (24.6) Hydrostatic...(2.5 - 12.7) 0.5 (1.25) 60 (152.4) GB - 33 in . (cm) SPECIFICATIONS 991085 991086 Max Zoom 48 Max Zoom 52 Kohler Courage 44.2 (725) 3,600 ± 75 Air 991087 Max Zoom 60 Courage Pro 8.0 (12.9) 4.0 (6.4) Zero Hydro - Rear Tire Size - Front Tire Pressure - psi (kPa) Rear Tire Pressure - mph (km/h) Turning ...
... (cm) Height - gal. (L) Transmission Type Transmission Oil Hydraulic Oil Filter Size and Weight Length - lbs (kg) Tires Front Tire Size - Parking Electric 12-Volt Maintenance Free U1-250 Electric PTO Clutch/Brake Refer to Engine Manual 6.5 (24.6) Hydrostatic...(2.5 - 12.7) 0.5 (1.25) 60 (152.4) GB - 33 in . (cm) SPECIFICATIONS 991085 991086 Max Zoom 48 Max Zoom 52 Kohler Courage 44.2 (725) 3,600 ± 75 Air 991087 Max Zoom 60 Courage Pro 8.0 (12.9) 4.0 (6.4) Zero Hydro - Rear Tire Size - Front Tire Pressure - psi (kPa) Rear Tire Pressure - mph (km/h) Turning ...
Owners Manual
Page 34
...3 years parts and labor Additional 2 years parts only 100% first year; An authorized Ariens dealer (Ariens brand products), Gravely dealer (Gravely brand products), or Countax dealer (Countax brand products)... Refer to this warranty: Warranty Code Warranty Exception All Batteries All Belts, Muffler, Tires Cloth, Plastic, and All Rubber Components (Including Belts and Cables) All Engines Warranty...product is limited to the conditions, limitations and exclusions set forth herein. AMP™ Rider Max Zoom & ZT HD Zero-Turn Riders Tractors, "961" Series Walk-Behind Mowers Classic LM ...
...3 years parts and labor Additional 2 years parts only 100% first year; An authorized Ariens dealer (Ariens brand products), Gravely dealer (Gravely brand products), or Countax dealer (Countax brand products)... Refer to this warranty: Warranty Code Warranty Exception All Batteries All Belts, Muffler, Tires Cloth, Plastic, and All Rubber Components (Including Belts and Cables) All Engines Warranty...product is limited to the conditions, limitations and exclusions set forth herein. AMP™ Rider Max Zoom & ZT HD Zero-Turn Riders Tractors, "961" Series Walk-Behind Mowers Classic LM ...

Parts Manual
Page 18
... Assembly 4.80-8 9 05978200 2 Bolt, Hex .50-13 x 7.50 Grade 5 10 06500010 2 Nut, Nyloc Flange .50-13 11 07100214 2 Tire/Wheel Assembly, 20 x 10.00-10 07100215 AR Rim and Hub Assembly 4.10/3.50 x 6 12 06536900 2 Nut, Center Lock Jam .75-16 13 00456800 2 Cap, ...
... Assembly 4.80-8 9 05978200 2 Bolt, Hex .50-13 x 7.50 Grade 5 10 06500010 2 Nut, Nyloc Flange .50-13 11 07100214 2 Tire/Wheel Assembly, 20 x 10.00-10 07100215 AR Rim and Hub Assembly 4.10/3.50 x 6 12 06536900 2 Nut, Center Lock Jam .75-16 13 00456800 2 Cap, ...

Operation Manual
Page 8
...may lose traction on slopes even though the brakes are sharp and can safely handle. Keep all possible precautions when leaving unit unattended. Tires may cause rotation of the discharge area. Use extra care when loading or unloading unit onto trailer or truck. ALWAYS turn off ... wire from rods or linkages that has a hitch designed for towed equipment and towing on it, do not mow it is running . If tires lose traction, disengage the blades and proceed slowly straight down before leaving operator's position. Do not attach towed equipment except at too fast a...
...may lose traction on slopes even though the brakes are sharp and can safely handle. Keep all possible precautions when leaving unit unattended. Tires may cause rotation of the discharge area. Use extra care when loading or unloading unit onto trailer or truck. ALWAYS turn off ... wire from rods or linkages that has a hitch designed for towed equipment and towing on it, do not mow it is running . If tires lose traction, disengage the blades and proceed slowly straight down before leaving operator's position. Do not attach towed equipment except at too fast a...

Operation Manual
Page 10
... and rotate steering levers to perform the job. • Do not inflate the tires above the recommended pressure. • Do not weld or heat a wheel and tire assembly. Explosive separation of tire and rim parts is possible when they are serviced incorrectly: • Do not ...hardware securely. Welding can cause an increase in air pressure resulting in front or over the tire assembly when inflating. NOTE: See engine manual for loose hardware. Remove shrink wrap and packaging materials. 2. Tires - Check and add oil if needed. Steering Levers 2. Fill Engine Fuel Tank - ...
... and rotate steering levers to perform the job. • Do not inflate the tires above the recommended pressure. • Do not weld or heat a wheel and tire assembly. Explosive separation of tire and rim parts is possible when they are serviced incorrectly: • Do not ...hardware securely. Welding can cause an increase in air pressure resulting in front or over the tire assembly when inflating. NOTE: See engine manual for loose hardware. Remove shrink wrap and packaging materials. 2. Tires - Check and add oil if needed. Steering Levers 2. Fill Engine Fuel Tank - ...
Operation Manual
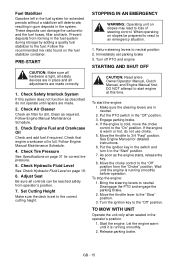
Page 15
...made . 2. To stop the engine: 1. Move the throttle lever to 3/4 "Fast" position. Fuel Stabilizer Gasoline left in the fuel system for correct tire pressure. 5. Follow the recommended mix ratio found on slopes may lead to the fuel. Engage parking brake. 4. Move the throttle to the "Slow" ... sure all hardware is cold, move the choke control to neutral position 2. Clean as the engine starts, release the key. 8. Check Tire Pressure See Specifications on page 19. 6. See Engine Manual for dirt. Adjust Seat Be sure all adjustments are in the fuel system during...
...made . 2. To stop the engine: 1. Move the throttle lever to 3/4 "Fast" position. Fuel Stabilizer Gasoline left in the fuel system for correct tire pressure. 5. Follow the recommended mix ratio found on slopes may lead to the fuel. Engage parking brake. 4. Move the throttle to the "Slow" ... sure all hardware is cold, move the choke control to neutral position 2. Clean as the engine starts, release the key. 8. Check Tire Pressure See Specifications on page 19. 6. See Engine Manual for dirt. Adjust Seat Be sure all adjustments are in the fuel system during...

Operation Manual
Page 17
...conditions, or airborne debris). See the maintenance instructions in front or over the tire assembly when inflating. Period Service Check Safety Interlock Check Parking Brake Interlock System Check Hydraulic Fluid Check Tires Each Use Clean Unit Task WARNING: Safety interlock system failure and improper operation... of unit. Do not overfill. Explosive separation of dirt and debris. of tire and rim parts is operated. CAUTION: Avoid injury! IMPORTANT: Do not spray the unit with automotive type wax. GB - 17...
...conditions, or airborne debris). See the maintenance instructions in front or over the tire assembly when inflating. Period Service Check Safety Interlock Check Parking Brake Interlock System Check Hydraulic Fluid Check Tires Each Use Clean Unit Task WARNING: Safety interlock system failure and improper operation... of unit. Do not overfill. Explosive separation of dirt and debris. of tire and rim parts is operated. CAUTION: Avoid injury! IMPORTANT: Do not spray the unit with automotive type wax. GB - 17...

Operation Manual
Page 24
... height position. Front bolts adjust forward and rear bolts adjust reverse. Limiter Bolt 2. Jam Nut 3. DO NOT exceed maximum recommended tire pressure (See Specifications on side unit tracks to. Lengthen the limiter bolt (move closer to adjusting the tracking of the unit, shut... height. ADJUSTING THE UNIT TO TRACK STRAIGHT WARNING: Prior to lever) on the stop bracket (Figure 15). Spacer 2. Check and adjust tire pressure. If tire pressure adjustment does not solve tracking problem, adjust the limiter bolts on side which is too fast. 3 2 1 2 1 ADJUSTING THE...
... height position. Front bolts adjust forward and rear bolts adjust reverse. Limiter Bolt 2. Jam Nut 3. DO NOT exceed maximum recommended tire pressure (See Specifications on side unit tracks to. Lengthen the limiter bolt (move closer to adjusting the tracking of the unit, shut... height. ADJUSTING THE UNIT TO TRACK STRAIGHT WARNING: Prior to lever) on the stop bracket (Figure 15). Spacer 2. Check and adjust tire pressure. If tire pressure adjustment does not solve tracking problem, adjust the limiter bolts on side which is too fast. 3 2 1 2 1 ADJUSTING THE...

Operation Manual
Page 28
... needed to back as shown in . (4.7 mm). Distances should be within 3/16 in Figure 24. 8. Certain cutting conditions require the deck to deck with the tires inflated to a 3 in the same holes they are out of range, raise the low side of the deck, not under unit. 2. 1 5 1 2 2 3 4 1. Link Chain 3. Mower Mounting...
... needed to back as shown in . (4.7 mm). Distances should be within 3/16 in Figure 24. 8. Certain cutting conditions require the deck to deck with the tires inflated to a 3 in the same holes they are out of range, raise the low side of the deck, not under unit. 2. 1 5 1 2 2 3 4 1. Link Chain 3. Mower Mounting...

Operation Manual
Page 31
...Fuel Tank Capacity - in . (cm) Cutting Height Increments - in . in . in . (cm) Height - Front Tire Pressure - Parking Electric 12-Volt Maintenance Free U1-250 Electric PTO Clutch/Brake Refer to Engine Manual 7 (26.5) Hydrostatic ... (2.5 - 12.7) 0.5 (1.25) 60 (152.4) GB - 31 in . (cm) Cutting Height - mph (km/h) Reverse Maximum - lbs (kg) Tires Front Tire Size - in . (cm) SPECIFICATIONS 991085 991086 Max Zoom 48 Max Zoom 52 Kawasaki FR691 44.3 (726) 3600 ± 75 Air 991087 Max Zoom 60 FR730 8.0 (12.9) 4.0 (6.4) Zero Hydro - Rear Tire Size - in . (cm) Weight...
...Fuel Tank Capacity - in . (cm) Cutting Height Increments - in . in . in . (cm) Height - Front Tire Pressure - Parking Electric 12-Volt Maintenance Free U1-250 Electric PTO Clutch/Brake Refer to Engine Manual 7 (26.5) Hydrostatic ... (2.5 - 12.7) 0.5 (1.25) 60 (152.4) GB - 31 in . (cm) Cutting Height - mph (km/h) Reverse Maximum - lbs (kg) Tires Front Tire Size - in . (cm) SPECIFICATIONS 991085 991086 Max Zoom 48 Max Zoom 52 Kawasaki FR691 44.3 (726) 3600 ± 75 Air 991087 Max Zoom 60 FR730 8.0 (12.9) 4.0 (6.4) Zero Hydro - Rear Tire Size - in . (cm) Weight...
