

Owners Manual
Page 1
... No. 10000 and up) Gasoline containing up to 10% MTBE (methyl tertiary butyl ether) is acceptable for use in USA Zoom XL® Owner/Operator Manual Manuel Du Propriétaire/Utilisateur Models 915163 - Il est possible d'utiliser de l'essence contenant jusqu'à 10% d'é...méthyl-tertiobutylique) sur cette machine.L'utilisation d'une essence contenant plus de 10% d'éthanol (E10) ou de 10% de MTBE annulent la garantie. Zoom XL 42 (Serial No. 10000 and up to 10% ethanol (E10) or up ) 915165 - ENGLISH FRANÇAIS 04043500A 9/11 Printed in this machine.The use...
... No. 10000 and up) Gasoline containing up to 10% MTBE (methyl tertiary butyl ether) is acceptable for use in USA Zoom XL® Owner/Operator Manual Manuel Du Propriétaire/Utilisateur Models 915163 - Il est possible d'utiliser de l'essence contenant jusqu'à 10% d'é...méthyl-tertiobutylique) sur cette machine.L'utilisation d'une essence contenant plus de 10% d'éthanol (E10) ou de 10% de MTBE annulent la garantie. Zoom XL 42 (Serial No. 10000 and up to 10% ethanol (E10) or up ) 915165 - ENGLISH FRANÇAIS 04043500A 9/11 Printed in this machine.The use...

Owners Manual
Page 2
...én puede imprimir manuales en idiomas diferentes del inglés descargándolos gratuitamente de nuestra página Web: http://www.ariens.com MANUELS NON ANGLAIS Des manuels dans différentes langues sont disponibles chez votre revendeur. All reference to the engine. MODEL AND... also available as a free download on this manual for engine service recommendations. ENGINE MANUAL The engine on our website: http://www.ariens.com MANUALES EN IDIOMAS DIFERENTES DEL INGLES Puede obtener manuales en idiomas diferentes del inglés en su distribuidor. TABLE OF CONTENTS ...
...én puede imprimir manuales en idiomas diferentes del inglés descargándolos gratuitamente de nuestra página Web: http://www.ariens.com MANUELS NON ANGLAIS Des manuels dans différentes langues sont disponibles chez votre revendeur. All reference to the engine. MODEL AND... also available as a free download on this manual for engine service recommendations. ENGINE MANUAL The engine on our website: http://www.ariens.com MANUALES EN IDIOMAS DIFERENTES DEL INGLES Puede obtener manuales en idiomas diferentes del inglés en su distribuidor. TABLE OF CONTENTS ...
Owners Manual
Page 3
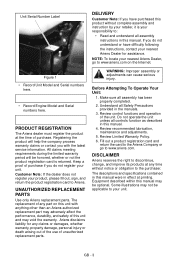
... during the limited warranty period will help the company process warranty claims or contact you with anything other than an Ariens authorized replacement part may adversely affect the performance, durability, and safety of any part on the Internet. UNAUTHORIZED REPLACEMENT PARTS Use only...the use of purchase if you do not understand or have purchased this product without notice or obligation to www.ariens.com. If you do not register your nearest Ariens Dealer, go to the purchaser. WARNING: Improper assembly or adjustments can cause serious injury. Review control functions ...
... during the limited warranty period will help the company process warranty claims or contact you with anything other than an Ariens authorized replacement part may adversely affect the performance, durability, and safety of any part on the Internet. UNAUTHORIZED REPLACEMENT PARTS Use only...the use of purchase if you do not understand or have purchased this product without notice or obligation to www.ariens.com. If you do not register your nearest Ariens Dealer, go to the purchaser. WARNING: Improper assembly or adjustments can cause serious injury. Review control functions ...
Owners Manual
Page 4
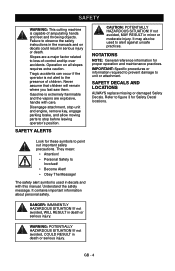
Slopes are explosive, handle with this manual. Never assume that children will remain where you last saw them. Disengage attachment, stop unit and engine, remove key, engage parking brake, and allow moving parts to unit or attachment. It may also be used in serious injury or death. IMPORTANT: Specific procedures or information required to prevent damage to stop before leaving operator's position. DANGER: IMMINENTLY HAZARDOUS SITUATION! NOTATIONS NOTE: General reference information for these symbols to point out important safety precautions. They mean: • Attention! &#...
Slopes are explosive, handle with this manual. Never assume that children will remain where you last saw them. Disengage attachment, stop unit and engine, remove key, engage parking brake, and allow moving parts to unit or attachment. It may also be used in serious injury or death. IMPORTANT: Specific procedures or information required to prevent damage to stop before leaving operator's position. DANGER: IMMINENTLY HAZARDOUS SITUATION! NOTATIONS NOTE: General reference information for these symbols to point out important safety precautions. They mean: • Attention! &#...
Owners Manual
Page 5
Avoid sudden turns. Understand location and function of rotating parts. POUR EVITER LES BLESSURES PARA EVITAR DANOS SERIOS GRAVES OU LA MORT O LA MUERTE Regardez derriere et sur les cotes lorsque Antes y durante retroceso mirar hacia abajo vous reculez. Suba y baje Tondez toujours de haut en bas et inversement pendientes, no transversalmente. Si la machines maquina se detiene subiendo cuesta, s'arrete en montee. Evitez les virages viradas subitas. Tenga conocimiento de utilisation tel qu'indique dans le manuel funciones y localizaciones de todos los d'utilisation. Ne jamais ...
Avoid sudden turns. Understand location and function of rotating parts. POUR EVITER LES BLESSURES PARA EVITAR DANOS SERIOS GRAVES OU LA MORT O LA MUERTE Regardez derriere et sur les cotes lorsque Antes y durante retroceso mirar hacia abajo vous reculez. Suba y baje Tondez toujours de haut en bas et inversement pendientes, no transversalmente. Si la machines maquina se detiene subiendo cuesta, s'arrete en montee. Evitez les virages viradas subitas. Tenga conocimiento de utilisation tel qu'indique dans le manuel funciones y localizaciones de todos los d'utilisation. Ne jamais ...
Owners Manual
Page 6
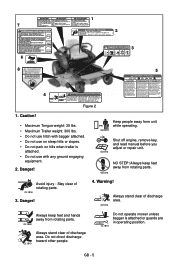
5. OL1801 DO NOT touch parts which are in place and working. • Check interlock system per manual before and while backing. ALWAYS allow operation by untrained persons. • Disengage PTO, stop blade and back down and behind before use. • Understand location and function of neck - Keep hands and feet away. To Avoid Serious Injury or Death Read the operator's manual. No smoking. Never overfill fuel tank. • Replace fuel cap securely and clean up and down slopes, not across. Danger! OL1802 Never direct discharge toward other people. ...
5. OL1801 DO NOT touch parts which are in place and working. • Check interlock system per manual before and while backing. ALWAYS allow operation by untrained persons. • Disengage PTO, stop blade and back down and behind before use. • Understand location and function of neck - Keep hands and feet away. To Avoid Serious Injury or Death Read the operator's manual. No smoking. Never overfill fuel tank. • Replace fuel cap securely and clean up and down slopes, not across. Danger! OL1802 Never direct discharge toward other people. ...

Owners Manual
Page 7
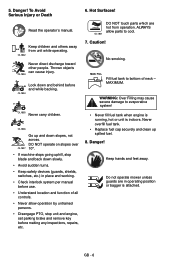
... Protection Agency (EPA) and/or California Air Resources Board (CARB) regulations. Only the user can only be used by an Ariens Company dealer or an authorized engine manufacturer's service center. ALWAYS check overhead and side clearances carefully before each use and when crossing... NEVER operate unit after or during operation. DO NOT touch unit parts which eject hydraulic fluid under watchful care of your Ariens Company Equipment Retailer concerning emission controls and component questions. Avoid sharp edges. ALWAYS keep hands and feet away from all toys,...
... Protection Agency (EPA) and/or California Air Resources Board (CARB) regulations. Only the user can only be used by an Ariens Company dealer or an authorized engine manufacturer's service center. ALWAYS check overhead and side clearances carefully before each use and when crossing... NEVER operate unit after or during operation. DO NOT touch unit parts which eject hydraulic fluid under watchful care of your Ariens Company Equipment Retailer concerning emission controls and component questions. Avoid sharp edges. ALWAYS keep hands and feet away from all toys,...
Owners Manual
Page 8
Reduced traction could be prepared to react to an emergency situation: • Return steering levers to neutral position. • Immediately set parking brake. DO NOT mow with an appropriately sized dispensing spout. Know the weight of steering control. DO NOT operate in or on the ground. Keep all times until fueling is down, or secured down, with a spark arrester meeting applicable local, state or federal laws. DO NOT operate on any unimproved, forest-covered or brush covered land unless exhaust system is spilled on slopes may obscure vision of control. NEVER...
Reduced traction could be prepared to react to an emergency situation: • Return steering levers to neutral position. • Immediately set parking brake. DO NOT mow with an appropriately sized dispensing spout. Know the weight of steering control. DO NOT operate in or on the ground. Keep all times until fueling is down, or secured down, with a spark arrester meeting applicable local, state or federal laws. DO NOT operate on any unimproved, forest-covered or brush covered land unless exhaust system is spilled on slopes may obscure vision of control. NEVER...
Owners Manual
Page 9
Poisonous battery fluid contains sulfuric acid and its contact with skin, eyes or clothing can cause serious injury. Use insulated tools. ALWAYS disconnect negative (-) cable FIRST and positive (+) cable SECOND. ALWAYS connect positive (+) cable FIRST, and negative (-) cable SECOND. Repair, if necessary, before putting on a charger or jump starting. Never make adjustments or repairs with manufacturer's recommended parts. Wrap the blade(s) or wear gloves, and use extra caution when servicing them. NEVER weld or straighten mower blades. Check brake operation frequently. Never ...
Poisonous battery fluid contains sulfuric acid and its contact with skin, eyes or clothing can cause serious injury. Use insulated tools. ALWAYS disconnect negative (-) cable FIRST and positive (+) cable SECOND. ALWAYS connect positive (+) cable FIRST, and negative (-) cable SECOND. Repair, if necessary, before putting on a charger or jump starting. Never make adjustments or repairs with manufacturer's recommended parts. Wrap the blade(s) or wear gloves, and use extra caution when servicing them. NEVER weld or straighten mower blades. Check brake operation frequently. Never ...

Owners Manual
Page 10
Place Unit in the installation section. Remove hardware from the transport position and place the discharge chute in the operating position. Adjust steering levers (see Adjusting Seat on page 15). 3. GB - 10 Connect Battery See Battery Removal and Installation on page 23). 1 3 2 1. Slide steering lever back to operating the unit, remove the discharge chute from top hole of the steering pivot arm. Steering Lever 2. Adjust the seat as possible. 1. If no adjustment is in the operating position (figure 4). Push steering levers aside and tip seat up. 2. ...
Place Unit in the installation section. Remove hardware from the transport position and place the discharge chute in the operating position. Adjust steering levers (see Adjusting Seat on page 15). 3. GB - 10 Connect Battery See Battery Removal and Installation on page 23). 1 3 2 1. Slide steering lever back to operating the unit, remove the discharge chute from top hole of the steering pivot arm. Steering Lever 2. Adjust the seat as possible. 1. If no adjustment is in the operating position (figure 4). Push steering levers aside and tip seat up. 2. ...
Owners Manual
Page 11
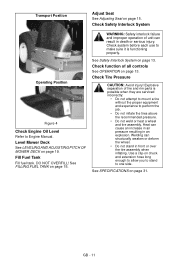
Check system before each use to make sure it is possible when they are serviced incorrectly: • Do not attempt to mount a tire without the proper equipment and experience to perform the job. • Do not inflate the tires above the recommended pressure. • Do not weld or heat a wheel and tire assembly. See Safety Interlock System on page 13. Explosive separation of tire and rim parts is functioning properly. Check function of unit can result in death or serious injury. Welding can cause an increase in air pressure resulting in front or over the tire assembly...
Check system before each use to make sure it is possible when they are serviced incorrectly: • Do not attempt to mount a tire without the proper equipment and experience to perform the job. • Do not inflate the tires above the recommended pressure. • Do not weld or heat a wheel and tire assembly. See Safety Interlock System on page 13. Explosive separation of tire and rim parts is functioning properly. Check function of unit can result in death or serious injury. Welding can cause an increase in air pressure resulting in front or over the tire assembly...
Owners Manual
Page 12
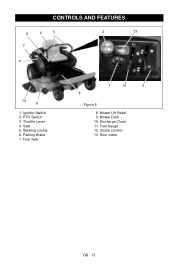
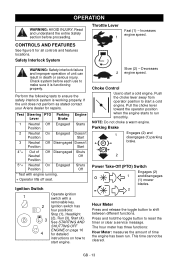
Ignition Switch 2. Mower Deck 10. Fuel Gauge 12. Parking Brake 7. Mower Lift Pedal 9. Steering Levers 6. Throttle Lever 4. Discharge Chute 11. Fuel Tank 1 12 3 8 Figure 5 8. Seat 5. PTO Switch 3. Hour meter GB - 12 CONTROLS AND FEATURES 6 4 5 7 2 13 11 10 9 1. Choke Control 13.
Ignition Switch 2. Mower Deck 10. Fuel Gauge 12. Parking Brake 7. Mower Lift Pedal 9. Steering Levers 6. Throttle Lever 4. Discharge Chute 11. Fuel Tank 1 12 3 8 Figure 5 8. Seat 5. PTO Switch 3. Hour meter GB - 12 CONTROLS AND FEATURES 6 4 5 7 2 13 11 10 9 1. Choke Control 13.
Owners Manual
Page 13
Increases engine speed. CONTROLS AND FEATURES See figure 5 for repairs. If the unit does not perform as stated contact your Ariens dealer for all controls and features locations. Slow (2) - Parking Brake 1 Engages (2) and disengages (1) parking brake. 2 Power Take-Off (PTO) Switch Engages (2) 1 and disengages (1) mower blades. 2 ...
Increases engine speed. CONTROLS AND FEATURES See figure 5 for repairs. If the unit does not perform as stated contact your Ariens dealer for all controls and features locations. Slow (2) - Parking Brake 1 Engages (2) and disengages (1) parking brake. 2 Power Take-Off (PTO) Switch Engages (2) 1 and disengages (1) mower blades. 2 ...

Owners Manual
Page 14
The meter flashes the word, "Now," when it is reset to zero. Press and hold the toggle button to reset the timer to zero again. Display 1 2 3 4 NOTE: To stop, return both steering levers to zero after performing the service. NOTE: The parking brake must be disengaged prior to set the height of the maintenance interval for changing the engine oil, changing the hydraulic oil and filter and servicing the air filter. Pull both steering levers forward. • Left (3) - Push both steering levers backward. • Forward (2) - Service Alert (Chg Oil, Chg H Oil & ...
The meter flashes the word, "Now," when it is reset to zero. Press and hold the toggle button to reset the timer to zero again. Display 1 2 3 4 NOTE: To stop, return both steering levers to zero after performing the service. NOTE: The parking brake must be disengaged prior to set the height of the maintenance interval for changing the engine oil, changing the hydraulic oil and filter and servicing the air filter. Pull both steering levers forward. • Left (3) - Push both steering levers backward. • Forward (2) - Service Alert (Chg Oil, Chg H Oil & ...
Owners Manual
Page 15
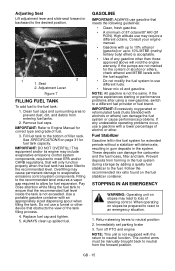
Pay close attention while filling the fuel tank to the fuel tank: 1. ALWAYS clean up to Engine Manual for fuel expansion. NOTE: All gasoline is not equipped with the return to allow for correct type and grade of any undesirable operating problems occur, use a funnel or other than those approved above will deteriorate, resulting in gum deposits in the fuel system during storage by adding a quality fuel stabilizer to the desired position. 1 2 1. Adjustment Lever Figure 7 FILLING FUEL TANK To add fuel to ensure that will only function properly when the fuel tank...
Pay close attention while filling the fuel tank to the fuel tank: 1. ALWAYS clean up to Engine Manual for fuel expansion. NOTE: All gasoline is not equipped with the return to allow for correct type and grade of any undesirable operating problems occur, use a funnel or other than those approved above will deteriorate, resulting in gum deposits in the fuel system during storage by adding a quality fuel stabilizer to the desired position. 1 2 1. Adjustment Lever Figure 7 FILLING FUEL TANK To add fuel to ensure that will only function properly when the fuel tank...
Owners Manual
Page 16
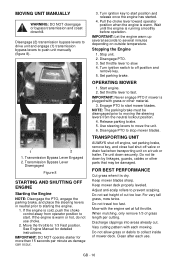
Transmission Bypass Lever Disengaged Figure 8 STARTING AND SHUTTING OFF ENGINE Starting the Engine NOTE: Disengage the PTO, engage the parking brake, and place the steering levers in neutral prior to slow. 4. OPERATING MOWER 1. Engage PTO to several minutes depending on a truck or trailer. Do not tie down securely. Do not travel too fast. Mow with the engine set parking brake, remove key, and close fuel shut-off valve or drain fuel when transporting unit on outside temperature. GB - 16 If the engine is warm. IMPORTANT: Let the engine warm up several seconds to ...
Transmission Bypass Lever Disengaged Figure 8 STARTING AND SHUTTING OFF ENGINE Starting the Engine NOTE: Disengage the PTO, engage the parking brake, and place the steering levers in neutral prior to slow. 4. OPERATING MOWER 1. Engage PTO to several minutes depending on a truck or trailer. Do not tie down securely. Do not travel too fast. Mow with the engine set parking brake, remove key, and close fuel shut-off valve or drain fuel when transporting unit on outside temperature. GB - 16 If the engine is warm. IMPORTANT: Let the engine warm up several seconds to ...

Owners Manual
Page 17
If unit rolls, contact your Ariens Dealer. of unit can result in an explosion. Water can cause an increase in air pressure resulting in death or serious injury. Heat can seep ...
If unit rolls, contact your Ariens Dealer. of unit can result in an explosion. Water can cause an increase in air pressure resulting in death or serious injury. Heat can seep ...
Owners Manual
Page 18
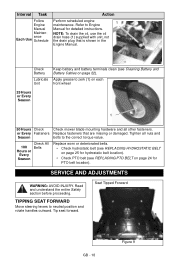
Check Battery Lubricate Unit Keep battery and battery terminals clean (see REPLACING PTO BELT on page 22). Tighten all other fasteners. TIPPING SEAT FORWARD Move steering levers to Engine 1 Manual for hydrostatic belt location). • Check PTO belt (see Cleaning Battery and Battery Cables on page 24 for PTO belt location). Interval Task Follow Engine Manual Maintenance Each Use Schedule Action Perform scheduled engine maintenance. Check All 100 Belts Hours or Every Season Replace worn or deteriorated belts. • Check hydrostatic belt (see REPLACING HYDROSTATIC BELT on ...
Check Battery Lubricate Unit Keep battery and battery terminals clean (see REPLACING PTO BELT on page 22). Tighten all other fasteners. TIPPING SEAT FORWARD Move steering levers to Engine 1 Manual for hydrostatic belt location). • Check PTO belt (see Cleaning Battery and Battery Cables on page 24 for PTO belt location). Interval Task Follow Engine Manual Maintenance Each Use Schedule Action Perform scheduled engine maintenance. Check All 100 Belts Hours or Every Season Replace worn or deteriorated belts. • Check hydrostatic belt (see REPLACING HYDROSTATIC BELT on ...
Owners Manual
Page 19
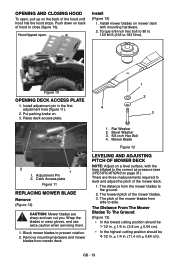
Torque 5/8-inch hex bolt to 80 to 120 lbf-ft (108 to prevent rotation. 2. Block mower blades to 163 N•m). There are sharp and can cut you. The forward pitch of the mower deck. 1. GB - 19 Figure 10 OPENING DECK ACCESS PLATE 1. Install (Figure 12) 1. Install adjustment pin in . (11.4 cm + 0.64 cm). Adjustment Pin 2. Wrap the blades or wear gloves, and use extra caution when servicing them. 1. The pitch of the hood until hood hits the hood stops. Flat Washer 2. Mower Blade Figure 12 LEVELING AND ADJUSTING PITCH OF MOWER DECK NOTE: Adjust on a level surface, ...
Torque 5/8-inch hex bolt to 80 to 120 lbf-ft (108 to prevent rotation. 2. Block mower blades to 163 N•m). There are sharp and can cut you. The forward pitch of the mower deck. 1. GB - 19 Figure 10 OPENING DECK ACCESS PLATE 1. Install (Figure 12) 1. Install adjustment pin in . (11.4 cm + 0.64 cm). Adjustment Pin 2. Wrap the blades or wear gloves, and use extra caution when servicing them. 1. The pitch of the hood until hood hits the hood stops. Flat Washer 2. Mower Blade Figure 12 LEVELING AND ADJUSTING PITCH OF MOWER DECK NOTE: Adjust on a level surface, ...
Owners Manual
Page 20
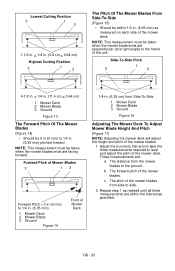
NOTE: This measurement must be taken when the mower blade ends are facing forward. Ground Figure 13 The Forward Pitch Of The Mower Blades (Figure 14) • Should be 0 in (0 mm) to the frame of the unit. NOTE: This measurement must be taken when the mower blades ends are perpendicular (at a right angle) to 1/4 in . (6.35 mm) 1. Mower Blade 3. The forward pitch of the mower blades. 1. Repeat step 1 as measured on each side of Mower Blades 3 12 Forward Pitch = 0 in (0 mm) to -side. 2. GB - 20 Forward Pitch of the mower deck. Mower Deck 2. c. Mower Blade 3. ...
NOTE: This measurement must be taken when the mower blade ends are facing forward. Ground Figure 13 The Forward Pitch Of The Mower Blades (Figure 14) • Should be 0 in (0 mm) to the frame of the unit. NOTE: This measurement must be taken when the mower blades ends are perpendicular (at a right angle) to 1/4 in . (6.35 mm) 1. Mower Blade 3. The forward pitch of the mower blades. 1. Repeat step 1 as measured on each side of Mower Blades 3 12 Forward Pitch = 0 in (0 mm) to -side. 2. GB - 20 Forward Pitch of the mower deck. Mower Deck 2. c. Mower Blade 3. ...