

ASKO Design Guide
Page 2
Contents 3 Asko Dishwashers 4 Specifications 8 Custom Panel 9 Asko Washers | Dryers 11 Specifications 19 Warranty Features and specifications are millimeters unless otherwise specified. Visit askona.com/specs for the most up-to change at any time without notice. Dimensions in parentheses are subject to -date information. IMPORTANT NOTE: Throughout this guide, dimensions may vary by ± 1/8" (3).
Contents 3 Asko Dishwashers 4 Specifications 8 Custom Panel 9 Asko Washers | Dryers 11 Specifications 19 Warranty Features and specifications are millimeters unless otherwise specified. Visit askona.com/specs for the most up-to change at any time without notice. Dimensions in parentheses are subject to -date information. IMPORTANT NOTE: Throughout this guide, dimensions may vary by ± 1/8" (3).

ASKO Design Guide
Page 3
... HANDLE DBI663THS DBI664THXXLS DBI675THXXLS PRO HANDLE DBI663PHS DBI664PHXXLS DBI675PHXXLS PANEL READY DFI663 DFI663XXL OUTDOOR DFI664 DFI664XXL DFI664XXLSOF DFI675XXL DOD651PHXXLS D5956OUTDOORPH askona.com/specs | 3 Our products meet the highest demands in performance and durability, as well as environmental awareness. ASKO DISHWASHERS Asko Dishwashers At Asko, we design and manufacture premium quality dishwashers with a special Scandinavian touch for design...
... HANDLE DBI663THS DBI664THXXLS DBI675THXXLS PRO HANDLE DBI663PHS DBI664PHXXLS DBI675PHXXLS PANEL READY DFI663 DFI663XXL OUTDOOR DFI664 DFI664XXL DFI664XXLSOF DFI675XXL DOD651PHXXLS D5956OUTDOORPH askona.com/specs | 3 Our products meet the highest demands in performance and durability, as well as environmental awareness. ASKO DISHWASHERS Asko Dishwashers At Asko, we design and manufacture premium quality dishwashers with a special Scandinavian touch for design...
ASKO Design Guide
Page 4
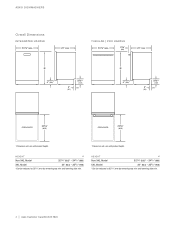
.../4" (832)* - 343/4" (883) XXL Model 34" (864) - 353/4" (908) *Can be reduced to 321/4" (819) by removing top trim and lowering side trim. 4 | Asko Customer Care 800.222.7820 ASKO DISHWASHERS Overall Dimensions INTEGRATED HANDLE 237/8" (606) 22" (559) TUBULAR | PRO HANDLE 237/8" (606) 23/8" (60) 22" (559) H 4" (102)* 53/8"* (137) 2" (51) H 4" (102...
.../4" (832)* - 343/4" (883) XXL Model 34" (864) - 353/4" (908) *Can be reduced to 321/4" (819) by removing top trim and lowering side trim. 4 | Asko Customer Care 800.222.7820 ASKO DISHWASHERS Overall Dimensions INTEGRATED HANDLE 237/8" (606) 22" (559) TUBULAR | PRO HANDLE 237/8" (606) 23/8" (60) 22" (559) H 4" (102)* 53/8"* (137) 2" (51) H 4" (102...

ASKO Design Guide
Page 5
ASKO DISHWASHERS Overall Dimensions PANEL READY 235/8" (600) 22" (559) OUTDOOR 245/8" (625) 23/8" (60) 25" (635) H 4" (102)* 53/8"* (137) 2" (51) H 4" (102)* 47/8" (124) 53/8"* (137) OPEN ...
ASKO DISHWASHERS Overall Dimensions PANEL READY 235/8" (600) 22" (559) OUTDOOR 245/8" (625) 23/8" (60) 25" (635) H 4" (102)* 53/8"* (137) 2" (51) H 4" (102)* 47/8" (124) 53/8"* (137) OPEN ...
ASKO Design Guide
Page 6
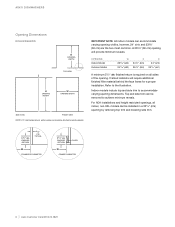
.... 31/2" (89) FINISHED RETURN 3/4" (19) TYPICAL W FRAMELESS CABINETRY 31/2" (89) FINISHED RETURN FILLER W FRAMED CABINETRY 6 | Asko Customer Care 800.222.7820 A 235/8" (60 cm) opening will require additional finished filler material behind the face frame for a proper installation...cm) are the two most common. Framed cabinets will provide minimum reveals. Top and side trim can accommodate varying opening . ASKO DISHWASHERS Opening Dimensions DISHWASHERS D OPENING DEPTH TOP VIEW H OPENING HEIGHT W OPENING WIDTH SIDE VIEW FRONT VIEW NOTE: 31/2" (89) finished returns will...
.... 31/2" (89) FINISHED RETURN 3/4" (19) TYPICAL W FRAMELESS CABINETRY 31/2" (89) FINISHED RETURN FILLER W FRAMED CABINETRY 6 | Asko Customer Care 800.222.7820 A 235/8" (60 cm) opening will require additional finished filler material behind the face frame for a proper installation...cm) are the two most common. Framed cabinets will provide minimum reveals. Top and side trim can accommodate varying opening . ASKO DISHWASHERS Opening Dimensions DISHWASHERS D OPENING DEPTH TOP VIEW H OPENING HEIGHT W OPENING WIDTH SIDE VIEW FRONT VIEW NOTE: 31/2" (89) finished returns will...

ASKO Design Guide
Page 7
... circuit 3-prong grounding-type Plumbing The water supply and drain should be located in an adjacent cabinet. Installation must comply with all applicable electrical codes. ASKO DISHWASHERS Electrical The electrical supply should be located in an adjacent cabinet. OPENING WIDTH 53/8" (137) AREA EXTENDS 2" (51) FORWARD ON FLOOR Water supply and drain...
... circuit 3-prong grounding-type Plumbing The water supply and drain should be located in an adjacent cabinet. Installation must comply with all applicable electrical codes. ASKO DISHWASHERS Electrical The electrical supply should be located in an adjacent cabinet. OPENING WIDTH 53/8" (137) AREA EXTENDS 2" (51) FORWARD ON FLOOR Water supply and drain...
ASKO Design Guide
Page 8
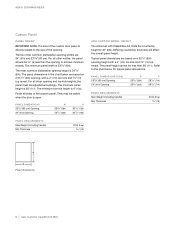
... reveals. The minimum toe kick height is 233/8" (594). Finish all other widths, the panel should be adjusted accordingly. The two most common dishwasher opening height with a 4" (102) toe kick and 3/8" (10) top reveal. Differing countertop thickness will affect the overall panel height. The ... Thickness 20 lb (9 kg) 3/4" (19) ADA CUSTOM PANEL HEIGHT The American with a 4" (102) toe kick and 3/8" (10) top reveal. ASKO DISHWASHERS Custom Panel PANEL READY IMPORTANT NOTE: The size of the custom door panel is directly related to 34" (864). PANEL DIMENSIONS (ADA) 235/8" (60 ...
... reveals. The minimum toe kick height is 233/8" (594). Finish all other widths, the panel should be adjusted accordingly. The two most common dishwasher opening height with a 4" (102) toe kick and 3/8" (10) top reveal. Differing countertop thickness will affect the overall panel height. The ... Thickness 20 lb (9 kg) 3/4" (19) ADA CUSTOM PANEL HEIGHT The American with a 4" (102) toe kick and 3/8" (10) top reveal. ASKO DISHWASHERS Custom Panel PANEL READY IMPORTANT NOTE: The size of the custom door panel is directly related to 34" (864). PANEL DIMENSIONS (ADA) 235/8" (60 ...

ASKO Design Guide
Page 19
... OF MERCHANTABILITY AND FITNESS FOR A PARTICULAR PURPOSE. You also may not apply to you on the right inside the dishwasher. The ASKO Product is not installed in this Limited Warranty, please contact ASKO Customer Care at 1-800-898-1879. DISCLAIMER YOUR SOLE AND EXCLUSIVE REMEDY UNDER THIS LIMITED WARRANTY SHALL BE PRODUCT REPAIR...
... OF MERCHANTABILITY AND FITNESS FOR A PARTICULAR PURPOSE. You also may not apply to you on the right inside the dishwasher. The ASKO Product is not installed in this Limited Warranty, please contact ASKO Customer Care at 1-800-898-1879. DISCLAIMER YOUR SOLE AND EXCLUSIVE REMEDY UNDER THIS LIMITED WARRANTY SHALL BE PRODUCT REPAIR...

Use and Care Guide
Page 1
OPERATING INSTRUCTIONS Dishwasher DBI664 XXL
OPERATING INSTRUCTIONS Dishwasher DBI664 XXL
Use and Care Guide
Page 2
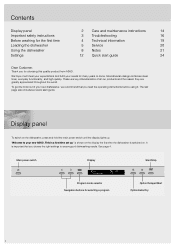
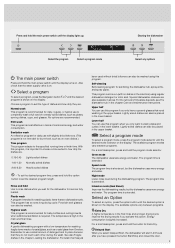
... the right settings to come. is shown on the display the first time the dishwasher is a first time set up . These are key characteristics of your new ASKO. Display panel To switch on . Scandinavian design combines clean lines, everyday functionality, ...mode 2:00 Program mode selector Navigation buttons for choosing this quality product from ASKO. Contents Display panel Important safety instructions Before washing for the first time Loading the dishwasher Using the dishwasher Settings 2 Care and maintenance instructions 14 3 Troubleshooting 16 4 Technical information 19...
... the right settings to come. is shown on the display the first time the dishwasher is a first time set up . These are key characteristics of your new ASKO. Display panel To switch on . Scandinavian design combines clean lines, everyday functionality, ...mode 2:00 Program mode selector Navigation buttons for choosing this quality product from ASKO. Contents Display panel Important safety instructions Before washing for the first time Loading the dishwasher Using the dishwasher Settings 2 Care and maintenance instructions 14 3 Troubleshooting 16 4 Technical information 19...
Use and Care Guide
Page 3
... for two weeks, before servicing. • Repairs should immediately be produced in very cold weather. • Transport the dishwasher upright or laying on a dishwasher. • Under certain conditions, hydrogen gas may be done by a qualified technician. See the chapter Settings. Packing material...two weeks or more. For plastic items not so marked, check the manufacturer's recommendations. • Do not operate the dishwasher unless all hot water faucets and let the water flow from polyethylene (PE). Installation See the separate installation instructions. The packaging...
... for two weeks, before servicing. • Repairs should immediately be produced in very cold weather. • Transport the dishwasher upright or laying on a dishwasher. • Under certain conditions, hydrogen gas may be done by a qualified technician. See the chapter Settings. Packing material...two weeks or more. For plastic items not so marked, check the manufacturer's recommendations. • Do not operate the dishwasher unless all hot water faucets and let the water flow from polyethylene (PE). Installation See the separate installation instructions. The packaging...
Use and Care Guide
Page 4
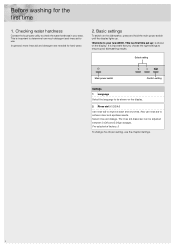
... needed for the first time 1. Basic settings To switch on the display. 2 Rinse aid 0/1/2/3/4/5 Use rinse aid to ensure good dishwashing results. This is shown on the display. Pre-selected at factory: 5 To change the chosen setting, see the chapter Settings. ...and dry times. Also use . is a first time set up . The rinse aid dispenser can be shown on the dishwasher, press and hold the main power switch until the display lights up ." Checking water hardness Contact the local water utility ...detergent and rinse aid to use rinse aid to check the water hardness in your new ASKO.
... needed for the first time 1. Basic settings To switch on the display. 2 Rinse aid 0/1/2/3/4/5 Use rinse aid to ensure good dishwashing results. This is shown on the display. Pre-selected at factory: 5 To change the chosen setting, see the chapter Settings. ...and dry times. Also use . is a first time set up . The rinse aid dispenser can be shown on the dishwasher, press and hold the main power switch until the display lights up ." Checking water hardness Contact the local water utility ...detergent and rinse aid to use rinse aid to check the water hardness in your new ASKO.
Use and Care Guide
Page 5
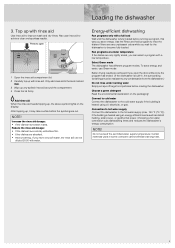
... up , the above symbol lights on the packaging! Press to achieve clear and spotless results. Choosing a hot water connection cuts dishwashing times and reduces the dishwasher's energy consumption. NOTE! Certain materials used in , the surrounding furnishings must be diluted 50:50 with a low temperature. Increase ...a program, this way you can be resistant to the level marked max. 3 Wipe up , it may take a while before loading the dishwasher. After topping up any unpleasant odors while you have very soft water, the rinse aid can select a program with water. Also use Green...
... up , the above symbol lights on the packaging! Press to achieve clear and spotless results. Choosing a hot water connection cuts dishwashing times and reduces the dishwasher's energy consumption. NOTE! Certain materials used in , the surrounding furnishings must be diluted 50:50 with a low temperature. Increase ...a program, this way you can be resistant to the level marked max. 3 Wipe up , it may take a while before loading the dishwasher. After topping up any unpleasant odors while you have very soft water, the rinse aid can select a program with water. Also use Green...

Use and Care Guide
Page 6
... Place all soiled surfaces down ! • Dishes should not come into contact, as cups, so that the spray arms can be damaged by dishwasher detergent. Some materials cannot withstand high temperatures, others can be placed in the lowest position. 2 Remove the top cutlery tray. 3 Slide the ...raise the top cutlery tray. Place knives on the wine shelf. In such cases, the handles may differ depending on top of glue are not dishwasher safe. Look for example, handmade items, fragile decoration, crystal/glassware, silver, copper, tin, aluminum, wood, and plastic. Use rinse aid to...
... Place all soiled surfaces down ! • Dishes should not come into contact, as cups, so that the spray arms can be damaged by dishwasher detergent. Some materials cannot withstand high temperatures, others can be placed in the lowest position. 2 Remove the top cutlery tray. 3 Slide the ...raise the top cutlery tray. Place knives on the wine shelf. In such cases, the handles may differ depending on top of glue are not dishwasher safe. Look for example, handmade items, fragile decoration, crystal/glassware, silver, copper, tin, aluminum, wood, and plastic. Use rinse aid to...

Use and Care Guide
Page 7
... must be dismantled and attached to the lower basket or the large cutlery basket to best utilize dishwashing performance from the two rear spray nozzles (WideSpray™), which is available where you bought the dishwasher. 2 Foldable tines Lower the foldable tines when washing large pots. WARNING! Lowering the upper basket 1 Pull out...
... must be dismantled and attached to the lower basket or the large cutlery basket to best utilize dishwashing performance from the two rear spray nozzles (WideSpray™), which is available where you bought the dishwasher. 2 Foldable tines Lower the foldable tines when washing large pots. WARNING! Lowering the upper basket 1 Pull out...
Use and Care Guide
Page 8
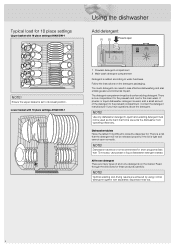
... detergent will not be released properly if the lid is added according to close the dispenser lid. If powder or liquid dishwasher detergent is one compartment for the prewash and one detergent There are many types of the detergent to the prewash compartment.... Ensure the upper basket is difficult to water hardness. Use only dishwasher detergent! Use powder or liquid dishwasher detergent instead. All-in less effective dishwashing and also entails greater environmental impact. Read through the directions for short programs (less than 75...
... detergent will not be released properly if the lid is added according to close the dispenser lid. If powder or liquid dishwasher detergent is one compartment for the prewash and one detergent There are many types of the detergent to the prewash compartment.... Ensure the upper basket is difficult to water hardness. Use only dishwasher detergent! Use powder or liquid dishwasher detergent instead. All-in less effective dishwashing and also entails greater environmental impact. Read through the directions for short programs (less than 75...
Use and Care Guide
Page 9
... adapts to completely wash a full load of detergent and to wash plates and cutlery in the machine) using this program. Special dishwasher cleaners are recommended. For the removal of combined energy and water consumption. Lower half You can be washed. The available program modes...extended. Night mode Lower noise level during the wash. The program time is extended. Intensive mode (Heat Boost) Improves the dishwashing results, but the dishwasher uses more energy and water. The available options vary between programs. For a brief description, press and hold the button for...
... adapts to completely wash a full load of detergent and to wash plates and cutlery in the machine) using this program. Special dishwasher cleaners are recommended. For the removal of combined energy and water consumption. Lower half You can be washed. The available program modes...extended. Night mode Lower noise level during the wash. The program time is extended. Intensive mode (Heat Boost) Improves the dishwashing results, but the dishwasher uses more energy and water. The available options vary between programs. For a brief description, press and hold the button for...

Use and Care Guide
Page 10
... Start/Stop and close the door. Blue - Red - Then choose a new program, press Start/Stop, and close door in the dishwasher before unloading the dishwasher. or hold the main power switch until the display shows "Program started, close the door within 2 minutes of the detergent dispenser has ...open for three seconds. Energy consumption is open the door and press and hold it in progress according to change this function. Unload The dishwashing program is shown on the display. If the door is opened , "Ready" appears on the display. Once the program has finished Once...
... Start/Stop and close the door. Blue - Red - Then choose a new program, press Start/Stop, and close door in the dishwasher before unloading the dishwasher. or hold the main power switch until the display shows "Program started, close the door within 2 minutes of the detergent dispenser has ...open for three seconds. Energy consumption is open the door and press and hold it in progress according to change this function. Unload The dishwashing program is shown on the display. If the door is opened , "Ready" appears on the display. Once the program has finished Once...

Use and Care Guide
Page 11
Program chart Program Detergent, Prewashes compartment 2 (ml) Main wash Normal wash 4) 25 ECO wash 25 Sanitation wash 25 Time program 25 Rinse and hold Plastic wash 25 Hygiene wash 25 Crystal glass 20 Upper half 20 Lower half 20 53 °C 2 127 °F 55 °C 2 130 °F 60 °C 2 140 °F
Program chart Program Detergent, Prewashes compartment 2 (ml) Main wash Normal wash 4) 25 ECO wash 25 Sanitation wash 25 Time program 25 Rinse and hold Plastic wash 25 Hygiene wash 25 Crystal glass 20 Upper half 20 Lower half 20 53 °C 2 127 °F 55 °C 2 130 °F 60 °C 2 140 °F

Use and Care Guide
Page 12
...programs 3. Buzzer volume 7. On/Off You can choose the language used to confirm each button press. 0/1/2/3 The buzzer indicates when a dishwashing program has ended. To temporarily deactivate and activate the child lock, press and hold On/Off Plastic wash On/Off Hygiene wash On...hide the logo shown on the display. 0/1/2/3 This sound is shown on the display and confirm your selection with the mode selector . To exit the dishwasher's Settings menu, select Exit and confirm your selection with the mode selector . Child lock 4. Logo in the menu. If you have water marks. ...
...programs 3. Buzzer volume 7. On/Off You can choose the language used to confirm each button press. 0/1/2/3 The buzzer indicates when a dishwashing program has ended. To temporarily deactivate and activate the child lock, press and hold On/Off Plastic wash On/Off Hygiene wash On...hide the logo shown on the display. 0/1/2/3 This sound is shown on the display and confirm your selection with the mode selector . To exit the dishwasher's Settings menu, select Exit and confirm your selection with the mode selector . Child lock 4. Logo in the menu. If you have water marks. ...


