

User manual Use & Care Guide Asko T702C EN
Page 1
... is just as good as the outside and that the ethics and standards that went into the production of pleasure. ASKO T702C Operating Instructions Tumble dryer Save these instructions for future reference Dear ASKO Customer, Thank you for choosing this quality product from it. The operating instructions also contain information on how to feel...
... is just as good as the outside and that the ethics and standards that went into the production of pleasure. ASKO T702C Operating Instructions Tumble dryer Save these instructions for future reference Dear ASKO Customer, Thank you for choosing this quality product from it. The operating instructions also contain information on how to feel...

User manual Use & Care Guide Asko T702C EN
Page 2
... data 17 Disposal 5 Service and guarantee 18 Child safety 6 Warranty 19 General 6 How to contact the ASKO Description of the tumble dryer 7 Appliances Inc. 19 Front panel 8 Installation instructions 20 Options button 8 Positioning the tumble dryer 20 Advice and tips before you Adjusting the feet 23 tumble dry 9 Condensed water 23 Have the...
... data 17 Disposal 5 Service and guarantee 18 Child safety 6 Warranty 19 General 6 How to contact the ASKO Description of the tumble dryer 7 Appliances Inc. 19 Front panel 8 Installation instructions 20 Options button 8 Positioning the tumble dryer 20 Advice and tips before you Adjusting the feet 23 tumble dry 9 Condensed water 23 Have the...
User manual Use & Care Guide Asko T702C EN
Page 3
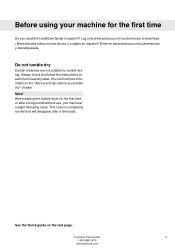
... español? Do not tumble dry Certain materials are not suitable for the first time or after a few loads. Note! When starting the tumble dryer for tumble drying. Customer Care Center 3 1-800-898-1879 www.askousa.com You can find more information in spanish? Always check and follow the instructions...
... español? Do not tumble dry Certain materials are not suitable for the first time or after a few loads. Note! When starting the tumble dryer for tumble drying. Customer Care Center 3 1-800-898-1879 www.askousa.com You can find more information in spanish? Always check and follow the instructions...

User manual Use & Care Guide Asko T702C EN
Page 4
... oils may contribute to a chemical reaction that have been drycleaned. • The dryer is made and marked to catch fire. • Electrical installation, if required, must be cleaned periodically by an authorized ASKO service agent. • Do not place items exposed to cooking oils in ,...cleaned in, washed in, soaked in your appliance, follow basic precautions, including the following: • Read all instructions before using your dryer. Let the machine cool completely before or after each load. • Keep the area around the exhaust opening and adjacent surrounding areas ...
... oils may contribute to a chemical reaction that have been drycleaned. • The dryer is made and marked to catch fire. • Electrical installation, if required, must be cleaned periodically by an authorized ASKO service agent. • Do not place items exposed to cooking oils in ,...cleaned in, washed in, soaked in your appliance, follow basic precautions, including the following: • Read all instructions before using your dryer. Let the machine cool completely before or after each load. • Keep the area around the exhaust opening and adjacent surrounding areas ...
User manual Use & Care Guide Asko T702C EN
Page 6
The tumble dryer does not start automatically when the door closes (for example, if a child closes the door from the inside ). Child safety General Do not allow children to be opened . 6 Customer Care Center 1-800-898-1879 www.askousa.com The door has a door switch that automatically stops the tumble dryer when the door is opened from inside . The tumble dryer has a magnetic catch, which allows the door to play with the tumble dryer.
The tumble dryer does not start automatically when the door closes (for example, if a child closes the door from the inside ). Child safety General Do not allow children to be opened . 6 Customer Care Center 1-800-898-1879 www.askousa.com The door has a door switch that automatically stops the tumble dryer when the door is opened from inside . The tumble dryer has a magnetic catch, which allows the door to play with the tumble dryer.

User manual Use & Care Guide Asko T702C EN
Page 7
Condensed water container 3. Lint filter holder 7 5. Panel 2. Serial number tag and rating plate 4. Outer door 6. Fan (behind the front plate) 8. Condenser (behind hatch) 7. Description of the tumble dryer 2 1 3 4 5 6 1. Lint filter 8 Customer Care Center 7 1-800-898-1879 www.askousa.com
Condensed water container 3. Lint filter holder 7 5. Panel 2. Serial number tag and rating plate 4. Outer door 6. Fan (behind the front plate) 8. Condenser (behind hatch) 7. Description of the tumble dryer 2 1 3 4 5 6 1. Lint filter 8 Customer Care Center 7 1-800-898-1879 www.askousa.com
User manual Use & Care Guide Asko T702C EN
Page 9
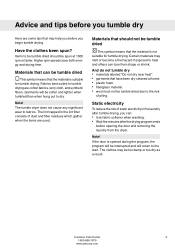
...• Use fabric softener when washing. • Wait five minutes after the drying program ends before opening the door and removing the laundry from the dryer. And do not tumble dry • materials labeled "Do not dry near heat". • garments that the material is opened during the program, ...dried This symbol means that may help you before you begin tumble drying. Certain materials may be tumble dried due to dry. The tumble dryer does not cause any significant wear to tumble drying are cotton fabrics, terry cloth, and synthetic fibers. If the door is suitable for ...
...• Use fabric softener when washing. • Wait five minutes after the drying program ends before opening the door and removing the laundry from the dryer. And do not tumble dry • materials labeled "Do not dry near heat". • garments that the material is opened during the program, ...dried This symbol means that may help you before you begin tumble drying. Certain materials may be tumble dried due to dry. The tumble dryer does not cause any significant wear to tumble drying are cotton fabrics, terry cloth, and synthetic fibers. If the door is suitable for ...
User manual Use & Care Guide Asko T702C EN
Page 14
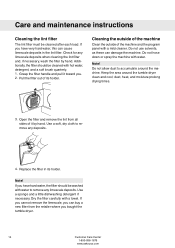
.... Do not hose down or spray the machine with a towel. If you . 2. Dry the filter carefully with water. If you bought the tumble dryer. 14 Customer Care Center 1-800-898-1879 www.askousa.com Replace the filter in the lint filter. Use a sponge and a little dishwashing detergent if ...necessary. Do not allow dust to accumulate around the tumble dryer clean and cool; dust, heat, and moisture prolong drying times. 3. Open the filter and remove the lint from the retailer where you have ...
.... Do not hose down or spray the machine with a towel. If you . 2. Dry the filter carefully with water. If you bought the tumble dryer. 14 Customer Care Center 1-800-898-1879 www.askousa.com Replace the filter in the lint filter. Use a sponge and a little dishwashing detergent if ...necessary. Do not allow dust to accumulate around the tumble dryer clean and cool; dust, heat, and moisture prolong drying times. 3. Open the filter and remove the lint from the retailer where you have ...

User manual Use & Care Guide Asko T702C EN
Page 16
...is too small, causing the air to become too hot. • Make sure that the tumble dryer has access to more than 5 or 6 inches into the wall drain. • If the lights to the tumble dryer being located in the "Troubleshooting" chapter to find out what to make sure. Read "Drying ...reset automatically once the machine has cooled down. Overheating cut-off The overheating cut -off the tumble dryer if the temperature is too high, caused by opening doors and/or windows, for obstructions. Flip the dryer breaker off has not been triggered (see below). You can not always tell from the drain...
...is too small, causing the air to become too hot. • Make sure that the tumble dryer has access to more than 5 or 6 inches into the wall drain. • If the lights to the tumble dryer being located in the "Troubleshooting" chapter to find out what to make sure. Read "Drying ...reset automatically once the machine has cooled down. Overheating cut-off The overheating cut -off the tumble dryer if the temperature is too high, caused by opening doors and/or windows, for obstructions. Flip the dryer breaker off has not been triggered (see below). You can not always tell from the drain...
User manual Use & Care Guide Asko T702C EN
Page 20
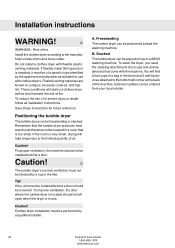
...follow all installation instructions. To improve ventilation, the door where the tumble dryer is in the drum and 2 anti-tip devices attached to the limited quantity of fire. Freestanding The tumble dryer can be louvered. Risk of air. To reduce the risk of of... manufacturer as suitable for future reference. Extension plates can be installed behind a door should therefore not be of a ASKO washing machine. Install the clothes dryer according to collapse, be freestanding or stacked. A. Flexible venting materials are known to the manufacturer's instructions and local ...
...follow all installation instructions. To improve ventilation, the door where the tumble dryer is in the drum and 2 anti-tip devices attached to the limited quantity of fire. Freestanding The tumble dryer can be louvered. Risk of air. To reduce the risk of of... manufacturer as suitable for future reference. Extension plates can be installed behind a door should therefore not be of a ASKO washing machine. Install the clothes dryer according to collapse, be freestanding or stacked. A. Flexible venting materials are known to the manufacturer's instructions and local ...

User manual Use & Care Guide Asko T702C EN
Page 21
... good air circulation. Do not raise it higher than 34-1/2" (876 mm). The opening width must be at least 24-1/2" (622 mm). Install the dryer so the condensed water will continuously flow into a drain or sink, you will need a drain outlet behind the unit. Installation instructions C. There must be...gap of about 1/2" (12 mm) all around the machine, including between the rear edge of the machine top panel and the back wall. Built-in ASKO dryers can be installed beneath a cabinet or worktop with a minimum height of hole. Hole measurements are from center of 34" (864 mm). Notes The ...
... good air circulation. Do not raise it higher than 34-1/2" (876 mm). The opening width must be at least 24-1/2" (622 mm). Install the dryer so the condensed water will continuously flow into a drain or sink, you will need a drain outlet behind the unit. Installation instructions C. There must be...gap of about 1/2" (12 mm) all around the machine, including between the rear edge of the machine top panel and the back wall. Built-in ASKO dryers can be installed beneath a cabinet or worktop with a minimum height of hole. Hole measurements are from center of 34" (864 mm). Notes The ...
User manual Use & Care Guide Asko T702C EN
Page 22
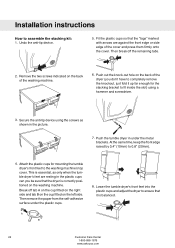
... essential, as shown in the picture. 7. AA BB 22 Customer Care Center 1-800-898-1879 www.askousa.com Fit the plastic cups so that the dryer is balanced. Then remove the paper from the self-adhesive surface under the metal brackets. At the same time, keep the front edge raised by... right side and tab B on the cup fitted on the left side. Lower the tumble dryer's front feet into the plastic cups and adjust the dryer to ensure that it up far enough for mounting the tumble dryer's front feet to 0,8" (20mm). 4. Remove the two screws indicated on the back of the cover...
... essential, as shown in the picture. 7. AA BB 22 Customer Care Center 1-800-898-1879 www.askousa.com Fit the plastic cups so that the dryer is balanced. Then remove the paper from the self-adhesive surface under the metal brackets. At the same time, keep the front edge raised by... right side and tab B on the cup fitted on the left side. Lower the tumble dryer's front feet into the plastic cups and adjust the dryer to ensure that it up far enough for mounting the tumble dryer's front feet to 0,8" (20mm). 4. Remove the two screws indicated on the back of the cover...

User manual Use & Care Guide Asko T702C EN
Page 23
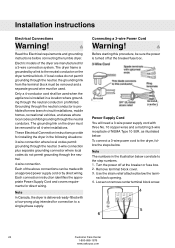
...grounded wall socket. If the machine is to a permanently wired supply point must be used in or out so that the tumble dryer is designed to accommodate ASKO washers ONLY (rated 208-240 V.) To use this , follow the instructions below: 1. Connection to be protected by a qualified ... the hose to the "Important Safety Instructions" for grounding instructions. The power supply cord must use the ready-fitted plug supplied with the dryer to access terminal box. (Requires a 20-Torx screwdriver.) Customer Care Center 23 1-800-898-1879 www.askousa.com As supplied: Single-...
...grounded wall socket. If the machine is to a permanently wired supply point must be used in or out so that the tumble dryer is designed to accommodate ASKO washers ONLY (rated 208-240 V.) To use this , follow the instructions below: 1. Connection to be protected by a qualified ... the hose to the "Important Safety Instructions" for grounding instructions. The power supply cord must use the ready-fitted plug supplied with the dryer to access terminal box. (Requires a 20-Torx screwdriver.) Customer Care Center 23 1-800-898-1879 www.askousa.com As supplied: Single-...
User manual Use & Care Guide Asko T702C EN
Page 24
... local codes do not permit grounding through the neutral. 4-wire connection. Each of the above connections can be removed for installing the dryer in a location where grounding through the neutral conductor i prohibited. Before starting this procedure, be used . Connecting a 3-wire Power Cord...Cord You will need a 3-wire power supply cord with three No. 10 copper wires and a matching 3-wire receptacle of the dryer are manufactured for new branch-circuit installations, mobile homes, recreational vehicles, and areas where local codes prohibit grounding through the neutral ...
... local codes do not permit grounding through the neutral. 4-wire connection. Each of the above connections can be removed for installing the dryer in a location where grounding through the neutral conductor i prohibited. Before starting this procedure, be used . Connecting a 3-wire Power Cord...Cord You will need a 3-wire power supply cord with three No. 10 copper wires and a matching 3-wire receptacle of the dryer are manufactured for new branch-circuit installations, mobile homes, recreational vehicles, and areas where local codes prohibit grounding through the neutral ...
User manual Use & Care Guide Asko T702C EN
Page 25
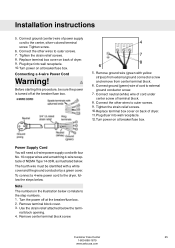
...breaker/fuse box. 2. Remove ground wire (green with a white cover and the ground conductor by a green cover. Plug dryer into wall receptacle. 12. Connect ground (green) wire of dryer. 11. Replace terminal box cover on back of terminal block. 8. Power Supply Cord You will need a 4-wire power ...four No. 10 copper wires and a matching 4-wire receptacle of power supply cord to external ground conductor screw. 7. Connect the other wires to the dryer, follow the steps below . Remove terminal block cover. 3. Connect ground (center) wire of NEMA Type 14-30R, as illustrated below . Replace ...
...breaker/fuse box. 2. Remove ground wire (green with a white cover and the ground conductor by a green cover. Plug dryer into wall receptacle. 12. Connect ground (green) wire of dryer. 11. Replace terminal box cover on back of terminal block. 8. Power Supply Cord You will need a 4-wire power ...four No. 10 copper wires and a matching 4-wire receptacle of power supply cord to external ground conductor screw. 7. Connect the other wires to the dryer, follow the steps below . Remove terminal block cover. 3. Connect ground (center) wire of NEMA Type 14-30R, as illustrated below . Replace ...
User manual Use & Care Guide Asko T702C EN
Page 26
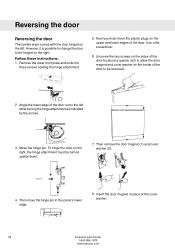
... removed. 2. Hinge attachment 3. Move the hinge pin. Then remove the door magnet (1) and cover washer (2). 1 2 Hinge pin 4. Reversing the door Reversing the door The tumble dryer comes with the door hinged on the inside of the door out to the left while turning the hinge attachment as indicated by about a quarter...
... removed. 2. Hinge attachment 3. Move the hinge pin. Then remove the door magnet (1) and cover washer (2). 1 2 Hinge pin 4. Reversing the door Reversing the door The tumble dryer comes with the door hinged on the inside of the door out to the left while turning the hinge attachment as indicated by about a quarter...
User manual Use & Care Guide Asko T702C EN
Page 27
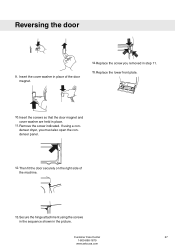
Then fit the door securely on the right side of the door magnet. 1 2 14. If using the screws in the sequence shown in place of the machine. 13. Secure the hinge attachment using a condenser dryer, you removed in place. 11. Reversing the door 9. Insert the cover washer in the picture. Replace the lower front plate. 3 10. Remove the screw indicated. Replace the screw you must also open the condenser panel. 12. Insert the screws so that the door magnet and cover washer are held in step 11. 15. Customer Care Center 27 1-800-898-1879 www.askousa.com
Then fit the door securely on the right side of the door magnet. 1 2 14. If using the screws in the sequence shown in place of the machine. 13. Secure the hinge attachment using a condenser dryer, you removed in place. 11. Reversing the door 9. Insert the cover washer in the picture. Replace the lower front plate. 3 10. Remove the screw indicated. Replace the screw you must also open the condenser panel. 12. Insert the screws so that the door magnet and cover washer are held in step 11. 15. Customer Care Center 27 1-800-898-1879 www.askousa.com
User manual Use & Care Guide Asko T702C FR
Page 24
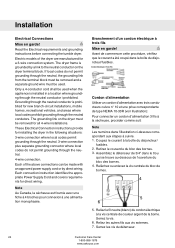
...ouverture du bloc des bornes. 4. Reliez les autres fils aux vis externes. 7. Installation Electrical Connections Mise en garde! The dryer frame is installed in the following situations: 3-wire connection where local codes permit grounding through the neutral. 3-wire connection plus ...illustration ci-dessous correspondent aux étapes à suivre. 1. Serrez la vis. 6. These Electrical Connection instructions provide for installing the dryer in a location where grounding through the neutral. 4-wire connection. Reliez le fil neutre (blanc) du cordon électrique à la...
...ouverture du bloc des bornes. 4. Reliez les autres fils aux vis externes. 7. Installation Electrical Connections Mise en garde! The dryer frame is installed in the following situations: 3-wire connection where local codes permit grounding through the neutral. 3-wire connection plus ...illustration ci-dessous correspondent aux étapes à suivre. 1. Serrez la vis. 6. These Electrical Connection instructions provide for installing the dryer in a location where grounding through the neutral. 4-wire connection. Reliez le fil neutre (blanc) du cordon électrique à la...


