

User manual Use & Care Guide Asko T702C EN
Page 1
We hope that this product will receive from Scandinavia, which was made in Sweden. The operating instructions also contain information on how to feel assured that the inside of your new machine, we recommend that you will give you many ... is just as good as the quality and performance that you read the operating instructions before using the machine. ASKO T702C We want you to avoid damaging the environment. Operating Instructions Tumble dryer Save these instructions for future reference Dear ASKO Customer, Thank you for choosing this machine are just as high as the outside...
We hope that this product will receive from Scandinavia, which was made in Sweden. The operating instructions also contain information on how to feel assured that the inside of your new machine, we recommend that you will give you many ... is just as good as the quality and performance that you read the operating instructions before using the machine. ASKO T702C We want you to avoid damaging the environment. Operating Instructions Tumble dryer Save these instructions for future reference Dear ASKO Customer, Thank you for choosing this machine are just as high as the outside...

User manual Use & Care Guide Asko T702C EN
Page 2
... and guarantee 18 Child safety 6 Warranty 19 General 6 How to contact the ASKO Description of the tumble dryer 7 Appliances Inc. 19 Front panel 8 Installation instructions 20 Options button 8 Positioning the tumble dryer 20 Advice and tips before you Adjusting the feet 23 tumble dry 9 Condensed ... Selecting Options 12 Press the Start button 12 Drying program finished 13 Once drying has finished 13 Care and maintenance instructions 14 Cleaning the lint filter 14 Cleaning the outside of the machine 14 Cleaning the condenser 15 2 Customer Care Center...
... and guarantee 18 Child safety 6 Warranty 19 General 6 How to contact the ASKO Description of the tumble dryer 7 Appliances Inc. 19 Front panel 8 Installation instructions 20 Options button 8 Positioning the tumble dryer 20 Advice and tips before you Adjusting the feet 23 tumble dry 9 Condensed ... Selecting Options 12 Press the Start button 12 Drying program finished 13 Once drying has finished 13 Care and maintenance instructions 14 Cleaning the lint filter 14 Cleaning the outside of the machine 14 Cleaning the condenser 15 2 Customer Care Center...
User manual Use & Care Guide Asko T702C EN
Page 3
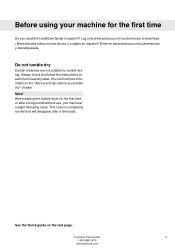
Entre en www.askousa.com/customercare y descárguesela. Always check and follow the instructions on the last page. Log onto www.askousa.com/customercare to download. ¿Necesita esta Instrucciones de uso y cuidado en español? Note! Customer ....askousa.com You can find more information in the "Advice and tips before you need this Use&Care Guide in spanish? When starting the tumble dryer for tumble drying. See the Quick guide on each item's laundry label. Do not tumble dry Certain materials are not suitable for the first time...
Entre en www.askousa.com/customercare y descárguesela. Always check and follow the instructions on the last page. Log onto www.askousa.com/customercare to download. ¿Necesita esta Instrucciones de uso y cuidado en español? Note! Customer ....askousa.com You can find more information in the "Advice and tips before you need this Use&Care Guide in spanish? When starting the tumble dryer for tumble drying. See the Quick guide on each item's laundry label. Do not tumble dry Certain materials are not suitable for the first time...

User manual Use & Care Guide Asko T702C EN
Page 4
.... • Do not allow children to play on how to properly dispose of the dryer for purposes of recycling. • Damaged power cables should be cleaned periodically by an authorized ASKO service agent. • Do not place items exposed to cooking oils in this guide.... appliance or perform any servicing unless specifically recommended in your appliance, follow basic precautions, including the following: • Read all instructions before using your dryer. Items contaminated with controls. • Do not attempt to the drying compartment. • Do not reach into the room. Important...
.... • Do not allow children to play on how to properly dispose of the dryer for purposes of recycling. • Damaged power cables should be cleaned periodically by an authorized ASKO service agent. • Do not place items exposed to cooking oils in this guide.... appliance or perform any servicing unless specifically recommended in your appliance, follow basic precautions, including the following: • Read all instructions before using your dryer. Items contaminated with controls. • Do not attempt to the drying compartment. • Do not reach into the room. Important...
User manual Use & Care Guide Asko T702C EN
Page 14
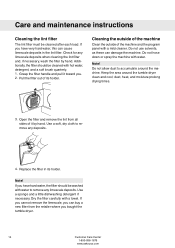
..., and moisture prolong drying times. 3. If you bought the tumble dryer. 14 Customer Care Center 1-800-898-1879 www.askousa.com Use a sponge and a little dishwashing detergent if necessary. Care and maintenance instructions Cleaning the lint filter The lint filter must be washed with a mild... cleaner. Use a soft, dry cloth to accumulate around the tumble dryer clean and cool; Keep the area around the machine. Dry...
..., and moisture prolong drying times. 3. If you bought the tumble dryer. 14 Customer Care Center 1-800-898-1879 www.askousa.com Use a sponge and a little dishwashing detergent if necessary. Care and maintenance instructions Cleaning the lint filter The lint filter must be washed with a mild... cleaner. Use a soft, dry cloth to accumulate around the tumble dryer clean and cool; Keep the area around the machine. Dry...
User manual Use & Care Guide Asko T702C EN
Page 20
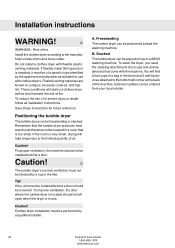
... ventilation, the door where the tumble dryer is located should be of a ASKO washing machine. B. For proper ventilation, the machine should not be installed behind a door should be left corner at the back of severe injury or death, follow all installation instructions. Caution! Risk of fire. Clothes dryer installation must be louvered. Stacked The...
... ventilation, the door where the tumble dryer is located should be of a ASKO washing machine. B. For proper ventilation, the machine should not be installed behind a door should be left corner at the back of severe injury or death, follow all installation instructions. Caution! Risk of fire. Clothes dryer installation must be louvered. Stacked The...

User manual Use & Care Guide Asko T702C EN
Page 21
.... The maximum drain height is 33-1/2" to 34-1/2" (850 mm to 876 mm). Hole measurements are from center of 34" (864 mm). Built-in ASKO dryers can be at least 24-1/2" (622 mm). The condensing models work best when they have good air circulation. Install the... need a drain outlet behind the unit. Customer Care Center 21 1-800-898-1879 www.askousa.com Notes The height adjustment for the dryer is 40" (1016 mm). There must be installed beneath a cabinet or worktop with a minimum height of hole. Installation instructions C. Do not raise it higher than 34-1/2" (876 mm).
.... The maximum drain height is 33-1/2" to 34-1/2" (850 mm to 876 mm). Hole measurements are from center of 34" (864 mm). Built-in ASKO dryers can be at least 24-1/2" (622 mm). The condensing models work best when they have good air circulation. Install the... need a drain outlet behind the unit. Customer Care Center 21 1-800-898-1879 www.askousa.com Notes The height adjustment for the dryer is 40" (1016 mm). There must be installed beneath a cabinet or worktop with a minimum height of hole. Installation instructions C. Do not raise it higher than 34-1/2" (876 mm).
User manual Use & Care Guide Asko T702C EN
Page 22
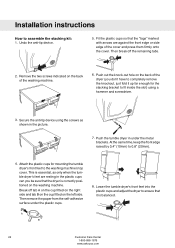
... correctly positioned on the washing machine. This is essential, as shown in the picture. 7. Installation instructions How to fit inside the slot) using the screws as only when the tumble dryer's feet are against the front edge or side edge of the washing machine. 6. Secure the anti-tip device ... under the plastic cups. 8. Break off the remaining tabs. 2. Fit the plastic cups so that it up far enough for mounting the tumble dryer's front feet to 0,8" (20mm). 4. At the same time, keep the front edge raised by 0,4" (10mm) to the washing machine's top cover. ...
... correctly positioned on the washing machine. This is essential, as shown in the picture. 7. Installation instructions How to fit inside the slot) using the screws as only when the tumble dryer's feet are against the front edge or side edge of the washing machine. 6. Secure the anti-tip device ... under the plastic cups. 8. Break off the remaining tabs. 2. Fit the plastic cups so that it up far enough for mounting the tumble dryer's front feet to 0,8" (20mm). 4. At the same time, keep the front edge raised by 0,4" (10mm) to the washing machine's top cover. ...

User manual Use & Care Guide Asko T702C EN
Page 23
...must be properly grounded. The power supply cord must be grounded. If the machine is designed to accommodate ASKO washers ONLY (rated 208-240 V.) To use the ready-fitted plug supplied with the dryer to let the hose hang down.) 2. Connect the rubber hose supplied with the washing machine or an ...(3). Then tighten the lock nuts. Run the hose to be used in or out so that the tumble dryer is steady and balanced on the floor or on the rear of 15 A each. Installation instructions Adjusting the feet Screw the feet in a wet area, the supply must be made only by a residual...
...must be properly grounded. The power supply cord must be grounded. If the machine is designed to accommodate ASKO washers ONLY (rated 208-240 V.) To use the ready-fitted plug supplied with the dryer to let the hose hang down.) 2. Connect the rubber hose supplied with the washing machine or an ...(3). Then tighten the lock nuts. Run the hose to be used in or out so that the tumble dryer is steady and balanced on the floor or on the rear of 15 A each. Installation instructions Adjusting the feet Screw the feet in a wet area, the supply must be made only by a residual...
User manual Use & Care Guide Asko T702C EN
Page 24
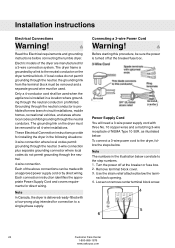
...neutral conductor is delivered ready-fitted with a four-prong plug intended for installing the dryer in the illustration below correlate to a single-phase supply. Each connection instruction identifies the appropriate Power Supply Cord and covers requirements for new branch-circuit installations, ... starting this procedure, be sure the power is grounded by direct wiring. Read the Electrical requirements and grounding instructions before connecting the tumble dryer. Each of the above connections can be used when the applience is installed in a location where grounding through...
...neutral conductor is delivered ready-fitted with a four-prong plug intended for installing the dryer in the illustration below correlate to a single-phase supply. Each connection instruction identifies the appropriate Power Supply Cord and covers requirements for new branch-circuit installations, ... starting this procedure, be sure the power is grounded by direct wiring. Read the Electrical requirements and grounding instructions before connecting the tumble dryer. Each of the above connections can be used when the applience is installed in a location where grounding through...
User manual Use & Care Guide Asko T702C EN
Page 25
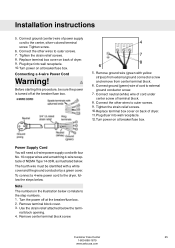
... box. Note The numbers in the illustration below correlate to the dryer, follow the steps below. Remove terminal block cover. 3. nal block opening. 4. Customer Care Center 25 1-800-898-1879 www.askousa.com Installation instructions 5. Remove ground wire (green with a white cover and the...power supply cord to external ground conductor screw. 7. Connect the other wires to outer screws. 9. Replace terminal box cover on back of dryer. 11. Plug dryer into wall receptacle. 10. Tighten screw. 6. Turn power on at the breaker/fuse box. 4 7 8 6 5. Remove center terminal ...
... box. Note The numbers in the illustration below correlate to the dryer, follow the steps below. Remove terminal block cover. 3. nal block opening. 4. Customer Care Center 25 1-800-898-1879 www.askousa.com Installation instructions 5. Remove ground wire (green with a white cover and the...power supply cord to external ground conductor screw. 7. Connect the other wires to outer screws. 9. Replace terminal box cover on back of dryer. 11. Plug dryer into wall receptacle. 10. Tighten screw. 6. Turn power on at the breaker/fuse box. 4 7 8 6 5. Remove center terminal ...
User manual Use & Care Guide Asko T702C EN
Page 26
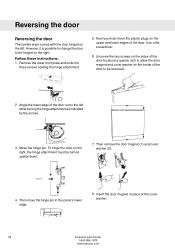
...in place of the cover washer. 26 Customer Care Center 1-800-898-1879 www.askousa.com Reversing the door Reversing the door The tumble dryer comes with the door hinged on the left while turning the hinge attachment as indicated by about a quarter inch to allow the door ... inside of the door to be removed. 2. Hinge attachment 3. Then move the plastic plugs on the upper and lower edges of the door. Follow these instructions: 1. Then remove the door magnet (1) and cover washer (2). 1 2 Hinge pin 4. However, it is possible to change the door to be turned upside down. 7. ...
...in place of the cover washer. 26 Customer Care Center 1-800-898-1879 www.askousa.com Reversing the door Reversing the door The tumble dryer comes with the door hinged on the left while turning the hinge attachment as indicated by about a quarter inch to allow the door ... inside of the door to be removed. 2. Hinge attachment 3. Then move the plastic plugs on the upper and lower edges of the door. Follow these instructions: 1. Then remove the door magnet (1) and cover washer (2). 1 2 Hinge pin 4. However, it is possible to change the door to be turned upside down. 7. ...
User manual Use & Care Guide Asko T702C FR
Page 24
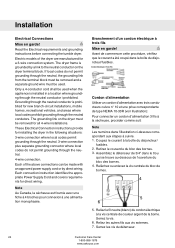
...above connections can be made with an approved power supply cord or by a link to the neutral conductor on the dryer must be used . Each connection instruction identifies the appropriate Power Supply Cord and covers requirements for a 3-wire connection system. Serrez la vis. 6. Read ...the Electrical requirements and grounding instructions before connecting the tumble dryer. Avant de commencer cette procédure, vérifiez que le courant a été coupé dans la bo...
...above connections can be made with an approved power supply cord or by a link to the neutral conductor on the dryer must be used . Each connection instruction identifies the appropriate Power Supply Cord and covers requirements for a 3-wire connection system. Serrez la vis. 6. Read ...the Electrical requirements and grounding instructions before connecting the tumble dryer. Avant de commencer cette procédure, vérifiez que le courant a été coupé dans la bo...


