

Motherboard DIY Troubleshooting Guide
Page 4
... a bootable floppy disk 2-2 Using the AwardBIOS Flash Utility 2-2 CrashFree BIOS feature 2-4 ASUS Update 2-4 2.2 BIOS beep codes 2-6 2.3 BIOS Setup program 2-6 2.3.1 BIOS menu bar 2-7 2.3.2 Legend bar 2-7 2.4 Main menu 2-9 2.5 Advanced menu 2-13 2.5.1 Chip Configuration 2-14 2.5.2 I/O Device Configuration 2-19 2.5.3 PCI Configuration 2-20 2.6 Power...28 Chapter 3: Software support 3.1 Installing an operating system 3-2 3.2 Support CD information 3-2 3.2.1 3.2.2 3.2.3 3.2.4 Running the support CD 3-2 Drivers menu 3-3 Utilities menu 3-3 ASUS contact information 3-4 iv
... a bootable floppy disk 2-2 Using the AwardBIOS Flash Utility 2-2 CrashFree BIOS feature 2-4 ASUS Update 2-4 2.2 BIOS beep codes 2-6 2.3 BIOS Setup program 2-6 2.3.1 BIOS menu bar 2-7 2.3.2 Legend bar 2-7 2.4 Main menu 2-9 2.5 Advanced menu 2-13 2.5.1 Chip Configuration 2-14 2.5.2 I/O Device Configuration 2-19 2.5.3 PCI Configuration 2-20 2.6 Power...28 Chapter 3: Software support 3.1 Installing an operating system 3-2 3.2 Support CD information 3-2 3.2.1 3.2.2 3.2.3 3.2.4 Running the support CD 3-2 Drivers menu 3-3 Utilities menu 3-3 ASUS contact information 3-4 iv

Motherboard DIY Troubleshooting Guide
Page 9
... 2.2, USB 2.0/1.1 Wake on Ring (WOR), Wake on LAN (WOL) Chassis intrusion Device drivers ASUS PC Probe ASUS Live Update Utility Award BIOS Flash Utility Adobe Acrobat Reader Trend Micro™ PC-cillin Anti-Virus Application User Guide ASUS A7V400-MX support CD UltraATA cable FDD cable I/O shield Micro-ATX form factor: 9.6 in x 9.6 in * Specifications are subject...
... 2.2, USB 2.0/1.1 Wake on Ring (WOR), Wake on LAN (WOL) Chassis intrusion Device drivers ASUS PC Probe ASUS Live Update Utility Award BIOS Flash Utility Adobe Acrobat Reader Trend Micro™ PC-cillin Anti-Virus Application User Guide ASUS A7V400-MX support CD UltraATA cable FDD cable I/O shield Micro-ATX form factor: 9.6 in x 9.6 in * Specifications are subject...

Motherboard DIY Troubleshooting Guide
Page 13
...The motherboard implements the Universal Serial Bus (USB) 2.0 specification, dramatically increasing the connection speed from a floppy disk even when BIOS code and data are corrupted. Digital audio support A Sony/Philips Digital Interface (S/PDIF) connector is onboard to give you convenient...and most reliable audio solution for business professionals, audiophiles, musicians, and gamers. See page 1-16 and page 1-19. ASUS A7V400-MX motherboard user guide 1-3 SoundMAX Digital Audio System can now enjoy this motherboard is a hardware protection circuit that automatically shuts ...
...The motherboard implements the Universal Serial Bus (USB) 2.0 specification, dramatically increasing the connection speed from a floppy disk even when BIOS code and data are corrupted. Digital audio support A Sony/Philips Digital Interface (S/PDIF) connector is onboard to give you convenient...and most reliable audio solution for business professionals, audiophiles, musicians, and gamers. See page 1-16 and page 1-19. ASUS A7V400-MX motherboard user guide 1-3 SoundMAX Digital Audio System can now enjoy this motherboard is a hardware protection circuit that automatically shuts ...

Motherboard DIY Troubleshooting Guide
Page 20
... Failure to do so may need to install expansion cards. Install the software drivers for information on the system and change the necessary BIOS settings, if any. Assign an IRQ to unplug the power cord before adding or removing expansion cards. The following sections describe the ...motherboard slots and the expansion cards that came with it and make the necessary hardware settings for later use . Turn on BIOS setup. 2. See Chapter 2 for the expansion card. 1-10 Chapter 1: Product introduction Align the card connector with the screw you may ...
... Failure to do so may need to install expansion cards. Install the software drivers for information on the system and change the necessary BIOS settings, if any. Assign an IRQ to unplug the power cord before adding or removing expansion cards. The following sections describe the ...motherboard slots and the expansion cards that came with it and make the necessary hardware settings for later use . Turn on BIOS setup. 2. See Chapter 2 for the expansion card. 1-10 Chapter 1: Product introduction Align the card connector with the screw you may ...

Motherboard DIY Troubleshooting Guide
Page 25
Remove the battery. 3. A7V400-MX A7V400-MX Clear RTC RAM CLRTC 12 23 Clear CMOS Normal (Default) ASUS A7V400-MX motherboard user guide 1-15 Re-install the battery. 5. Plug the power cord and turn ON the computer. 6. The RAM data in CMOS. Move the jumper ... [2-3] to the original position, [2-3]. 4. To erase the RTC RAM: 1. Replace the jumper cap to [1-2] momentarily. Hold down the key during the boot process and enter BIOS setup to re-enter data. Turn OFF the computer and unplug the power cord. 2. 3. Clear RTC RAM (CLRTC) This jumper clears the Real Time Clock...
Remove the battery. 3. A7V400-MX A7V400-MX Clear RTC RAM CLRTC 12 23 Clear CMOS Normal (Default) ASUS A7V400-MX motherboard user guide 1-15 Re-install the battery. 5. Plug the power cord and turn ON the computer. 6. The RAM data in CMOS. Move the jumper ... [2-3] to the original position, [2-3]. 4. To erase the RTC RAM: 1. Replace the jumper cap to [1-2] momentarily. Hold down the key during the boot process and enter BIOS setup to re-enter data. Turn OFF the computer and unplug the power cord. 2. 3. Clear RTC RAM (CLRTC) This jumper clears the Real Time Clock...
Motherboard DIY Troubleshooting Guide
Page 32
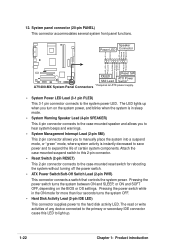
... to this LED to light up when you turn on the BIOS or OS settings. Speaker Power LED Connector +5 V PLED +5V Ground Ground Speaker HD_LED+ HD_LEDExtSMI# Ground PWRBIN Ground Reset Ground ® A7V400-MX IDELED SMI Lead Reset SW ATX Power Switch* A7V400-MX System Panel Connectors * Requires an ATX power supply. • System Power...
... to this LED to light up when you turn on the BIOS or OS settings. Speaker Power LED Connector +5 V PLED +5V Ground Ground Speaker HD_LED+ HD_LEDExtSMI# Ground PWRBIN Ground Reset Ground ® A7V400-MX IDELED SMI Lead Reset SW ATX Power Switch* A7V400-MX System Panel Connectors * Requires an ATX power supply. • System Power...
Motherboard DIY Troubleshooting Guide
Page 33
Chapter 2 This chapter tells how to change system settings through the BIOS Setup Menus. Detailed descriptions of the BIOS parameters are also provided. BIOS information
Chapter 2 This chapter tells how to change system settings through the BIOS Setup Menus. Detailed descriptions of the BIOS parameters are also provided. BIOS information

Motherboard DIY Troubleshooting Guide
Page 34
... Windows® XP environment a. Select "Create an MS-DOS Startup Disk" in the floppy disk drive. ASUS CrashFree BIOS (Updates the BIOS using a bootable floppy disk with the executable Award BIOS Flash utility (AWDFLASH.EXE). d. 2.1 Managing and updating your BIOS The following to create a bootable floppy disk. From the Windows desktop, click Start > My Computer...
... Windows® XP environment a. Select "Create an MS-DOS Startup Disk" in the floppy disk drive. ASUS CrashFree BIOS (Updates the BIOS using a bootable floppy disk with the executable Award BIOS Flash utility (AWDFLASH.EXE). d. 2.1 Managing and updating your BIOS The following to create a bootable floppy disk. From the Windows desktop, click Start > My Computer...

Motherboard DIY Troubleshooting Guide
Page 35
.... 2. For example: "AWDFLASH aw0702.bin" The AWDFLASH screen appears. 4. At the "A:\" prompt, type "C:\" and then press . 3. ASUS A7V400-MX motherboard user guide 2-3 Save only the updated BIOS file in the floppy disk to POST after the new BIOS file is copied. At the "C:\" prompt, type "AWDFLASH BIOSFILENAME" and then . The computer returns to avoid loading...
.... 2. For example: "AWDFLASH aw0702.bin" The AWDFLASH screen appears. 4. At the "A:\" prompt, type "C:\" and then press . 3. ASUS A7V400-MX motherboard user guide 2-3 Save only the updated BIOS file in the floppy disk to POST after the new BIOS file is copied. At the "C:\" prompt, type "AWDFLASH BIOSFILENAME" and then . The computer returns to avoid loading...
Motherboard DIY Troubleshooting Guide
Page 36
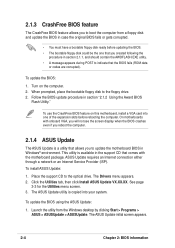
... Launch the utility from a floppy disk and update the BIOS in Windows® environment. The ASUS Update initial screen appears. 2-4 Chapter 2: BIOS information When prompted, place the bootable floppy disk to update the motherboard BIOS in case the original BIOS fails or gets corrupted. • You must have a... in the support CD that comes with onboard VGA, you will not see the screen display when the BIOS crashes even if you reboot the computer. 2.1.4 ASUS Update The ASUS Update is copied into one that allows you created following the procedure in section "2.1.2 Using the Award...
... Launch the utility from a floppy disk and update the BIOS in Windows® environment. The ASUS Update initial screen appears. 2-4 Chapter 2: BIOS information When prompted, place the bootable floppy disk to update the motherboard BIOS in case the original BIOS fails or gets corrupted. • You must have a... in the support CD that comes with onboard VGA, you will not see the screen display when the BIOS crashes even if you reboot the computer. 2.1.4 ASUS Update The ASUS Update is copied into one that allows you created following the procedure in section "2.1.2 Using the Award...

Motherboard DIY Troubleshooting Guide
Page 37
2. If you selected the option to update the BIOS from the Internet, select the ASUS FTP site nearest you to locate the BIOS file. Follow screen instructions to download. ASUS A7V400-MX motherboard user guide 2-5 Click Next. 5. If you selected updating/downloading from a file, an Open window appears prompting you to complete the update process. Click Next...
2. If you selected the option to update the BIOS from the Internet, select the ASUS FTP site nearest you to locate the BIOS file. Follow screen instructions to download. ASUS A7V400-MX motherboard user guide 2-5 Click Next. 5. If you selected updating/downloading from a file, an Open window appears prompting you to complete the update process. Click Next...
Motherboard DIY Troubleshooting Guide
Page 38
..., the system provides you can update using this last option only if the first two failed. System running at a lower frequency 2.3 BIOS Setup program This motherboard supports a programmable Low Pin Count (LPC) chip that the computer can also restart by three short beeps High ...frequency beeps when system is designed to make changes to change the configuration of your BIOS." For example, you are installing a motherboard, reconfiguring your system using the provided utility described in section "2.1 Managing and updating your ...
..., the system provides you can update using this last option only if the first two failed. System running at a lower frequency 2.3 BIOS Setup program This motherboard supports a programmable Low Pin Count (LPC) chip that the computer can also restart by three short beeps High ...frequency beeps when system is designed to make changes to change the configuration of your BIOS." For example, you are installing a motherboard, reconfiguring your system using the provided utility described in section "2.1 Managing and updating your ...

Motherboard DIY Troubleshooting Guide
Page 39
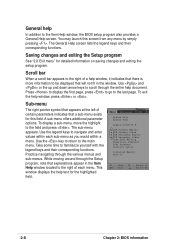
...BIOS setup screens and descriptions are for reference purposes only, and may not exactly match what you to navigate through the values for the highlighted field Brings up or down between fields Page Down or - (minus) Scrolls backward through the values for the highlighted field Saves changes and exit ASUS A7V400-MX...to configure and enable Power Management features. Use this menu to make changes to the left arrow key on your screen. 2.3.1 BIOS menu bar The top of the Setup screen is constantly being updated, the following table lists the legend bar keys and their ...
...BIOS setup screens and descriptions are for reference purposes only, and may not exactly match what you to navigate through the values for the highlighted field Brings up or down between fields Page Down or - (minus) Scrolls backward through the values for the highlighted field Saves changes and exit ASUS A7V400-MX...to configure and enable Power Management features. Use this menu to make changes to the left arrow key on your screen. 2.3.1 BIOS menu bar The top of the Setup screen is constantly being updated, the following table lists the legend bar keys and their ...
Motherboard DIY Troubleshooting Guide
Page 40
... information to familiarize yourself with the legend keys and their corresponding functions. To display a sub-menu, move the highlight to the Item Help window, the BIOS setup program also provides a General Help screen. General help window, press or . Scroll bar When a scroll bar appears to the right of certain parameters indicates... Open Warning Supervisor Password User Password Security Option Installed Memory Halt On F1 : Help ↑↓ : Select It ESC : Exit →← : Select Me 2-8 Chapter 2: BIOS information
... information to familiarize yourself with the legend keys and their corresponding functions. To display a sub-menu, move the highlight to the Item Help window, the BIOS setup program also provides a General Help screen. General help window, press or . Scroll bar When a scroll bar appears to the right of certain parameters indicates... Open Warning Supervisor Password User Password Security Option Installed Memory Halt On F1 : Help ↑↓ : Select It ESC : Exit →← : Select Me 2-8 Chapter 2: BIOS information

Motherboard DIY Troubleshooting Guide
Page 41
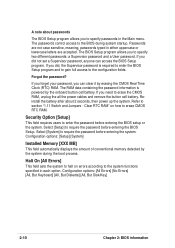
... set a password, highlight the appropriate field and press . Legacy Diskette A [1.44M, 3.5 in .] [ST321122A] [ASUS CDS520/A] [None] [None] [Enabled] Clear Clear [Setup] 256MB [All Errors] Select Menu Item Specific Help Change... Symbols and other characters are Month: (1 to 12), Day: (1 to 31), Year: (1999 to [Set]. The password is set to 2099). ASUS A7V400-MX motherboard user guide 2-9 F1 : Help ↑↓ : Select Item -/+ : Change Value F5 : Setup Defaults ESC : Exit →← ... box appear, press . The password is now set to the BIOS Setup menus.
... set a password, highlight the appropriate field and press . Legacy Diskette A [1.44M, 3.5 in .] [ST321122A] [ASUS CDS520/A] [None] [None] [Enabled] Clear Clear [Setup] 256MB [All Errors] Select Menu Item Specific Help Change... Symbols and other characters are Month: (1 to 12), Day: (1 to 31), Year: (1999 to [Set]. The password is set to 2099). ASUS A7V400-MX motherboard user guide 2-9 F1 : Help ↑↓ : Select Item -/+ : Change Value F5 : Setup Defaults ESC : Exit →← ... box appear, press . The password is now set to the BIOS Setup menus.
Motherboard DIY Troubleshooting Guide
Page 42
...different passwords: a Supervisor password and a User password. Refer to erase CMOS RTC RAM. Select [System] to require the password before entering the BIOS setup or the system. If you forget your password, you did , the Supervisor password is powered by the onboard button cell battery. Clear ...2 seconds, then power up the system. Passwords are not case sensitive, meaning, passwords typed in the Main menu. If you can access the BIOS Setup program. If you did not set a Supervisor password, anyone can clear it by the system during system startup. The RAM data containing the...
...different passwords: a Supervisor password and a User password. Refer to erase CMOS RTC RAM. Select [System] to require the password before entering the BIOS setup or the system. If you forget your password, you did , the Supervisor password is powered by the onboard button cell battery. Clear ...2 seconds, then power up the system. Passwords are not case sensitive, meaning, passwords typed in the Main menu. If you can access the BIOS Setup program. If you did not set a Supervisor password, anyone can clear it by the system during system startup. The RAM data containing the...

Motherboard DIY Troubleshooting Guide
Page 43
......on this sub-menu. If the hard disk was already formatted on a previous system, the setup BIOS may be because the hard disk drive is successful, the setup BIOS automatically fills in the correct values for the remaining fields on this may detect incorrect parameters. Select [CHS... enter will detect the HDD and then open access to enter the hard disk drive values manually. If automatic detection fails, this channel. ASUS A7V400-MX motherboard user guide 2-11 IDE Primary Master/Slave [Auto] IDE Secondary Master/Slave [Auto] Select [Auto] to automatically detect an IDE ...
......on this sub-menu. If the hard disk was already formatted on a previous system, the setup BIOS may be because the hard disk drive is successful, the setup BIOS automatically fills in the correct values for the remaining fields on this may detect incorrect parameters. Select [CHS... enter will detect the HDD and then open access to enter the hard disk drive values manually. If automatic detection fails, this channel. ASUS A7V400-MX motherboard user guide 2-11 IDE Primary Master/Slave [Auto] IDE Secondary Master/Slave [Auto] Select [Auto] to automatically detect an IDE ...

Motherboard DIY Troubleshooting Guide
Page 44
... read data from the hard disk. Head This field configures the number of the Primary IDE hard disk drives to [CHS]. 2-12 Chapter 2: BIOS information Configuration options: [CHS] [LBA] [Large] [Auto] Capacity Displays the hard disk drive capacity in this field, set the IDE Primary ...with more than 504MB storage capacity. This item is necessary for configuring the fields below. After entering the IDE hard disk drive information into BIOS, use a disk utility, such as FDISK, to select sector addressing method. To make manual entries for drives with your selections on this ...
... read data from the hard disk. Head This field configures the number of the Primary IDE hard disk drives to [CHS]. 2-12 Chapter 2: BIOS information Configuration options: [CHS] [LBA] [Large] [Auto] Capacity Displays the hard disk drive capacity in this field, set the IDE Primary ...with more than 504MB storage capacity. This item is necessary for configuring the fields below. After entering the IDE hard disk drive information into BIOS, use a disk utility, such as FDISK, to select sector addressing method. To make manual entries for drives with your selections on this ...

Motherboard DIY Troubleshooting Guide
Page 45
... this item allows the system to [Manual]. Transfer Mode This field selects the UDMA transfer mode. Configuration options: [Disabled] [Enabled] ASUS A7V400-MX motherboard user guide 2-13 It also contains the following BIOS parameters. You can manually set the Type field to [User Type HDD] and the Translation Method field to detect a USB device...
... this item allows the system to [Manual]. Transfer Mode This field selects the UDMA transfer mode. Configuration options: [Disabled] [Enabled] ASUS A7V400-MX motherboard user guide 2-13 It also contains the following BIOS parameters. You can manually set the Type field to [User Type HDD] and the Translation Method field to detect a USB device...

Motherboard DIY Troubleshooting Guide
Page 46
...] This option allows you to set the AGP display control to [Auto] or through the onboard AGP controller. Configuration options: [16M] [32M] [64M] 2-14 Chapter 2: BIOS information Configuration options: [PCI Slot] [AGP] AGP Display switch [Auto] This option allows you to sub menu.
...] This option allows you to set the AGP display control to [Auto] or through the onboard AGP controller. Configuration options: [16M] [32M] [64M] 2-14 Chapter 2: BIOS information Configuration options: [PCI Slot] [AGP] AGP Display switch [Auto] This option allows you to sub menu.


